Having a door that sticks or doesn’t close properly can be incredibly frustrating. While the problem may seem complex, it’s often caused by something simple – the door not fitting correctly within the door frame. In many cases, this issue can be fixed by planning the door, which involves shaving off thin layers from the edges to resize it for a perfect fit.
Planning a door to size doesn’t require any fancy tools. With just a few affordable items and some elbow grease, you can plane a door smoothly and accurately without the need for a large electric planer. In this comprehensive guide, we’ll learn everything you need to DIY plane a door for a flawless fit within your door frame.
What is Door planning?
Door planning refers to the process of removing thin layers of material from the sides of a door using specialized tools to resize and achieve proper clearance within the door frame. It involves gradually planning down the door’s width, length or thickness by shaving off material.
This is done when:
- The door is too big to fit in the frame
- There is too much friction, causing it to stick
- Installing new flooring raises the height so it scrapes the floor
- The frame has shifted, causing misalignment
Planning can involve just trimming off a small amount to tweak the fit or more extensive resizing. Doing it correctly helps doors operate smoothly, prevents damage to the frame, and improves insulation and security.
Benefits of Planing a Door
There are several advantages to planning a door versus completely replacing it:
- Far more affordable than installing a new door
- Preserves the style/finish of the existing door
- Much less complicated than door replacement
- Quickly fixes alignment and clearance issues
- Improves operation and functionality
- No specialty skills or tools required
- Allows doors to close fully and seal properly
As long as the door is solid wood and you avoid planning off too much material, resizing by planing is an ideal solution for restoring proper fit and function.
Prep Work Before Planing the Door
Planning a door doesn’t require advanced skills, but taking a few preparatory steps will ensure the best results:
Remove the Door from the Frame
It’s generally advised to fully detach the door from the hinges in order to plane it. This allows you to work all around the edges and provides the control needed for uniform planning. Lay the door flat on a stable, cushioned work surface.
Inspect Hinges
Inspect the hinges while the door is unmounted. Tighten any loose screws to eliminate hinge issues playing a part in misalignment.
Check for Warping
Inspect the door for any significant warping or twisting. Attempting to plane a badly warped door can be difficult and may require addressing the underlying cause first before planning.
Clean the Door Edges
Use a rag and degreaser to wipe down the door edges. You’ll be planning to remove any dirt, oils or grime that could interfere with smooth planning.
Mark Problem Areas
Note where the door is binding against the frame. Also, mark any high spots or unevenness along the door edges. Use these markings as a reference when planning.
Tools & Materials Needed for Planing Without a Planer
You don’t need an expensive power planer to successfully resize a door. Here are the basic tools required:
- Hand planes – Bench hand plane and/or block hand plane
- Sandpaper – Assorted coarse & fine grit sheets
- Chisel – For trimming door edges
- Handsaw – For rough cutting (optional)
- Wood shims – For stabilizing door while planing
- Safety gear – Eye protection, dust mask, ear protection
- Miscellaneous – Tape measure, pencil, rubber mallet
Hand planes do the bulk of the work in removing material and reshaping the door edges. We’ll go over how to use them effectively in the next section. You’ll also need sandpaper for smoothing and fine-tuning the door edges after planning.
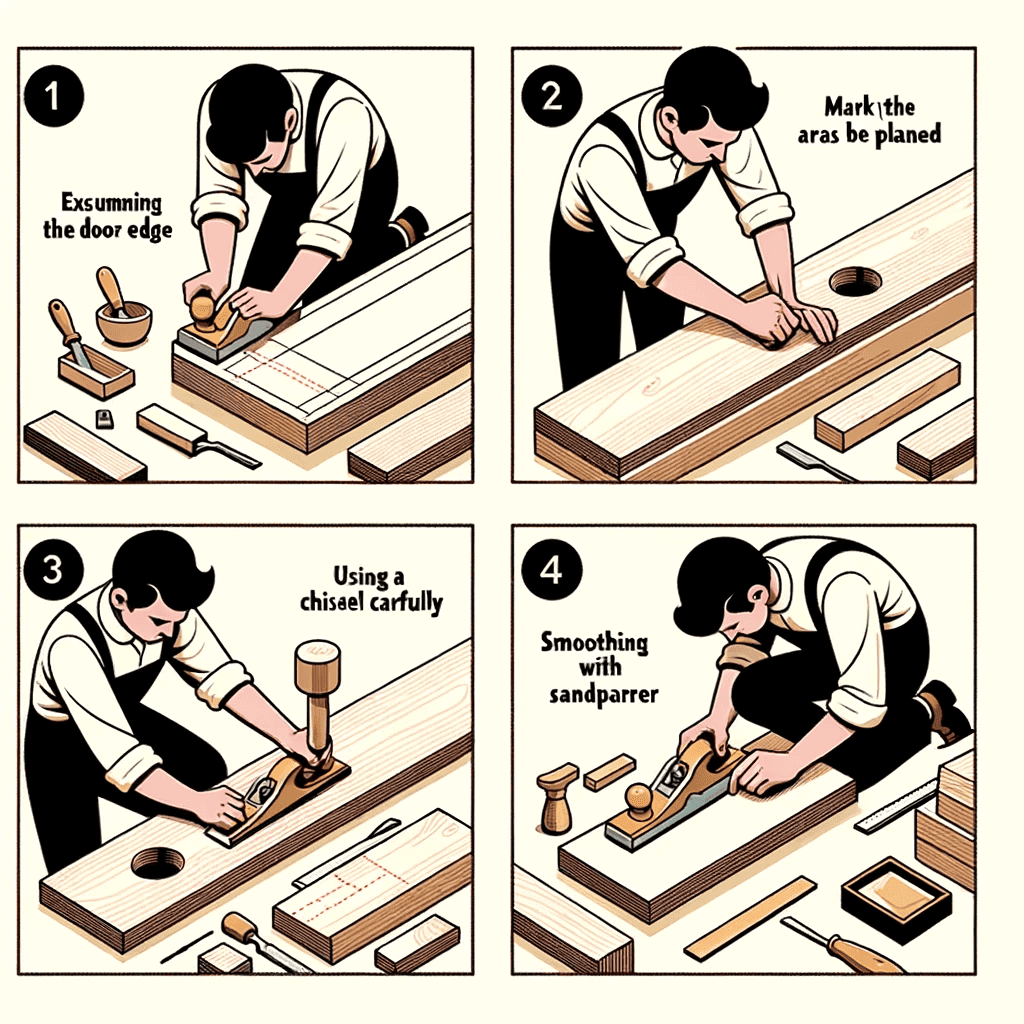
How to Use a Hand Plane to Plane Down a Door
Hand planes are the ideal tool for planning doors. Here are some tips on how to use them properly and effectively:
Secure the Door
Make sure the door can’t shift or rock while planning. Place wood shims underneath to stabilize it. Clamping the door bottom can also prevent movement.
Extend the Plane Blade Slightly
Only extend the blade enough to take off a thin shaving of material. Start with it minimally protruding from the sole.
Use Proper Hand Positioning
Grasp the plane with both hands. Lead with your dominant hand placed on the knob at the front. Your other hand should be on the rear handle. Keep wrists straight.
Begin Planning with Light Pressure
Let the sharp blade do the work. Apply only minimal downward force when starting a pass. Increase pressure as you get a feel for removing an optimal amount of material.
Take Off Thin Shavings
Set the blade for thin cuts. Trying to hog off too much material at once can tear out chunks rather than shave the door smoothly.
Plane in Direction of Wood Grain
Always plane in the direction of the wood grain. Going against the grain can splinter the door edge. The grain runs vertically on most doors.
Use Smooth, Consistent Motions
Use the full length of the plane to make smooth, continuous cuts without twisting or rocking it. Lifting in the middle of a pass can gouge the door.
Make Repeated Light Passes
Make several light passes, removing minimal material rather than trying to aggressively plane off a thick shaving in one pass.
Check Progress Frequently
Pause regularly to see and test the door edges for smoothness and fit against the jamb. Don’t over-plane beyond what’s needed.
Planning Technique for Common Door Fit Issues

Here are some planning techniques to address specific door fit and clearance problems:
Door Too Wide
If the door is too wide to fit into the frame opening, you’ll need to plane down both vertical door edges. Make light passes with a bench plane along the hinge side and latch side to narrow the door gradually.
Door Too Tall
When the door height is preventing proper clearance, especially after installing new flooring, you’ll plane down the top and/or bottom horizontal edges. Use a block plane for these narrower surfaces.
Door Binding at the Top
Focus on that specific area using a block plane for a door sticking at just the upper corner. Check frequently to not over-thin that section.
Door Rubbing at Latch Side
For friction just on the latch side, run the plane vertically along that edge until a slight clearance is achieved that allows free movement.
Thick Door Won’t Close
If door thickness is preventing full closure, use a bench plane to shave off layers equally from both door faces until the frame stops moulding, allowing complete closure.
Smoothing & Refining the Planed Door Edges
After the door edges have been sized and shaped by planing, switch to sandpaper to perfect the finish:
- Start with coarse 80-100 grit paper to smooth any planing marks
- Move progressively through finer grits up to ~220 grit
- Fold paper into a rigid pad for best control
- Sand with the wood grain using straight strokes
- Finish with the final pass using a sanding block
- Clean dust and debris with a tack cloth before re-hanging
Take your time with sanding to leave the door edges perfectly flush and smooth. Remove all ridges, uneven spots and visible planing marks.
Re-hang and Test Fit of the Planed Door
The final step is to re-hang the planned door and assess the fit:
- Clean hinge mortises and mating hinges before reinstalling
- Hang the door and check alignment on all sides
- Open/close the door and test for binding or friction
- Ensure door latches properly and seals against jamb stops
- Make minor additional adjustments with sandpaper if needed
- Finish door edges to match the existing finish
If there are any remaining high spots causing tight clearance, use sandpaper to refine the door edges and eliminate them.
Tips for Successful Door Planing
Follow these tips to safely plane your door to an ideal fit:
- Plane all the way to the door edge, but avoid rounding over corners
- Work slowly and only take off a little material per pass
- Label doors to ensure you re-hang in the original position and orientation
- Don’t plane off more than approximately 1/8″ thickness
- Plane both door faces evenly to avoid warping or twisting
- Check for flatness using a straightedge along the planed edges
- Always plane in the direction of the wood grain for the cleanest cut
With care and patience, these door planning techniques will allow you to successfully resize your door for a perfect fit within the opening.
What Tools to Use for Planing a Door
While hand planes do most of the work, some other tools can help make planning easier and more accurate:
- Wood chisel – Sharp chisel removes material from corners or tight spots planes can’t reach
- Handsaws – A backsaw or mitre box can be used to make rough cuts to remove bulk material quickly
- Sanding block – Helps support sandpaper for smooth, flat edges around the door perimeter
- Rabbet plane – Specialty plane cuts smooth rebates into door edges if needed
- Meter stick/straightedge – Checks door edges for being perfectly straight or warped
- Shims – Wood or plastic shims support and stabilize the door while planning
- Clamps – Clamp the door to a workbench to prevent shifting as you plane
FAQs About Planing a Door Without a Planer
Here are answers to some of the most common questions about planning doors:
Can you plane a door while still hanging?
It’s not recommended. Removing the door allows much better access and control when planning all around the edges. It’s very challenging to plane a mounted door evenly.
How much can you safely plane off a door?
It’s recommended to limit planing thickness to around 1/8″. Excessive planning can lead to the door warping or veneer layers delaminating if it’s a thinner door.
Do you have to remove moulding to plane a door?
The door trim doesn’t usually have to be taken off. You’ll plane the door edges so moulding can remain in place if it’s not easily removable without damage.
What type of sander is best for planed door edges?
Use a palm or block sander with fine grit paper for smooth, flat door edges. Avoid using an orbital or belt sander, which can create uneven spots. Work progressively through finer paper grits.
How much gap should there be between the door and the jamb?
Approximately 1/8″ is ideal all the way around. Enough for free movement but minimizing air leaks. Ensure the gap is even on both sides for proper alignment.
Can I Use the Same Method to Plane a Mirrored Door Without a Planer?
To achieve a smooth and flawless surface on beautiful mirrored doors without a planer, alternative methods can be employed. Consider using a belt sander equipped with fine grit sandpaper to carefully remove any imperfections and create an even finish. This technique requires patience and a gentle touch to avoid damaging the delicate mirror surface.
Planning A Door To Fit Properly
Planning a door to fit properly in its frame is a straightforward DIY project that saves the cost of replacing the door. With some simple preparation and the right techniques, carefully planning the door edges can restore smooth and secure function.
Allow yourself ample time and make light passes. Frequently stop to check progress. Finishing up with thorough sanding ensures attractive, flush surfaces. Done right. Your planned door will operate like new again.
We hope this guide gives you the confidence to tackle planning your sticking or misaligned doors. Let us know if you have any other questions!

Hi, I’m George Anderson, an expert installer with an extensive door installation and maintenance background. I’m passionate about sharing my knowledge on door equipment and accessories through my writing, helping homeowners make informed decisions. My specialty lies in custom door installations, with a commitment to enhancing the aesthetics of every home. Please feel free to reach out anytime for help with door-related questions or needs.
Related posts:
 Door Painting Secrets Revealed: Expert Tips for Choosing the Perfect Paint for Your Doors
 Creative Interior Door Ideas for Small Spaces
 A Step-By-Step Guide to Removing Protective Film From Wooden Doors
 Are 8 Foot Doors Worth the Money? A Comprehensive Guide
 Are Bifold Doors Good for Bathrooms?
 How Much Can You Cut Off a Solid Wood Door? A Complete Guide
 How Thick is the Wood on a Door Jamb? A Complete Guide
 Can You Drill into a Wooden Door? The Complete Guide
 How to Keep Your Shed Door Open: A Comprehensive Guide