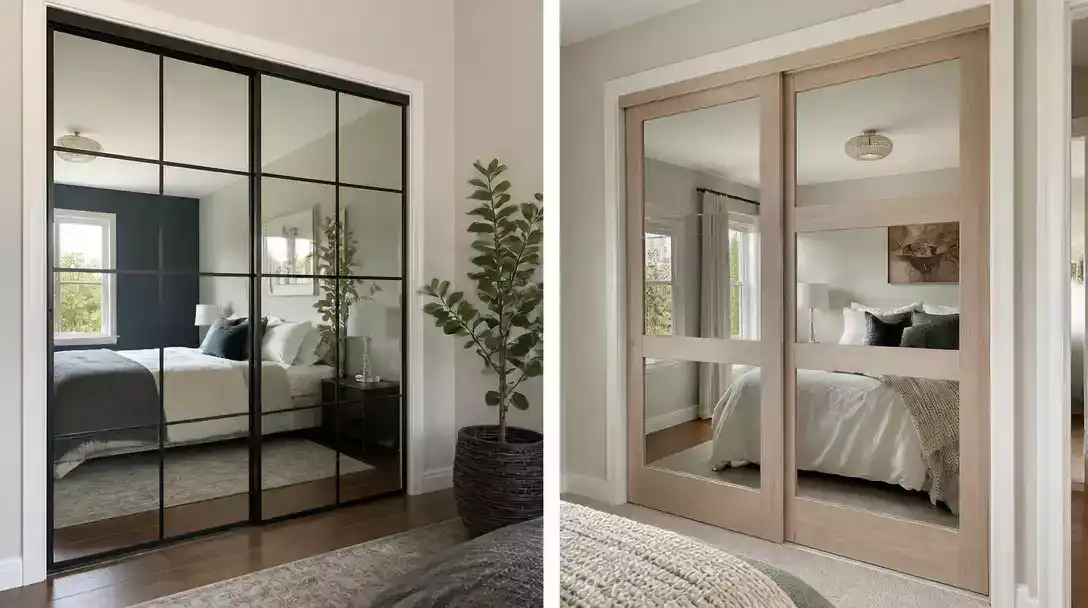
Updating dated mirrored wardrobe doors is the fastest way to refresh a bedroom without an expensive tear-out. This guide covers 12 door ideas worth saving that help you mask reflective surfaces with clean, intentional finishes. Find the fix that fits your home and get started below.
Slim black grid
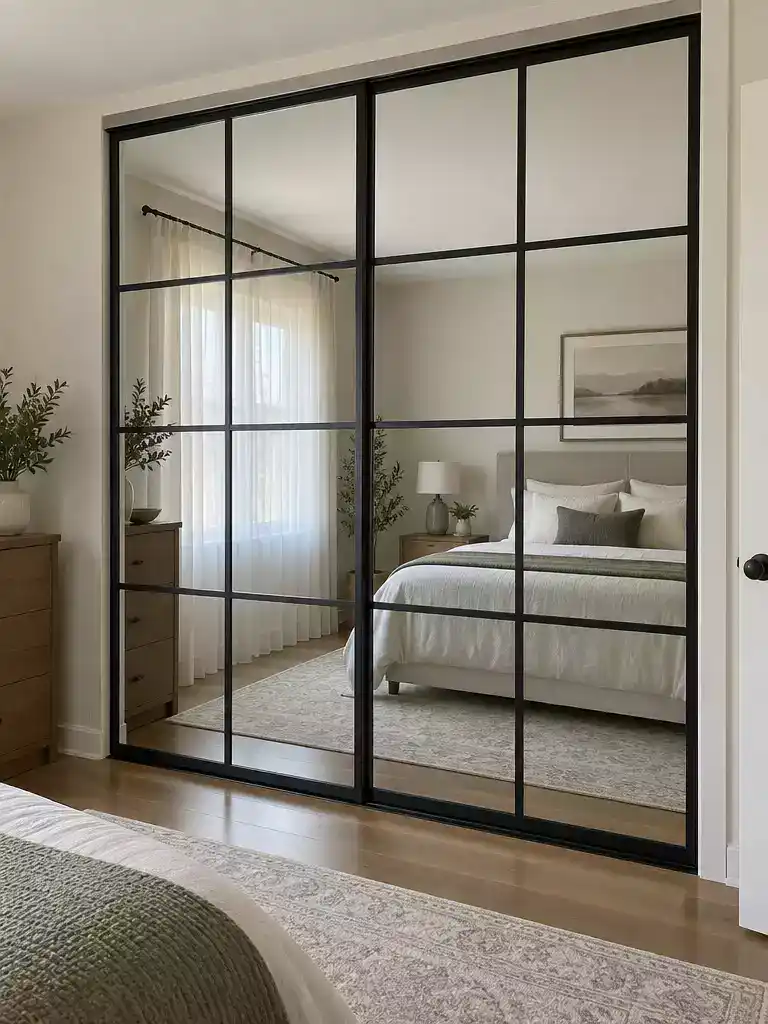
Transform standard mirrored doors into an industrial-style window feature with simple, precise trim work.
As an Amazon Associate I earn from qualifying purchases. Affiliate links may earn me a commission at no extra cost to you.
This approach uses thin, lightweight trim strips to transform a monolithic mirror into an architectural grid that mimics an industrial window. It works best for those who want to break up large, reflective surfaces without adding significant weight to the sliding mechanism.
Crucial Clearance Warning
Before you commit to a specific trim thickness, measure the gap between your sliding doors. If your chosen grid material is thicker than the clearance space, your doors will scrape, bind, or potentially shatter the glass during operation.
Installation typically involves applying adhesive-backed strips or finishing them with small brad nails directly onto the glass. You can achieve this using standard PVC or thin wood lath painted in a matte black finish.
Quick Planning Checklist:
- Measure your total door surface and draft the grid pattern on paper first.
- Use a laser level to ensure your horizontal lines aren’t sloping across the mirror.
- Test the sliding movement with a mock-up strip using painter’s tape before applying adhesive.
- Ensure all vertical lines align perfectly when the doors are in their closed position.
This style is ideal for bedrooms with a modern or loft-inspired aesthetic. You should skip this if your sliding track hardware is already showing signs of age or struggle, as even lightweight trim adds minor drag.
⭐ Best Slim Black Grid Decor Options
✨ Editor’s Pick
Small Black Frame Pin Display Case
Reflective Mirror Film for Window Privacy
Grid Wall Accessory Hooks for Panels
📋 Quick Reality Check
- Track clearance: Sliding doors often have minimal tolerances; use a piece of cardboard the same thickness as your trim to test for binding before final installation.
- Mirror integrity: Inspect the glass for existing cracks or loose seals, as adding adhesive grids to a compromised substrate can lead to further damage.
- Surface prep: Clean the mirror thoroughly with alcohol to remove every trace of oil or film, which ensures your adhesive grid stays securely in place.
Reeded Film Panels
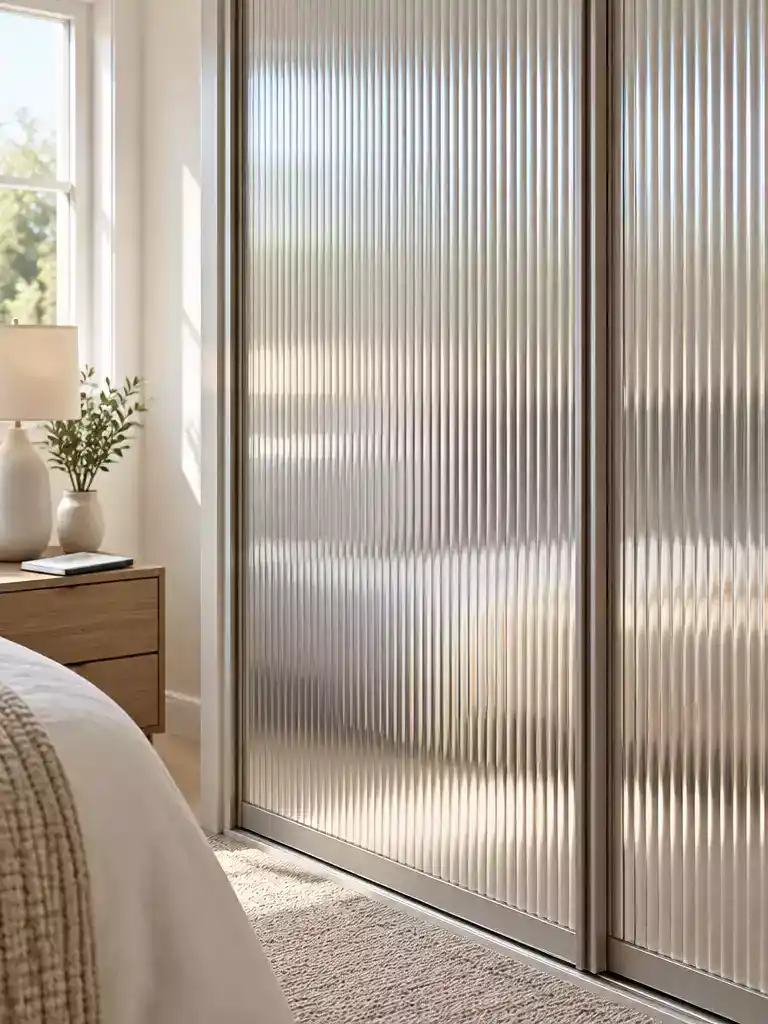
Transform harsh wall mirrors into soft, light-diffusing textured panels without adding any weight.
Reeded film is your best bet if you want that high-end fluted glass look without the cost or weight of actual glass replacement. It obscures the direct reflection of your room while still allowing plenty of light to pass through.
This is a perfect solution for sliding wardrobe doors because the film is practically weightless. Your tracks won’t experience any extra drag, keeping the sliding motion smooth and quiet.
The Wet-Application Trick:
Fill a spray bottle with a mixture of water and a single drop of dish soap. Spray the mirror surface liberally before applying the film so you can slide it into the perfect position without it sticking instantly.
To get a professional result, use a fresh, razor-sharp blade for your edge trimming. A dull knife will cause the film to drag and tear, leaving you with jagged edges that look messy.
If your closet is in a high-traffic area, skip the budget-bin films. Invest in a high-quality, thicker vinyl that resists surface scuffs and remains durable over time.
⭐ Reeded Film Panels We Love
Frosted Glass Privacy Film with Lines
✨ Editor’s Pick
Reeded Glass Window Privacy Film
All-in-One Frosted Glass Roller Paint
📋 Quick Reality Check: Before You Apply Film
- Inspect the Substrate: Check for any cracks or loose mirror edges; film will highlight imperfections rather than hide structural damage.
- Clearance Test: Confirm the door overlap gap is wide enough to accommodate the film’s thickness without catching or binding.
- Cleaning Protocol: Thoroughly clean the glass with isopropyl alcohol to remove all oils and dust, ensuring the adhesive bonds permanently.
Frosted lower panels
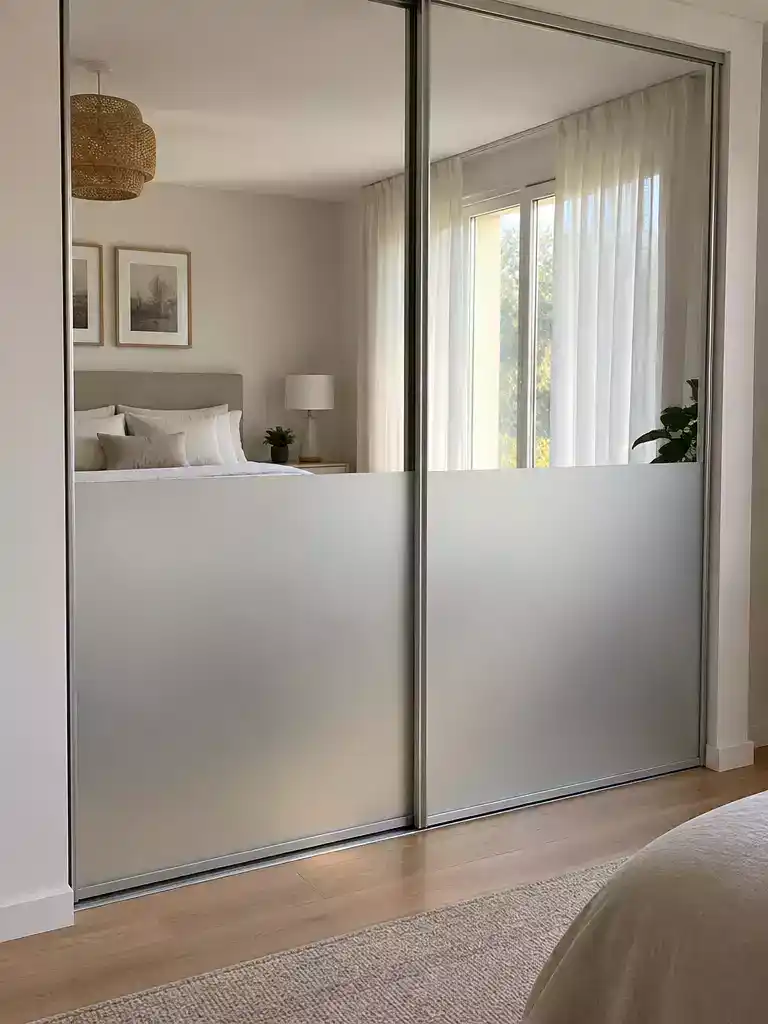
Ground your bedroom closet with a matte finish that hides clutter while reflecting light.
This two-tone approach works by keeping the top half of your mirrored doors reflective to bounce light around the room, while applying a matte frosted film to the bottom half. It effectively breaks up the floor-to-ceiling “gym mirror” look that makes many dated bedrooms feel cold.
Use high-quality frosted vinyl film for a seamless, bubble-free finish. Before you peel the backing, ensure your horizontal line is laser-leveled across both doors; even a slight tilt will look obvious once the doors are in use.
Pro Tip: Clean the glass strictly with isopropyl alcohol before applying the film. Any microscopic dust, oil, or pet hair trapped between the adhesive and the mirror will show through the frost forever.
This style is ideal for homeowners who want to hide messy shoe storage or closet clutter sitting on the floor without losing the airy, spacious feel the mirrors provide. If your closet hardware is already struggling with the weight of the doors, this film-based solution is a perfect choice because it adds virtually no weight to the tracks.
⭐ Frosted Lower Panels to Consider
Static Cling Frosted Glass Privacy Film
Five Panel Glass Barn Door Kit
✨ Editor’s Pick
Fiberglass Entry Door with Frosted Glass
🏡 How This Works in a Real Home:
- Visual flow: Align your frost height with the lowest bedroom drawer or nightstand top to create a unified sightline.
- Daily maintenance: Choose a matte finish to minimize visible fingerprints and smudges in high-traffic reach areas near the door handles.
- Natural integration: Use a translucent film pattern that echoes the geometry of your existing room trim to make the update feel intentional.
Your bedroom’s layout feels significantly different once the heavy reflection of dated mirrors is broken up. You do not need to overhaul the entire wall to change how the space presents, as a strategic update to your wardrobe door designs often yields the most immediate visual shift.
Focusing on just one or two high-impact design choices creates a cohesive bedroom aesthetic without the pressure of needing every single detail to be perfectly matched.
Shaker Overlay Panels

Give your closet a custom, built-in cabinet aesthetic by adding classic architectural depth.
This technique creates a recessed panel look by framing the mirror with lightweight rails and stiles. By building this grid directly onto the glass, you shift the visual focus from a flat, dated reflection to a structured, high-end cabinet design.
Weight Warning: This is the heaviest modification you can make to sliding doors. Before applying any wood or MDF, test your current floor track rollers to ensure they can handle the extra load without skipping or binding.
To pull this off effectively, use thin, lightweight materials like 1/4-inch MDF strips or pine lattice. Paint these strips the same color as your room’s existing trim to make the transition look professional and intentional.
Follow these steps to ensure your Shaker frame stays square and functional:
- Measure your total door surface area and map out the rail and stile placement before cutting any wood.
- Use a construction-grade adhesive designed for mirrors to bond the wood strips securely to the glass.
- Once the adhesive cures, caulk all internal joints and paint the entire overlay to achieve a seamless, factory-built finish.
- Check the clearance between the two doors at every stage; if the trim is too thick, the frames will scrape against each other.
This project is perfect for homeowners who want to hide the mirror entirely while mimicking the style of custom cabinetry. If your sliding hardware is already struggling or the track is narrow, skip this option in favor of a thinner, profile-free treatment.
⭐ Shaker Overlay Panels Worth Buying
✨ Editor’s Pick
Peel and Stick Wall Molding Kit
Flexible Peel and Stick Door Molding
Professional Door Trim Removal Tool
💰 What This Really Costs
- Material investment: Expect to spend on mid-grade MDF or pine trim, plus specialty adhesive and high-quality paint.
- Hidden expense: Don’t forget to factor in the cost of new, upgraded rollers if your track struggles under the weight.
- Budget strategy: Stick to simple, flat-stock trim rather than intricate crown molding to keep labor time and material costs manageable.
Cane Lower Inserts

Bring organic warmth to your bedroom by adding tactile, woven texture to glass doors.
Cane lower inserts provide a boho-natural aesthetic by breaking up the cold, monolithic reflection of standard mirrored doors. By covering only the bottom third, you ground the closet visually while keeping the upper section clear to bounce light around the room.
The installation requires a thin, lightweight wood frame to hold the cane webbing taut against the mirror surface. You must secure this frame using high-strength adhesive or thin finish nails, ensuring the setup remains flush enough that it never catches on the adjacent sliding door.
Durability Warning
Natural cane is sensitive to moisture and prone to snagging if placed in high-traffic zones. Keep this treatment away from the edges where the doors overlap to prevent fraying or hardware binding.
This look works best in bedrooms with neutral palettes and soft textiles, as the woven material introduces necessary visual weight. If you have active pets or children who frequently brush against the closet, consider a synthetic cane-look vinyl instead to avoid accidental snags.
⭐ Cane Lower Inserts We Love
Heavy Duty Steel Cane Gate Bolt
✨ Editor’s Pick
Natural Rattan Pressed Cane Webbing Sheet
Christmas Mailbox Wreath with LED Lights
🏡 How This Works in a Real Home:
- Frame integration: Build your wood frame slightly wider than the cane panel to allow for easy stapling and tensioning.
- Daily maintenance: Keep a soft dusting brush nearby, as the woven texture can trap lint more quickly than smooth glass.
- Visual grounding: Pair the cane with warm-toned wood furniture or linen bedding to make the closet feel like a deliberate decor choice.
Wood Slat Overlay
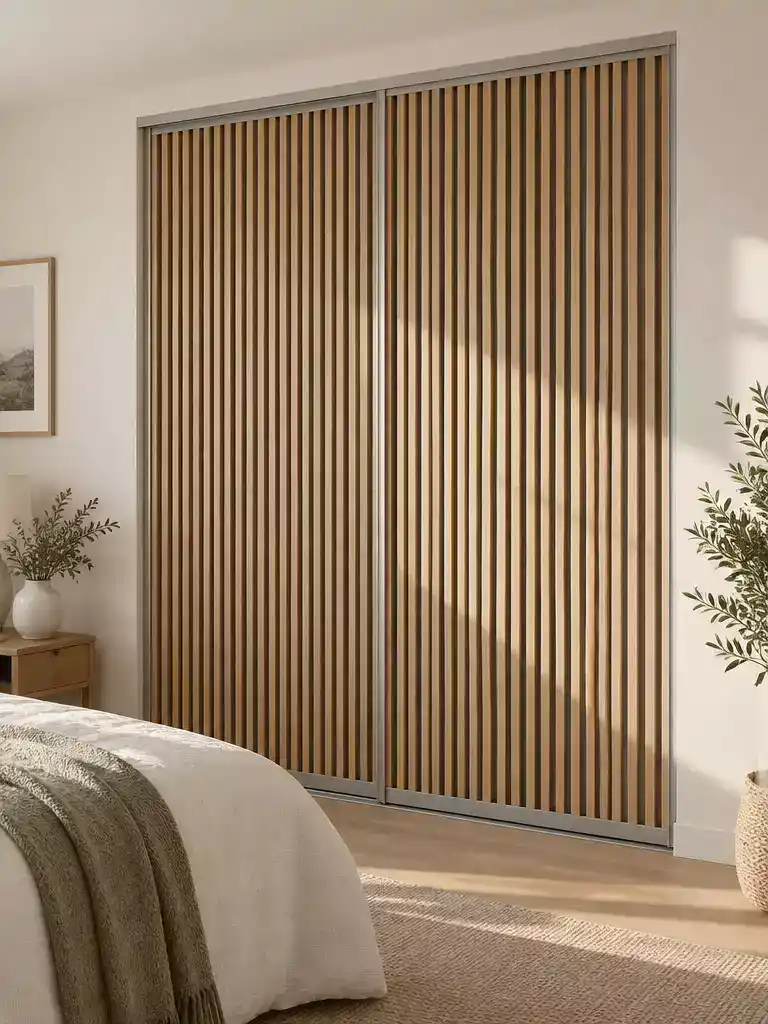
Create a rhythmic, architectural shadow play that fully masks dated glass with organic texture.
This approach uses vertical or horizontal wood lath to turn a flat, reflective closet into a tactile feature wall. It is ideal for bedrooms that need warmth and depth, as the slats completely obscure the original glass surface.
Pro Tip: Uniformity is everything. Use a scrap piece of wood as a spacer between each slat to ensure perfectly consistent gaps across all doors.
Before you buy your materials, you must account for the added thickness. If your doors have tight tolerances, even thin lath can cause them to scrape or bind in the track.
- Acclimate your wood: Let your slats sit in the bedroom for 48 hours to prevent warping after installation.
- Seal the finish: Unsealed wood will absorb humidity, which can lead to bowing; apply a clear matte poly before mounting.
- Check clearance: Use a cardboard strip the same thickness as your slats to verify that the doors still slide past each other without hitting.
Warning: Avoid this project if your existing sliding rollers are already struggling to move the doors. The added weight of a full-slat overlay can place excessive strain on older track systems.
⭐ Wood Slat Overlay Options
Swivel Partition Post Room Divider Set
Natural Acacia Interlocking Wood Deck Tiles
✨ Editor’s Pick
Accordion Tambour Slat Wardrobe Door
💡 Why This Works:
The beauty of a slat overlay lies in how it transforms a flat, monotonous reflection into a dynamic, architectural feature. By adding rhythmic vertical or horizontal lines, you introduce a sense of movement that draws the eye and makes the closet feel less like a utility cabinet and more like a custom, built-in design element.
Design takeaway: Use consistent, narrow spacing to maintain a clean, sophisticated look that feels intentional rather than cluttered.
Fabric Panel Covers

Soften your bedroom acoustics and add warmth with a tactile, fabric-wrapped wardrobe transformation.
Fabric panel covers turn cold, reflective mirror surfaces into upholstered acoustic features. This approach is perfect for bedrooms that feel too clinical or echoey, as the soft texture absorbs sound rather than bouncing it around.
Budget Note: Expect to spend between $50 and $75 for materials, including your choice of fabric, a thin backing board, and mounting adhesives.
To achieve a professional finish, you will need to stretch your linen or heavy cotton fabric over a thin, lightweight backing board before attaching it to the mirror frame.
Installation Basics:
- Measure the exact dimensions of each door to ensure your fabric panels sit flush.
- Use a staple gun to secure the fabric to the back of your backing board, pulling it taut from the center outward to prevent sagging.
- Apply the finished panels to the mirror surface using high-strength construction adhesive or double-sided mounting tape.
Common Pitfalls: Avoid using thin or light-colored fabrics that might show adhesive spots or the glass reflection underneath. Ensure your final assembly does not exceed the weight or thickness capacity of your existing sliding door tracks.
This method suits anyone chasing a boutique-hotel vibe who doesn’t mind a little light maintenance. If you have pets or a high-traffic room, remember that fabric is susceptible to snagging and dust accumulation compared to hard surface overlays.
⭐ Fabric Panel Covers to Consider
✨ Editor’s Pick
Magnetic Thermal Insulated Door Curtain
Custom Tufted Seat Cushion for Benches
Outdoor Waterproof Throw Pillow Covers
💡 Why This Works:
By introducing fabric, you fundamentally change a room’s acoustics. Hard mirror surfaces bounce sound waves, creating an echoey, clinical feeling. Upholstered panels act as a soft, sound-absorbing feature that dampens noise, making the bedroom feel intimate, quiet, and far more like a high-end, boutique hotel suite.
Acoustic Benefit: Soft textiles effectively soak up unwanted noise, immediately increasing your bedroom’s sense of comfort and serenity.
Arched mirror trim

Soften harsh, boxy closet lines by introducing a classic, architectural curve to your mirror.
Arched mirror trim is a high-impact way to break up the rigid, boxy geometry of builder-grade sliding doors. This technique uses flexible trim or precision-cut wood pieces to create a curved top profile directly over the flat glass surface.
It works best for homeowners who want to shift their bedroom aesthetic toward a more intentional, custom-cabinetry look without removing the doors. However, you should skip this if you lack the patience for high-precision carpentry, as even a slight misalignment will be immediately obvious against the straight lines of a standard door frame.
Crucial Symmetry Check: Use a rigid cardboard template to trace your arch shape before cutting any expensive trim.
Once you have the perfect arc on paper, test it on both doors to ensure the curves align perfectly when closed.
Installation typically involves applying the trim with a high-strength construction adhesive or small finish nails, depending on the thickness of your material. Because these pieces sit on the face of the mirror, ensure your selected trim is lightweight to avoid putting excess strain on the door rollers.
Common installation pitfalls include:
- Failing to account for the door overlap, which can cause the arched trim to catch or scrape the adjacent door when opened.
- Using material that is too thick, preventing the sliding doors from bypassing each other smoothly.
- Inconsistent spacing between the arch and the door perimeter, which ruins the custom, built-in appearance.
If your doors already struggle to slide, avoid this method entirely. Adding any rigid overlay increases the weight of the mechanism and will likely lead to track failure or uneven door movement.
⭐ Arched Mirror Trim We Love
Flexible Arch Shaped Molding Trim
✨ Editor’s Pick
Elegant Half Round Door Arch Kit
Precurved Doorway Arch Molding Kit
📋 Before You Try This: A Quick Reality Check
- Check your track: Ensure your door rollers are functioning perfectly; added trim weight can cause binding if the track is already worn.
- Verify door overlap: Use a piece of cardboard to simulate the trim’s thickness to be certain the doors won’t scrape each other when sliding.
- Assess the substrate: Inspect the mirror for any loose edges or existing cracks; never attach heavy overlays to glass that is already compromised.
Natural Oak Border
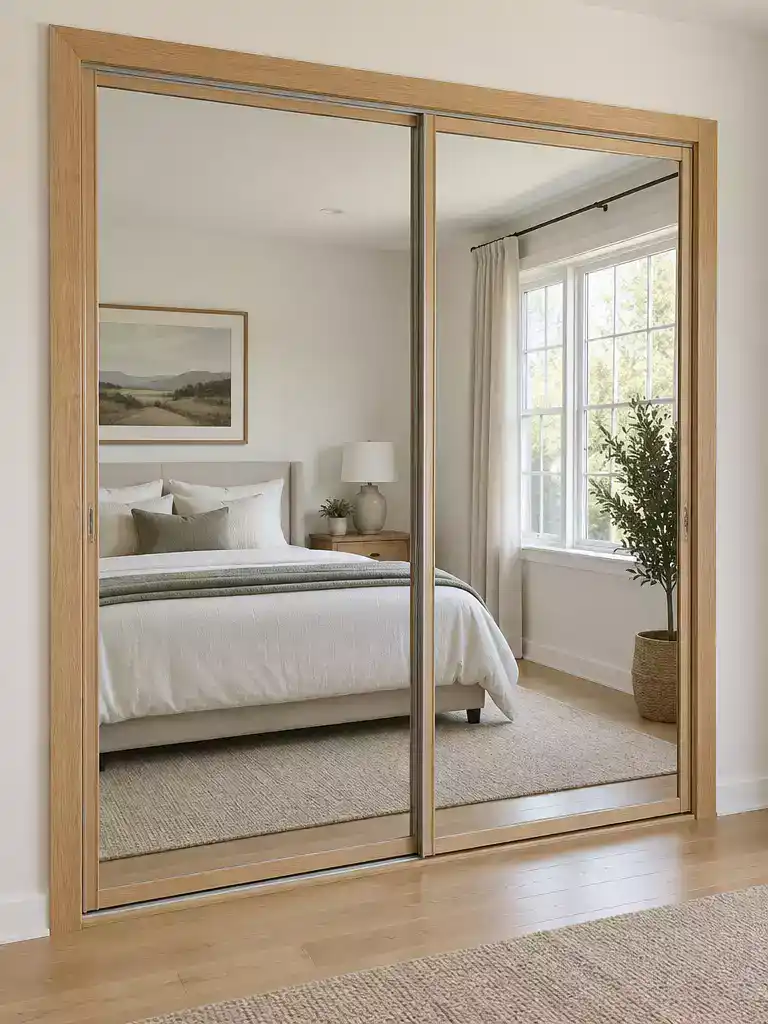
Give your closet a custom, built-in furniture appearance with warm, natural wood framing.
Framing your mirrors with natural oak trim shifts the aesthetic from builder-grade industrial to custom cabinetry. This approach works best in bedrooms that already feature wood flooring or furniture, as the oak adds warmth that cold glass lacks.
Pro-Tip: Always seal the end grain of your oak strips before installation to prevent moisture absorption and long-term warping. Match the stain or finish to your existing bedroom furniture for a cohesive, intentional look.
Installation requires precise miter cuts to ensure the corners of your frames meet perfectly. Because this adds a physical border to the glass, you must confirm that the combined thickness of the wood and the adhesive won’t cause the doors to scrape against one another during operation.
- Measure Twice: Check the clearance between your doors before selecting the thickness of your oak stock.
- Secure Bonding: Use high-strength construction adhesive specifically rated for mirror-to-wood applications.
- Hide the Gaps: A thin bead of clear silicone or color-matched wood filler can hide tiny gaps at the mitered joints for a pro finish.
This style is ideal for homeowners who want a clean, minimalist upgrade that doesn’t completely hide the mirror. Skip this project if your doors already have very tight tolerances, as even thin oak trim can interfere with the sliding mechanism if the overlap clearance is insufficient.
⭐ Natural Oak Border Options
Encouraging Rolled Bulletin Board Border
Seasonal Tiered Tray Wood Frame Set
✨ Editor’s Pick
White Oak Wood Border Wallpaper
💡 Why This Works:
Framing creates a “visual anchor” that tricks the eye into seeing a structured cabinet rather than a flat, floating mirror. By adding this linear border, you break up the monolithic reflection, making the entire piece feel intentional and integrated into your bedroom’s architecture instead of just a functional afterthought.
Design takeaway: Oak framing adds organic warmth that softens the stark, industrial coldness of reflective glass surfaces.
Antique Brass Dividers

Add a touch of metallic warmth to your bedroom by segmenting mirrors into intentional, custom-look panels.
Antique brass dividers are the best way to break up an oversized, dated mirror wall without the heavy construction of a full overlay. By applying adhesive-backed brass-finish strips, you can quickly create a geometric layout that makes your closet look like a high-end designer fixture.
Critical Warning: Never place these metal strips where the two sliding doors overlap. The thickness of the metal will cause the doors to catch and inevitably scratch the finish of the adjacent glass panel.
This project is ideal for homeowners who want a quick, low-impact visual change but have limited DIY experience. If your wardrobe has a simple track system that is already slightly temperamental, skip this option to avoid adding any thickness that could bind the rollers.
Before you begin, use painter’s tape to map out your desired grid on the glass to ensure the pattern looks balanced. Only remove the adhesive backing once you are satisfied with the spacing, as repositioning can be difficult and may stretch the thin metal material.
⭐ Antique Brass Dividers to Consider
✨ Editor’s Pick
Adjustable Indoor Decor Separation Divider Posts
Premium Foldable Accordion Room Divider
Solid Brushed Brass Mail Slot Set
🧰 Questions for Your Installer:
- Hardware clearance: Can you confirm these metal strips won’t bind the track or scratch the overlapping door?
- Adhesive longevity: How do you ensure the brass finish won’t lift over time due to bedroom humidity?
- Finishing detail: Should we seal the edges of the metal to prevent snagging on clothing or cleaning cloths?
Wallpapered Lower Panels
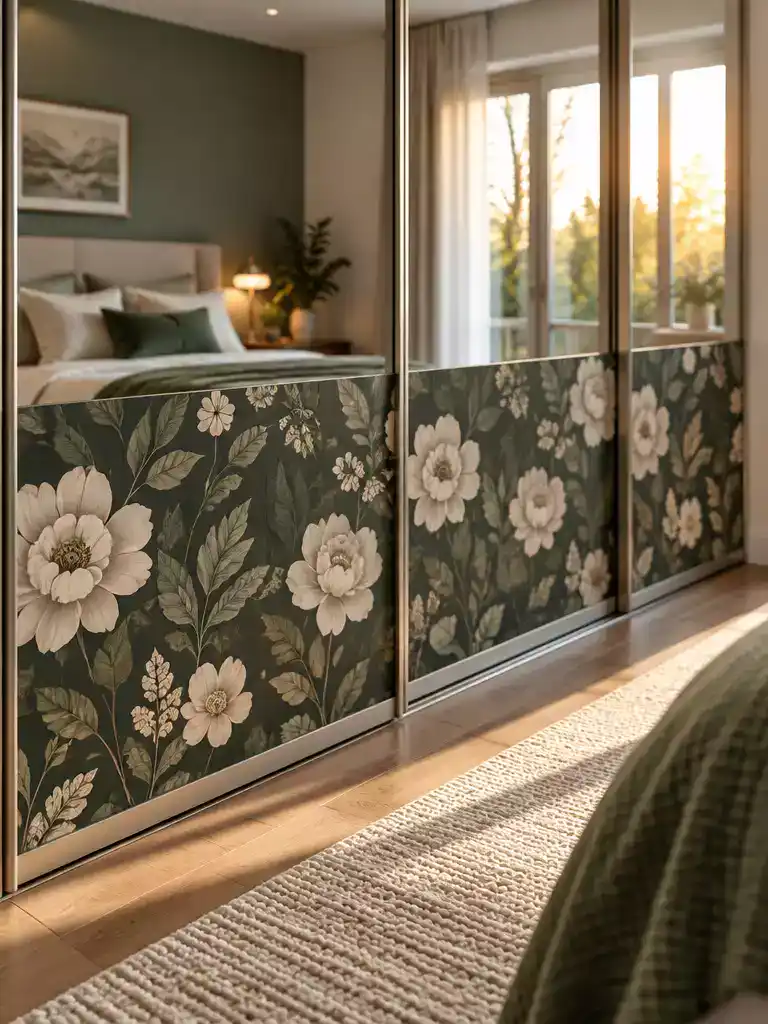
Refresh your bedroom aesthetic by transforming plain mirrors into a striking, patterned focal point.
Applying peel-and-stick wallpaper to the lower sections of your mirrored doors is a fast way to inject personality without a permanent renovation. This technique works best for those who want to hide the “gym mirror” look while keeping the top half reflective to bounce light around the room.
Pro-Tip: Preparation is everything. Before applying any adhesive paper, you must clean the glass surface thoroughly with rubbing alcohol to remove every trace of dust or fingerprints.
The cost for this project typically ranges between $53 and $85, depending on the quality of the wallpaper you choose. Because the edges are the most vulnerable point for peeling, be sure to use a smoothing tool to press the paper firmly against the glass perimeter.
This approach is perfect for renters or anyone who wants a low-commitment style change. If your mirrors are already cracked or loose in their frames, skip this method and opt for a more structural cover instead.
⭐ Wallpapered Lower Panels We Love
Vintage Floral Peony Contact Paper
✨ Editor’s Pick
Floral Peel and Stick Wallpaper
Flexible Foam Molding Wallpaper Border
🏡 How This Works in a Real Home:
- Strategic placement: Apply wallpaper only to the bottom third to keep the upper mirror for light, avoiding a “closed-in” feel.
- Lived-in durability: Use a matte-finish wallpaper in high-traffic bedrooms to hide inevitable scuffs and fingerprints better than standard paper.
- Seamless transition: Hide the raw edge of the wallpaper by applying a simple, painted wood trim strip where the paper ends.
Full-Cover Panels
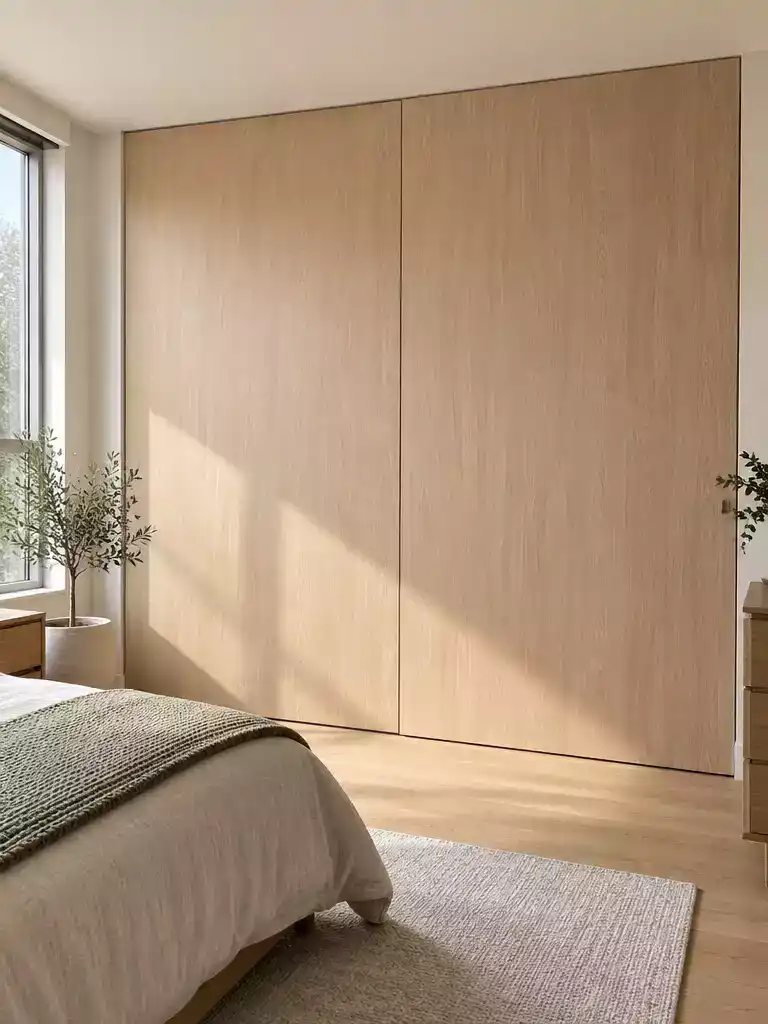
Completely erase dated glass walls to create a sleek, custom-built cabinetry aesthetic.
This is the most permanent transformation available for mirrored doors. By mounting rigid panels – such as thin plywood, decorative MDF, or high-density board – directly over the glass, you effectively turn your closet into a solid wall of cabinetry.
Crucial Track Warning: Before purchasing your materials, measure the depth of your existing sliding tracks. If your chosen panel is too thick, the doors will lose their clearance and fail to slide past one another.
This approach is right for homeowners who want a total aesthetic shift and aren’t afraid of a more involved DIY process. If your current sliding mechanism is already struggling or if the mirror substrate is cracked, skip this method; the added weight will only exacerbate existing hardware failures.
Once installed, these panels provide a clean slate for paint or wallpaper. They hide the mirror completely, giving your bedroom a cohesive, intentional look that feels far more modern than the original reflective surface.
⭐ Full-Cover Panels to Consider
Five Lite Frosted Glass Closet Door
Five Lite Frosted Glass Closet Panel
✨ Editor’s Pick
Louvered Sliding Closet Door Panels
💰 What This Really Costs
- Material variability: Expect a wide range depending on whether you choose basic plywood, pre-finished decorative boards, or custom panels.
- Hidden hardware costs: Budget extra for high-strength adhesives and potential track replacements if the added weight forces a mechanical upgrade.
- Professional installation: If the mirror substrate is cracked or the door is too heavy, the cost to hire a pro for track adjustments is a necessary, non-negotiable expense.
You now have twelve distinct ways to move beyond those dated bedroom mirrors. Choosing the right method for your space means filtering for both the aesthetic you want and the weight your tracks can handle, rather than attempting to incorporate every technique.
Start by testing a small sample of film or a single trim piece on one door this weekend to ensure it functions smoothly before committing to the full project. When you rework your closet doors to fit the character of the room, the entire bedroom feels more intentional. Focus on the style that genuinely aligns with your home, and you will find that a single, well-executed update transforms the surface more effectively than a total replacement.
Related posts
 11 Sliding Door Wardrobe Designs for Bedrooms
 Flat Door Makeovers That Look Custom-Built Not Builder-Grade
 Front Door Makeovers That Transformed the Entire Entrance
 Flat Door Makeovers That Look Custom-Built Not Builder-Grade
 Mirrored Closet Doors Wrapped in Oak to Look Like Real Wood Panels
 Mirrored Doors
 15 Sliding-Door Wardrobe Designs That Save Space and Look Sleek
 10 Wardrobe Door Designs That Hide Visual Clutter