

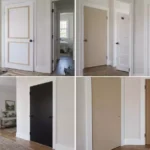
Updating flat closet doors to mimic custom paneling is the most effective way to eliminate the unfinished feel of builder-grade interiors. This guide narrows your choices down to 6 specific configurations that offer the best ROI for your space. Let’s start with the cleanest approach.
1. SINGLE TALL CABINET PANEL

Create a sophisticated, hidden-wardrobe aesthetic with a single, clean architectural field.
As an Amazon Associate I earn from qualifying purchases. Affiliate links may earn me a commission at no extra cost to you.
The single tall cabinet panel is the ultimate choice for achieving a monolithic, high-end look in a bedroom. By framing the entire door height as one continuous field, you transform a standard builder-grade closet into a piece of custom millwork that feels intentional rather than like an afterthought.
This style is particularly effective for narrow doors where adding multiple horizontal rails would only create visual clutter. The goal is to mimic the look of a high-end integrated wardrobe found in European cabinetry.
The “Frame-Within-a-Frame” Technique
To pull this off, you need to apply trim that creates a clean, modern silhouette. Using 2.25-inch stiles and rails is the sweet spot for most standard doors. This width provides enough architectural weight to cast a crisp shadow without overwhelming the door surface.
Placement is everything here. You must ensure the panel is perfectly centered on the door face, leaving equal gaps between the trim and the door edges. If the spacing is off by even a fraction of an inch, the eye will immediately catch the mistake, turning your custom project into a “tacked-on” DIY look.
Avoid the “Pinched” Look
Never be tempted to use stiles narrower than 2 inches. While it might seem like a subtle difference, stiles under 2 inches make the door look like a flimsy craft project rather than a structural cabinet element. Stick to the 2.25-inch to 3-inch range to maintain the structural heft required for a professional result.
When you are ready to prepare your materials, prioritize paint-grade trim that can be sanded to a glass-smooth finish. You will need adhesive, high-quality caulk to bridge the gap between the trim and the door, wood filler for the miter joints, and a high-build primer to ensure the trim and door look like a single, cohesive unit once painted.
⭐ Top Single Tall Cabinet Panel Picks
✨ Editor’s Pick
Aluminum Sliding Door Track Rail
Frosted Glass Sliding Closet Door Panel
Solid Pine Dutch Style Interior Door
💡 The Detail That Pulls It Together
The secret to making a single-panel door look truly architectural is the quality of the shadow lines. By using 3/4-inch thick frame material, you create enough depth for the panel to cast a distinct shadow, which gives the door a solid, heavy feel. This depth is what distinguishes a custom, built-in look from a flat door with thin, stuck-on molding.
2. TALL TWIN CABINET PANELS

Create vertical drama with a classic two-panel layout that draws the eye upward.
Splitting a tall closet door into two stacked panels is one of the most effective ways to introduce a formal, wardrobe aesthetic to a standard bedroom. By adding a horizontal rail, you instantly break up the mass of a flat, builder-grade surface, giving the door a structural depth that feels intentional rather than like a thin, hollow slab.
To avoid the common mistake of making your panels look like squashed squares, you need to respect the math of your door’s dimensions. Aim for a height-to-width ratio between 1.4:1 and 1.7:1 for each individual panel. This range ensures that the rectangles feel elongated and elegant, rather than squat or crowded.
Pro-Tip: Material Selection
Skip the standard construction-grade trim. Use 1×3 select pine boards for your vertical and horizontal pieces. Because these boards are essentially knot-free and have a smooth surface, they provide a much cleaner finish once painted, helping you avoid that dreaded DIY grain texture.
The horizontal rail is the hero of this design, but it must be executed with precision. It should feel like a natural seam, not a stuck-on piece of wood. Before you finalize your layout, use a laser level to ensure that the horizontal rail sits at a height that feels balanced – usually aligning it with the top of your room’s door frames or window headers can create a cohesive flow across the entire space.
Mistake-Avoidance: The “Stacked Box” Syndrome
If the horizontal rail is placed exactly in the middle of the door, you risk creating two identical, boxy shapes that look like a generic grid. For a more sophisticated, custom-furniture look, offset the rail slightly higher than the midpoint – giving the bottom panel more visual weight – to anchor the door firmly to the floor.
Ultimately, this style is about creating clean shadow lines. Once your trim is secured, take the time to caulk every single seam where the trim meets the door. This is the difference between a project that looks like a custom installation and one that looks like an afterthought.
⭐ Tall Twin Panels We Love
Linen Soundproof Blackout Sliding Door Curtains
✨ Editor’s Pick
Frosted Glass French Double Door Slab
Acoustic Wood Slat Wall Panel Set
📋 Quick Reality Check: Before You Secure the Trim
- Check hinge clearance: Ensure your door swings fully open without the added trim depth hitting the adjacent wall or casing.
- Verify door squareness: Measure diagonally across the door; if it’s out of square, adjust your trim layout to hide the taper.
- Confirm edge alignment: Check that your vertical boards don’t overlap the hinge side, which would prevent the door from closing properly.
Achieving a custom appearance isn’t about transforming every inch of your home at once; it comes down to scaling your trim to match the specific proportions of each door. Getting the layout right is often simpler than these complex grids suggest.
Focusing on strategic trim placement allows you to elevate a standard closet without the cost of a full architectural overhaul.
3. THREE PANEL CABINET GRID

Create a sense of rhythm and height with a carefully proportioned tripartite grid.
The three-panel grid is all about establishing a deliberate, rhythmic pattern that feels significantly more intentional than a basic two-panel setup. By dividing the door into three distinct fields, you introduce a vertical flow that draws the eye upward, which can make ceilings appear taller than they actually are.
The secret to pulling this off without it looking like a generic grid is the 1/3 and 2/3 partition rule. You want the center panel to act as the “hero” of the design, making it the largest field, while the top and bottom panels serve as anchors that ground the door.
The Proportion Trap: Avoid equal-sized panels at all costs. When all three sections are the same height, the door loses its custom furniture appeal and begins to look like a generic, industrial-style grid that lacks character.
When you are planning your layout, keep the horizontal rails consistent with your stiles. This maintains a balanced face-frame appearance that looks like one solid, expensive piece of millwork rather than a series of trim pieces glued onto a flat surface.
If you are unsure about your spacing, use this mental checklist before you start cutting your trim:
- Center Focus: Is the middle panel the largest section of the three?
- Rail Consistency: Are the horizontal rails the same width as your vertical stiles?
- Visual Flow: Does the grid feel like it belongs to the room’s architecture, or does it look like a busy afterthought?
Avoid Heavy Rails: Do not be tempted to use overly thick horizontal rails. Keep them consistent with your vertical stiles to ensure the “face frame” remains elegant and does not look top-heavy or clunky.
Because this design is more complex than a single-panel door, the quality of the finish is non-negotiable. Ensure your seams are perfectly caulked and your wood filler is sanded flush, as any gap in the grid will immediately reveal the “add-on” nature of the project.
⭐ Three Panel Cabinet Grid Ideas
Flexible Peel and Stick Grid Trim
Stackable Wired Grid Shoe Storage Rack
✨ Editor’s Pick
Self Adhesive Window Grid Insert Kit
💡 Why This Works
The three-panel grid utilizes the “1/3 and 2/3” rule to manipulate your eye, creating a vertical tether that makes standard-height ceilings feel more expansive. By anchoring the door with a substantial center field, you shift the focus from a flat, builder-grade slab to a custom-built furniture piece that adds immediate character to the bedroom.
Design Payoff: A thoughtful, rhythmic layout that elevates the perceived architectural value of your entire closet wall.
4. FOUR PANEL CABINET GRID

Bring architectural weight to wide closet openings with a classic, symmetrical four-panel grid.
When you have a wider closet opening, a single or twin panel design can sometimes look lost or stretched too thin. The four-panel grid brings an intentional, library-inspired aesthetic to the space, creating a sense of structural heft that makes the doors look like they were part of the home’s original blueprint.
This style relies entirely on the precision of your geometry. Because the grid creates multiple intersections, the center horizontal and vertical rails must meet perfectly; any staggering or misalignment here will immediately betray the DIY nature of the project.
Pro Tip: Use Substantial Materials. To get that high-end cabinet look, skip the thin lattice strips. Use 3/4-inch thick frame material for your stiles and rails. This extra depth is what allows the doors to cast the sharp, deep shadows that define professional millwork.
Symmetry is non-negotiable for this configuration. Your left and right panels must be mirror images of each other, and the gaps between the panels should remain consistent across the entire door surface. If you are working on double doors, remember that the grid needs to flow across the center seam as if the two doors were one continuous piece of furniture.
Checklist for Four-Panel Success
- ✔ Verify axis alignment: Ensure your center vertical rail is perfectly plumb.
- ✔ Check intersection depth: The horizontal rail should be flush with the vertical rail at every joint.
- ✔ Consistent spacing: Use a spacer block to keep your distances uniform between the outer edge and the inner panels.
- ✔ Symmetry check: Measure from the center seam outward on both doors to ensure the grid mirrors perfectly.
Standard stile and rail widths for this look typically fall between 2 and 2.5 inches. If your room features tall ceilings or you want a more substantial, Old World feel, bumping your material width up to 3 inches can provide a bolder, more grounded focal point. Just ensure that the frame width remains consistent across every door in the room to maintain a cohesive finish.
⭐ Four Panel Cabinet Grid Solutions
✨ Editor’s Pick
Soft Close Pocket Door Frame Kit
Flexible Peel and Stick Molding Trim
Primed Pine Wood Door Jamb Kit
Designer Note: Why This Grid Feels So Intentional
The four-panel grid succeeds because it breaks the monotony of a flat door into a rhythmic, geometric pattern that mimics traditional furniture construction. By using the 3/4-inch trim to create depth, you aren’t just decorating the surface – you are visually subdividing the door’s mass, which makes the entire closet feel like a permanent, high-end architectural feature rather than a builder-grade afterthought.
5. WIDE STILE CABINET FACE

Transform standard flat doors into a robust, high-end statement with consistent, wide-profile architectural framing.
When you want your closet to read as a custom-built furniture piece rather than a standard door, the wide stile approach is your strongest move. By utilizing 3-inch stiles, you create a substantial face frame that anchors the entire wall, effectively masking the original flat-door edges that often give away a builder-grade origin.
This style prioritizes the frame over the panel field, making it an excellent choice for rooms where the doors might not be perfectly square. Because the wide trim covers more of the door’s perimeter, it provides a larger margin for error during installation, helping you hide slight inconsistencies in the original door alignment.
The Consistency Rule: If you commit to a 3-inch wide stile for one closet in a room, you must carry that exact dimension to every other door in the space. Using different stile widths on adjacent doors creates a visual conflict that immediately signals a DIY project rather than cohesive architectural millwork.
While standard trim often hovers around 2 inches, pushing your width to 3 inches creates a more robust, architectural look that feels intentional and heavy. Think of this as the “face frame” of the entire closet unit; it should feel like the structural skeleton of the door, not just a decorative band applied to the surface.
Quick Planning Check:
- Measure Twice: Verify your total door width before cutting; ensure the 3-inch stiles don’t interfere with your existing door handle placement.
- Select Your Material: Use smooth, paint-grade MDF or select pine to ensure the grain doesn’t telegraph through your finish.
- Check the Reveal: Ensure your stiles are set back from the door edge by at least 1/8 inch to allow for proper door swing without hitting the adjacent frame.
Avoid the common mistake of treating these stiles as purely decorative additions. To achieve the high-end look, your trim must be meticulously caulked and filled at every intersection to erase the seam between the trim and the door face. When done with precision, the result is a unified, solid-looking door that grounds the room and draws the eye with its clean, weighted geometry.
⭐ Wide Stile Cabinet Face Options
Clear Rubber Retainer for Glass Panels
✨ Editor’s Pick
Fiberglass Entry Door with Vinyl Frame
Bevel Raised Panel Cabinet Router Bits
📈 The Long-Term Payoff
Investing in robust, wide-stile cabinetry elevates your closet from a standard utility door to a permanent architectural feature. While the material cost is modest, the perceived value at resale significantly outweighs the effort. By choosing a timeless, heavy-frame aesthetic, you avoid the “trend-chasing” look that often forces homeowners to replace doors every few years.
Built-in longevity: High-quality, substantial trim creates a permanent, custom-built impression that appeals to future buyers.
6. Matched Double Door Grid

Create a cohesive, high-end furniture aesthetic by treating double doors as one unified canvas.
When you have a double-door closet, the most common mistake is treating each door as an independent project. To achieve a continuous façade that feels like custom millwork, you must plan your grid lines from the outer edges inward. This ensures that the horizontal rails flow seamlessly across the center seam, creating the illusion of a single, expansive piece of cabinetry rather than two separate doors slapped together.
Pro Tip: Use a laser level to mark your horizontal rail positions across both doors simultaneously. Even a 1/8-inch deviation in your rail height will break the illusion and make the project look like a DIY afterthought.
Before you begin, verify the squareness of your door opening. If the gap between your doors isn’t perfectly plumb, your horizontal lines will look crooked regardless of how carefully you measure. You may need to adjust your stiles slightly to compensate for irregular door edges, ensuring the visual “heft” remains consistent across the entire unit.
Checklist for Seamless Alignment:
- Measure for the center gap first; ensure this space is accounted for in your total width calculation.
- Use 1×3 select pine boards for your vertical and horizontal pieces to minimize wood grain texture under paint.
- Layout your grid on the floor before attaching anything to the doors to confirm the proportions look balanced.
- Caulk every seam where the trim meets the door surface; this is the only way to hide the “applied” nature of the trim.
Choosing this configuration requires a bit more patience during the installation phase, but the payoff is significant. By maintaining a consistent grid, you draw the eye across the entire closet wall rather than letting it get stuck on the center split. This approach is particularly effective in smaller bedrooms where you want to maximize the sense of space while adding architectural weight.
⭐ Matched Double Door Grid Picks
Waterproof Double Door Shoe Storage Bench
Extreme Outdoor Double Sided Mounting Tape
✨ Editor’s Pick
Plastic Sliding Cabinet Door Track Kit
📋 Quick Reality Check Before You Align:
- Check door plumb: Ensure both doors hang perfectly straight; any slight tilt will cause your horizontal rails to stagger.
- Measure center gap: Factor in the exact width of your center reveal so your grid pattern doesn’t look cut off.
- Test hinge clearance: Confirm your added trim doesn’t strike the door frame or adjacent trim when the doors swing open.
With all six configurations now on the table, it becomes clear that the path to a custom look is less about covering every door and more about choosing the geometry that complements your specific room scale. Focusing on the one or two layouts that best suit your interior is how you achieve a high-end result without overextending your project.
When you prioritize clean proportions and consistent trim widths, even a standard closet begins to read like permanent, architectural millwork. You might also want to explore additional door makeovers to ensure your entire home maintains that same cohesive, intentional feel. Start with the configuration that aligns with your space, and you will find that the final, polished look is exactly what you set out to achieve.
Related posts:
 Bifold Closet Doors Rebuilt With Shaker Style Faces Instead of Flat Slabs
 Mirrored Closet Doors Wrapped in Oak to Look Like Real Wood Panels
 What Color to Paint Interior Doors When Basic White Falls Flat
 How to Make Sliding Closet Doors Stop Jumping Off the Track
 Curtains for Closet Doors That Hide Clutter Without Looking Makeshift
 Flat Door Makeovers That Look Custom-Built Not Builder-Grade
 Flat Door Makeovers That Look Custom-Built Not Builder-Grade
 10 Safety Door Design Entrance for Flat Ideas That Look Stylish Not Heavy