Your front door is the anchor of your home’s exterior, acting as the primary driver for both curb appeal and resale value. This guide narrows the noise down to 10 high-impact projects that secure a measurable return on your investment. Let’s start with a simple, high-visibility reset.
Faded Wood to Deep Navy

A sophisticated navy finish instantly anchors your home’s exterior with a modern, professional look.
As an Amazon Associate I earn from qualifying purchases. Affiliate links may earn me a commission at no extra cost to you.
If your front door has spent the last few years baking in the sun, you are likely looking at a “sun-bleached” finish that drains the life out of your entryway. Choosing a Deep Navy isn’t just about picking a trendy color; it acts as a sophisticated reset button that adds immediate weight and character to your home’s exterior.
This is one of the most accessible weekend projects, but the difference between a professional result and a DIY eyesore comes down to how you handle the surface before that first coat hits the wood.
The Prep Protocol
- Remove hardware: Take off the handles, deadbolts, and knockers rather than trying to tape around them.
- Wash thoroughly: Use a degreaser to remove years of environmental grime, pollen, and oily residue.
- Sand to dull: Lightly sand the entire surface with 220-grit paper to remove the old gloss; this creates the “tooth” necessary for the new paint to bond.
- Spot prime: If you have bare wood showing through, apply an exterior-grade primer to those specific areas before painting.
When it comes to paint selection, skip the standard interior wall paint. You need a 100% acrylic exterior paint or a dedicated door-and-trim exterior enamel, which are designed to handle temperature fluctuations without becoming tacky or peeling.
The “No Direct Sun” Rule
Never paint your door while it is in direct sunlight. If the surface is hot, the paint will dry far too quickly at the surface, which prevents it from leveling out and leads to premature peeling. Aim for a window of time when the door is in the shade.
Plan on applying at least two full coats. Because navy is a deep, pigment-heavy color, one coat will almost always look streaky or translucent against the lighter wood underneath. Take your time to let the first coat dry completely according to the manufacturer’s instructions before starting the second.
Project Cost Breakdown
For a standard wood door, you should expect to spend between $40 and $120 on materials, assuming you already have basic tools like a paintbrush and sandpaper. This covers a high-quality quart of exterior enamel, a small amount of primer, and fresh supplies.
⭐ Top Products for Faded Wood Transformations
✨ Editor’s Pick
Compact Acrylic Enamel Paint for Doors
Primed Shaker Style Bifold Door Kit
Adjustable Paintable Exterior Door Sweep
💡 Practical Tips That Work:
- Hardware organization: Use a labeled bag for each piece of door hardware to ensure reinstallation goes quickly.
- Consistent sheen: Select a satin or semi-gloss finish to hide minor surface imperfections while staying easy to clean.
- Brush management: Keep a damp cloth nearby to wipe away drips immediately before they set on your wood panels.
2. Builder White to Soft Black

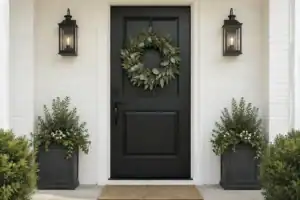
A high-contrast entrance creates an immediate, sophisticated focal point for a standard suburban home.
The standard “builder white” door is often the first thing that strips a home of its personality. It is functional, sure, but it rarely does anything to anchor your home’s exterior. Moving to Soft Black provides an immediate, high-contrast focal point that makes the entire entrance feel intentional rather than like an afterthought.
Choosing a “Soft Black” – which is typically a slightly muted, off-black shade – is a strategic move for most homeowners. Unlike a true, deep black, these softer tones are significantly more forgiving when it comes to everyday wear. They hide dust, pollen, and minor surface imperfections much better than a stark, high-gloss black, keeping your curb appeal looking polished without constant maintenance.
Material Matters: Before you pick up a brush, identify your door material. Metal doors require a High Performance Acrylic Metal Primer to ensure the topcoat bonds correctly, and you should allow it to dry for a full 24 hours. If you have a composite door, check your manufacturer’s specs, as these often require specific primers to prevent peeling.
The biggest risk with this project is primer and paint pooling in the recessed shaker-style panels. To avoid this, use a smaller brush to cut into the corners of the panels first, then use a high-quality roller for the flat surfaces. Keep your coats thin; multiple light layers are always better than one heavy, sagging coat that collects in the corners.
The Heat Warning: Never paint your door when the surface is hot to the touch. Painting in direct, intense sunlight can cause the paint to dry too quickly, leading to bubbles and poor adhesion that will inevitably peel. Wait for a window of time when the door is in the shade, or plan your project for an overcast day to ensure a smooth, durable finish.
If you aren’t sure where to start, treating your front door as a high-contrast frame for your home is a proven way to boost its perceived value. By focusing on the prep and respecting the temperature of your surface, you turn a generic feature into a custom-looking entrance.
⭐ Best Paint Solutions for Builder White
Black Wood Touch Up Paint Pen
✨ Editor’s Pick
Waterproof Anti Rust Black Metal Paint
Primed Exterior Wood Door Frame Kit
📋 What to Check First:
- Door material type: Confirm if your door is metal or composite to select the correct, compatible primer for long-term adhesion.
- Surface moisture levels: Inspect for any signs of standing water or dew before starting, as trapped moisture ruins finish quality.
- Recessed panel depth: Check the corners of your shaker panels to ensure you have a small enough brush to reach without primer buildup.
Flat Paint to High-Gloss Finish

Achieve a mirror-like, luxury entrance with a high-gloss finish that captures the light.
Moving from a flat or satin paint to a high-gloss finish is a bold move that turns a standard door into a luxury statement piece. This look relies entirely on a glass-like reflectivity that catches the light, but it comes with a strict trade-off: high-gloss is incredibly unforgiving. Because the finish acts like a mirror, it will highlight every single dent, scratch, or imperfection on the surface of your door.
The High-Gloss Reality Check
This is arguably the most labor-intensive DIY paint project you can take on. If your door surface isn’t perfectly smooth before you begin, the final result will look wavy rather than professional. Expect to spend significant time on prep work.
To achieve that professional, depth-filled look, you cannot rush the preparation. You must fill every minor indentation with wood filler or glazing putty, then sand the entire surface until it is perfectly uniform. The secret to the final shine is sanding between every single coat, which removes tiny dust nibs and ensures the next layer lays down perfectly flat.
When it comes to application, the technique is just as important as the materials. You must use an exterior-rated high-gloss enamel, but avoid “overworking” the paint as it sets. High-gloss formulas are designed to level themselves out as they dry; if you keep brushing over a section that has started to tack up, you will leave permanent brush marks that ruin the glassy effect.
If you find that your door has deep gouges or is made of a material that is difficult to sand, hiring a professional is often the smarter financial move. The cost for professional painting typically falls between $163 and $332, which includes the specialized labor required to achieve a flawless, ripple-free finish. If you do attempt this yourself, ensure you have a high-quality, synthetic-bristle brush designed for enamels to minimize texture.
⭐ High Gloss Finishes for Dramatic Impact
Ultra High Gloss Designer Paint
Protective Gloss Enamel Paint for Metal
✨ Editor’s Pick
Marine Grade High Gloss Wood Varnish
⚠️ Where High-Gloss Can Go Wrong:
- Surface imperfections: Any tiny dent or uneven sanding mark will be magnified by the light-reflecting finish.
- Overworking paint: Trying to touch up a spot once it starts to dry creates permanent, visible drag marks.
- Inadequate sanding: Skipping the fine-grit sanding between coats leaves tiny dust nibs that ruin the mirror-like effect.
Exterior upgrades often feel like a massive commitment, but the reality of long-term maintenance is far more manageable when you focus on high-impact areas. Choosing durable materials now prevents the cycle of constant repairs that plagues many timeless entrance designs.
Focusing on quality materials and proper preparation ensures your investment stays functional and visually sharp for years, effectively reducing the need for recurring labor.
Faded Fiberglass to Rich Stain

Achieve a high-end wood aesthetic on durable fiberglass with the right staining technique.
Many homeowners assume that fiberglass doors are destined for paint, but you can achieve the warmth and character of real wood with the right approach. The secret lies in using a gel stain, which is specifically formulated for non-porous surfaces like fiberglass. Unlike traditional liquid stains that soak into wood, gel stain sits on top of the surface, allowing you to manipulate the color and grain appearance before it sets.
The Layering Secret: Achieving a professional, authentic look is entirely about patience. You must apply thin, translucent coats rather than one heavy application; this layering builds the richness and depth that makes the door look like genuine walnut or mahogany, rather than a streaky DIY attempt.
Because fiberglass doesn’t absorb the stain, your finish is entirely dependent on the quality of your topcoat. A UV-resistant clear coat, such as a marine spar varnish, is mandatory to shield the stain from the sun’s harsh rays. Without this protective barrier, you will find yourself back at square one with a faded, blotchy door after just a few seasons of direct exposure.
Execution Checklist
- ✅ Select Gel Stain: Ensure the product is rated for exterior use on non-porous substrates.
- ✅ Thin Application: Use a high-quality foam brush or rag to work in thin, even layers following the grain.
- ✅ UV Protection: Apply at least two coats of marine-grade spar varnish to lock in the color.
- ✅ Temperature Check: Work in shaded conditions between 50°F and 80°F to ensure proper drying times.
While this process is achievable as a DIY project, it is undeniably high-skill. If you are not confident in your ability to maintain a consistent grain look, consider that professional refinishing typically ranges between $400 and $1,500. A poor DIY application often results in a “streaky” finish that is difficult to correct without stripping the entire door down to the base material.
Warning: Avoid using traditional wood stains. They will not adhere properly to the fiberglass and will likely peel or wash away during the first rain, leaving behind a messy, uneven surface that is significantly harder to prep for a second attempt.
⭐ Rich Stains for Fiberglass Door Upgrades
✨ Editor’s Pick
Fast Drying Gray Wood Stain
Premium Water Based Weathered Gray Stain
Wood Filler and Stain Repair Kit
🔢 The Right Sequence
Gel staining is a multi-stage process where rushing the drying time or skipping the final seal will ruin the wood-grain effect entirely.
- Prep the base: Clean thoroughly with a degreaser and lightly sand to ensure the stain grips the fiberglass surface.
- Apply thin layers: Build the depth of color gradually with multiple translucent coats, allowing full curing between each application.
- Seal the finish: Apply at least two coats of marine-grade spar varnish once the stain is completely dry to prevent future peeling.
Brass Hardware to Matte Black

Swap dated brass for a modern matte black finish to instantly anchor your entryway.
Replacing worn or dated brass hardware is often the quickest way to shed years of neglect from a home’s appearance. Matte black has become the standard for a reason; it provides a crisp, modern contrast against almost any door color, from classic white to deep navy or natural wood tones.
Before you commit to a purchase, you must confirm your door’s technical specifications. A common mistake is buying a set that does not match your existing setup, which leads to unnecessary drilling or a return trip to the store.
Technical Checks Before You Buy:
- Bore Size: Measure the diameter of the holes already in your door to ensure the new hardware will fit.
- Backset: This is the distance from the edge of the door to the center of the bore hole; common standards are 2-3/8 inches or 2-3/4 inches.
- Handing: Determine if your door is left-handed or right-handed so the levers or knobs swing in the correct direction.
Once you have your measurements, you will find that matte black is widely available across all price points. If you are looking to increase security or convenience, consider whether a smart-lock set fits your lifestyle.
Installation is straightforward, but do not tighten every screw until you have verified the alignment. Always test the latch and deadbolt movement with the door open first to ensure there is no binding. If the bolt feels stiff or requires force to turn, adjust the strike plate on the door frame before finalizing the installation.
Avoid the Binding Trap: Never force a deadbolt into place. If it doesn’t slide smoothly, your strike plate is likely misaligned by a fraction of an inch; adjusting this now saves you from a locked door later.
⭐ Matte Black Hardware for Modern Entries
Matte Black Exterior Door Lock Set
✨ Editor’s Pick
Matte Black Privacy Bedroom Door Knobs
Square Matte Black Privacy Door Levers
📋 What to Check First:
- Bore Size: Verify the diameter of existing holes to ensure the new hardware plate covers any exposed raw wood or gaps.
- Backset Precision: Confirm if your latch requires a 2-3/8 or 2-3/4 inch backset to prevent the handle from hitting the door frame.
- Handing Accuracy: Test the door swing and lever direction before purchase to avoid a handle that opens toward your siding instead of the entryway.
6. Adding a Bold Kick Plate

A polished kick plate adds a refined, custom look that anchors your entire entryway.
A kick plate is far more than a functional shield for your door’s finish; it serves as a visual anchor. By adding a metallic element to the bottom of the door, you create a sense of weight and architectural intention that makes the entrance feel custom-designed rather than store-bought.
When selecting your plate, the finish matters as much as the size. For a cohesive, curated aesthetic, match the kick plate finish to your existing door handle and deadbolt. If your hardware is matte black, a matching black plate creates a modern, monochromatic look, while polished brass or brushed nickel adds a touch of classic contrast against darker door colors.
Before you purchase, measure the width of your door carefully. Common sizes range from 4″x32″ up to 8″x34″, and you generally want a fit that leaves about an inch of door showing on either side. Precision is critical here; a kick plate that is too wide will look like an afterthought, while one that is too narrow will fail to ground the door visually.
Installation Checklist
- Clean the door surface thoroughly with a degreaser to ensure the adhesive bond holds.
- Use a level to mark your placement; even a slight tilt will be immediately noticeable.
- Decide between adhesive-mount (easier, no holes) or screw-mount (permanent, secure).
- If using screws, pre-drill small pilot holes to prevent splitting the wood or stripping the metal.
If you are choosing between mounting methods, consider your door material and your commitment level. Adhesive-mount plates are excellent for quick, non-destructive updates, but screw-mount options provide a more permanent, high-end feel that won’t shift over time. If your door is exposed to extreme temperature swings, verify that your adhesive is rated for exterior weather conditions to prevent peeling edges.
⭐ Bold Kick Plates for Door Protection
Gloss White Aluminum Door Kick Plate
Antique Brass Aluminum Door Kick Plate
✨ Editor’s Pick
Stainless Steel Pet Scratch Kick Plate
⚖️ Choose the Right Version
- Choose standard steel: Ideal for high-traffic entryways where durability is the priority and you prefer a budget-conscious, classic look.
- Skip the adhesive: Avoid tape-only mounts on doors facing intense, direct sun, as extreme heat can compromise the bond over time.
- Pair it with: Match your plate finish to the mailbox or house numbers to create a cohesive, professional exterior design scheme.
Missing Sidelights to Framed Glass

Create a grand entrance that floods your home with natural light and architectural character.
Adding sidelights is arguably the most dramatic way to change your home’s exterior profile. It transforms a standard, often dark entryway into a light-filled, grand opening that instantly elevates your home’s curb appeal and perceived value. By expanding the footprint of your door assembly, you create a more substantial, custom look that makes the entire front facade feel finished and intentional.
The Structural Reality Check
This is rarely a simple DIY weekend project. Because adding sidelights requires cutting into the wall adjacent to your door, you must have a professional evaluate your home’s header and jamb support. If you are not familiar with structural framing and load-bearing requirements, do not attempt this without a contractor who understands local building codes.
Beyond the structural work, you need to ensure every component meets local impact codes. This is particularly important if you live in a region with strict wind or storm requirements. Your installer will need to confirm that the glass, the frame, and the mounting hardware are all rated for your specific area before you purchase a single piece of material.
Because this project often involves significant carpentry – including reframing the opening, adjusting the exterior trim, and potentially matching interior finishes – it sits at the top end of the cost spectrum. You are paying for both the high-quality glass components and the skilled labor required to integrate the new assembly into your home’s existing structure.
Before moving forward, ask your contractor to confirm exactly how they will handle the transition between the new frame and your existing siding. A seamless look depends entirely on the quality of the flashing and the precision of the exterior trim work. When done correctly, the sidelights don’t just look like an addition; they look like they were always part of the home’s original design.
⭐ Framed Glass Inserts for Entryways
✨ Editor’s Pick
Clear Tempered Glass Entry Door Insert
Energy Efficient Low-E Door Glass Kit
Low-E Clear Glass Sidelite Replacement Kit
🧰 Questions for Your Installer:
- Header support: Will the existing header hold this additional weight, or is structural reinforcement required?
- Weather sealing: How will the new frame-to-wall transition be flashed to prevent long-term moisture intrusion?
- Impact compliance: Can you confirm that these specific glass units meet all local wind and storm safety codes?
8. Bare Frame to Painted Trim Surround

Adding substantial trim frames your entryway like a piece of art, creating a finished, custom architectural look.
When you look at a front door and it feels like it just “floats” on the side of the house, you’re missing the frame. A thick, painted trim surround acts as the final punctuation mark for your entryway, turning a standard door into a deliberate, high-end design feature.
Many builders use thin, minimal casing that disappears against the siding. By beefing up the trim, you add visual weight and a sense of permanence to the entire facade.
Material Selection Matters: Skip standard pine or MDF for this project. Because this trim is at your home’s most exposed point, it needs to handle moisture, temperature swings, and direct UV rays without rotting or warping. Always opt for PVC or composite trim to ensure your hard work stays crisp for years.
The installation is where most DIYers run into trouble with long-term durability. It is not enough to simply nail the boards up and slap on a coat of paint.
You must prioritize weatherproofing at every single joint to prevent water infiltration behind the trim:
- Flashing and Drip Caps: Install a metal or rigid plastic drip cap above the header trim to deflect water away from the top of the door frame.
- Sealing: Every cut end and mitered joint should be sealed with high-quality, exterior-grade caulk to keep moisture out.
- Fastening: Use stainless steel or hot-dipped galvanized fasteners. Standard nails will eventually rust and leave ugly, weeping streaks down your new white trim.
If you aren’t confident in your ability to cut precise miters or manage the flashing requirements, this is a great project to hand off to a professional carpenter. A clean, gap-free installation makes the difference between a custom look and a DIY project that reveals itself the first time the temperature changes.
⭐ Carriage Lights for Porch Charm
Large Matte Black Outdoor Wall Sconces
✨ Editor’s Pick
Large Bronze Outdoor Carriage Wall Lights
Modern Bronze Outdoor Wall Light Fixtures
⚖️ Quick Decision Guide: Trim Choices
- Choose PVC if: You want a maintenance-free finish that will never rot, warp, or require seasonal scraping.
- Skip wood if: Your entryway faces south or is prone to heavy rain, as wood will inevitably degrade.
- Pair it with: A high-quality, exterior-grade caulk to bridge the gap between the trim and your siding.
9. Dated Sconces to Carriage Lights

Elevate your home’s character with balanced, warm lighting that guides guests to your door.
Lighting acts as the jewelry of your front entrance. Replacing builder-grade, dated fixtures with substantial carriage lights is one of the most effective ways to shift your home’s aesthetic toward a more traditional, high-end feel.
Beyond the visual upgrade, these fixtures serve a functional role by providing necessary security and convenience after dark. When you choose the right scale and placement, you transform the entry from a dark, overlooked space into a welcoming focal point.
Scale matters immensely. If your lights are too small, they will look like an afterthought against the scale of the door. Aim for fixtures that measure between 1/4 and 1/3 of the total height of your door to ensure they look proportionate.
Installation is where many DIYers run into trouble. For optimal light distribution, mount your lanterns so the center of the fixture sits between 65 and 75 inches from the floor. This height ensures the light illuminates your lockset and the threshold, which is essential for safely navigating your entry at night.
Installation Success Checklist
- Measure Twice: Verify the height against your door frame before drilling into your siding.
- Check the Glow: If you are using clear bulbs, opt for fixtures with frosted or seeded glass to prevent harsh glare.
- Safety First: Ensure the light path covers the lockset entirely so you aren’t fumbling for keys in the shadows.
You can expect to spend between $50 and $150 per fixture depending on the material and finish. While matte black is currently the most popular choice for its clean, high-contrast look, focus on the quality of the construction to ensure the finish stands up to seasonal weather changes.
Pro Tip: Avoid the “glare trap” by choosing seeded glass or frosted panels if the bulbs are visible from the street. This softens the light output, creating a warm, ambient glow rather than a harsh, high-intensity beam.
⭐ Shop Outdoor Lighting for Entryways
Modern Bronze Wall Sconces Set
Vintage Black Exterior Wall Sconces
✨ Editor’s Pick
Bronze Motion Sensor Outdoor Wall Lights
💡 Why This Works:
Properly scaled carriage lights do more than just brighten a dark entryway; they act as a visual frame that connects the door to the surrounding architecture. By drawing the eye upward and outward, they make a standard entrance appear wider and more substantial, creating a sense of balance and intentionality that builder-grade fixtures simply cannot achieve.
Visual impact: High-quality lighting instantly elevates the perceived architecture and curb appeal of your home’s main entrance.
10. Overgrown Entry to Framed Planters

Create an instant sense of order and welcome with perfectly scaled, symmetrical container arrangements.
When your entry feels a bit tired or lacks architectural definition, you don’t always need a major remodel to shift the perspective. Adding symmetrical planters is one of the most effective ways to command attention and draw the eye exactly where you want it – right to your front door.
The goal here is to move away from the “clutter” of mismatched pots and toward a curated, intentional look. By framing your entrance, you create a visual anchor that naturally distracts from minor exterior flaws and makes the entire porch feel more polished.
The Scaling Rule: Planters that are too small look like an afterthought, while those that are too large can impede your walkway. Aim for a height that reaches roughly one-third of your door’s height, and ensure the width doesn’t block more than a third of the available entry path.
Success in this project often comes down to your material choices. Because these planters sit outside year-round, you want materials that can handle the elements without cracking or fading.
- Fiberglass or GFRC (Glass Fiber Reinforced Concrete): These are the gold standard for durability, especially in freeze-thaw zones where traditional materials crumble.
- Metal: Powder-coated aluminum or galvanized steel offers a sharp, modern silhouette that holds up exceptionally well.
- Avoid: Standard plastic or terracotta, which often become brittle or crack under extreme temperature fluctuations.
The “Thriller, Filler, Spiller” Method
Use this classic design technique to ensure your containers look professional from every angle:
- Thriller: A tall, dramatic plant placed in the center or back to provide height and a focal point.
- Filler: Mounded plants that surround the thriller, adding texture and hiding the soil.
- Spiller: Trailing plants placed near the edge that cascade over the sides, softening the hard lines of the planter.
Finally, remember that symmetry is your best friend for a high-impact entrance. Using two identical planters creates a sense of balance and formality that instantly elevates a standard entryway. If your door is off-center, focus your symmetry on the door itself rather than the entire porch width to keep the entrance feeling intentional and grounded.
⭐ Porch Planters That Frame Your Entry
✨ Editor’s Pick
Lattice Design White Outdoor Planter Box
Large Tall Black Outdoor Planter Set
Tall Black Striped Outdoor Planter Set
💡 Why This Works:
Symmetry taps into our brain’s natural desire for order, turning a chaotic or cluttered porch into a composed, intentional focal point. By framing the door with identical elements, you create a visual “gateway” that draws the eye directly to the entrance, effectively masking minor exterior imperfections elsewhere.
The psychological benefit: A balanced, orderly entrance signals to visitors – and potential buyers – that the entire home is well-cared for.
You now have a full range of high-impact strategies to elevate your entrance, from minor hardware swaps to significant architectural shifts. Selecting the one or two improvements that align with your home’s current style will yield the greatest return, as the most successful curb appeal projects often rely on a few deliberate, high-quality interventions rather than an exhaustive overhaul.
Whether you prioritize a cohesive front door style or focus on structural details that enhance your home’s exterior, the goal is to make a choice that looks intentional and stands the test of time. Focusing your budget on the elements that guests and potential buyers notice first ensures the transformation feels professional and complete. By choosing the specific upgrade that addresses your home’s most pressing need, you can move forward with total confidence in the final result.
Related posts
 Interior Door Makeover for a More Finished Designer-Led Look
 17 Front Door Ideas for Walkway Impact
 Why Some Homes Feel Welcoming Before You Reach the Front Door
 What to Know Before Replacing a Front Door
 21 Unique Wardrobe Door Designs You’ve Never Seen Before
 What Homeowners Wish They Knew Before Buying Smart Door Locks
 What to Know Before Choosing a Safety Door
 From Classic to Contemporary: The Impact of French Doors on Modern Architectural