
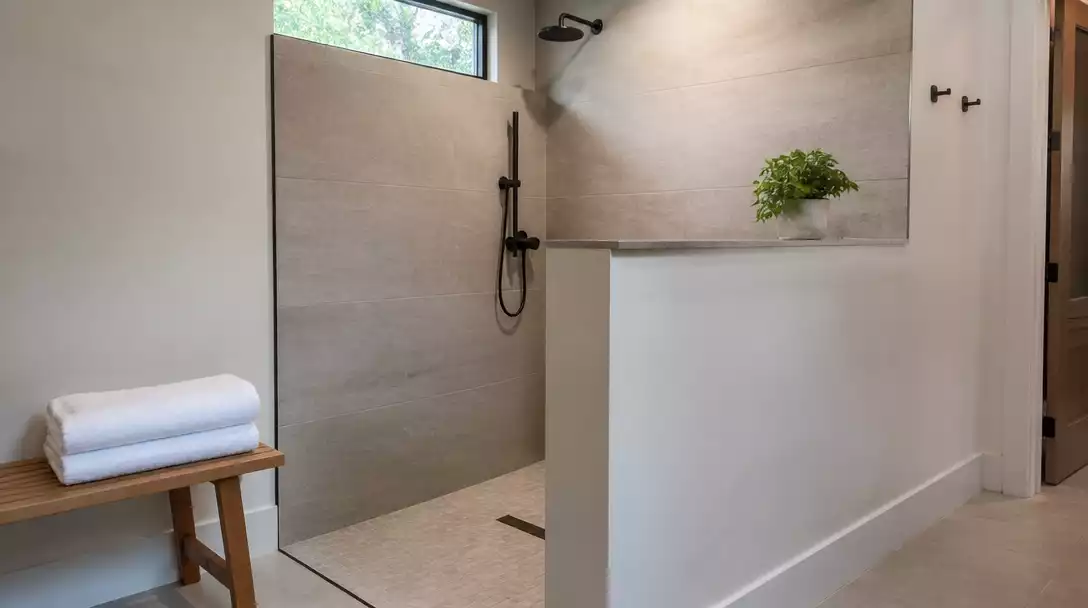
Creating a walk-in shower with no door is less about hardware and more about mastering spatial geometry to balance openness with privacy. This guide covers 10 layout ideas worth saving to help you design a functional, well-contained entry that fits your home perfectly. Let’s start with the basics.
Half Wall Partition
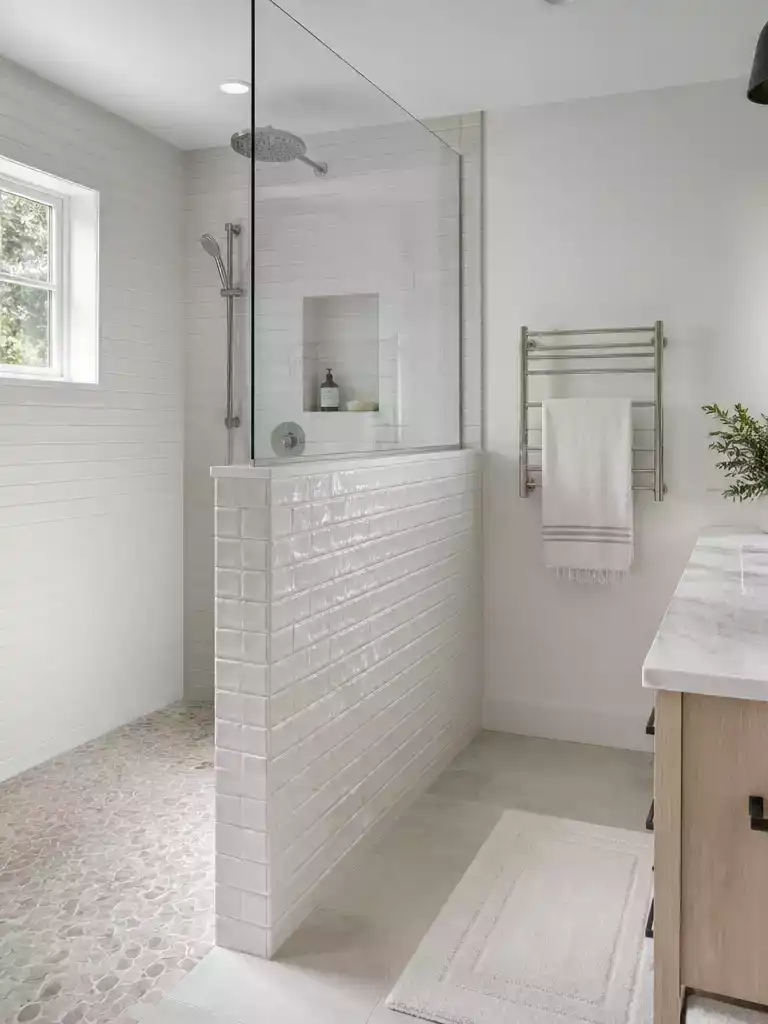
Create a spa-like flow that hides the splash zone while keeping your bathroom feeling bright.
As an Amazon Associate I earn from qualifying purchases. Affiliate links may earn me a commission at no extra cost to you.
The half-wall partition acts as the perfect bridge between a fully enclosed stall and a completely open wet room. By standing at roughly 42 inches in height, it creates a visual anchor that hides your lower body while allowing natural light to travel across the entire bathroom.
This structural barrier physically intercepts water spray, ensuring that your vanity and toilet area remain dry even during a high-pressure shower. It is the most effective way to gain the openness of a walk-in layout without sacrificing the comfort of feeling tucked away.
Critical Construction Note:
This wall is a structural element that must be integrated directly into the waterproofing membrane of your shower floor. Do not simply tile over standard drywall, as moisture will inevitably compromise the seams and lead to hidden water damage.
For those who want extra protection against steam and errant splashes, adding a fixed glass pane to the top of the masonry is an excellent upgrade. This “topper” provides a physical barrier for water droplets without the visual weight of a full-height shower wall.
This design is ideal for homeowners who want a clean, architectural look that feels intentional and custom-built. If you prefer a completely invisible barrier, you might find the solid base of a half-wall too bulky, in which case a frameless glass screen would be a better fit.
⭐ Best Half Wall Partitions for Privacy
✨ Editor’s Pick
Adjustable Wood Slat Room Divider Post
Indoor Decorative Wood Slat Privacy Pillar
Thermal Insulated Blackout Room Divider Curtain
🔢 The Right Sequence for Success:
Waterproofing fails when structural elements are added as an afterthought. Follow this order to ensure your half-wall remains leak-proof and stable for years.
- Frame and anchor: Bolt the wall frame directly to the subfloor before laying your shower pan membrane.
- Tie in membranes: Wrap the shower floor membrane up and over the wall to ensure seamless water containment.
- Tile and seal: Apply tile only after the entire structure is fully waterproofed and tested for drainage slope.
Glass Screen Panels
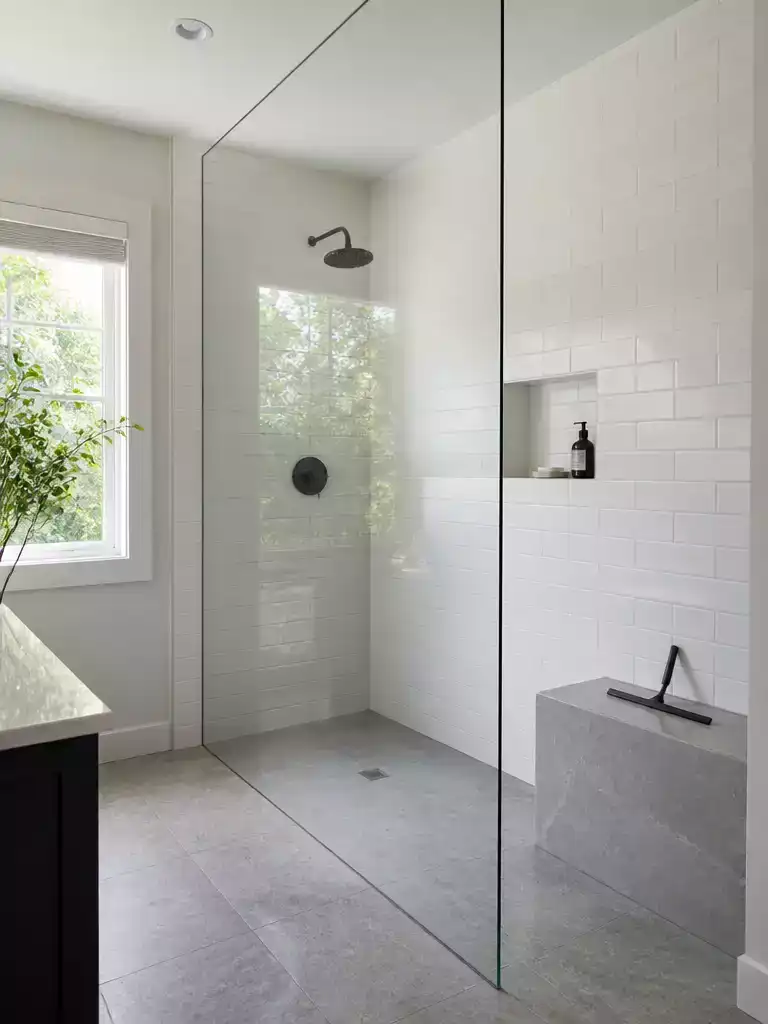
Achieve an invisible barrier that maintains your room’s flow while keeping the vanity bone-dry.
A glass screen panel functions as a strategic shield, creating a dedicated wet zone without the visual weight of a door frame or a solid wall. It is the perfect choice for homeowners who want to preserve the airy feel of a seamless floor plan while preventing spray from migrating to the rest of the bathroom.
Pro-Tip: Always opt for low-iron glass during your design phase. Standard glass often carries a subtle green tint that can make a shower area feel enclosed or “boxy,” whereas low-iron options remain crystal clear and effectively invisible.
Success with this layout relies entirely on the dry-walk distance. If your panel is too short, water will simply bypass the edge and leave your bathroom floor slippery.
This solution is best for those who appreciate a minimalist aesthetic and are diligent about quick daily cleaning. If you prefer a “set it and forget it” shower, the high maintenance of clear glass may become a frustration.
⭐ Glass Screen Panels We Love
Clear Tempered Glass Framed Shower Screen
✨ Editor’s Pick
Frameless Fixed Glass Shower Screen Panel
Reeded Glass Privacy Window Film Sticker
Why This Looks Better
Beyond just utility, a glass screen panel excels by maintaining the sightlines that make a bathroom feel expansive. By eliminating the visual “stop” of a framed door or tiled wall, you allow light to travel uninterrupted across the room. Using low-iron glass keeps those lines truly clean, ensuring the shower feels like a purposeful, intentional part of your floor plan rather than a crowded afterthought.
Navigating bathroom airflow and splash zones often feels like a technical puzzle, but the unseen physics of your floor slope do most of the heavy lifting. You don’t need to overthink every detail, as choosing a few reliable features – like modern shower screens – will stabilize the entire room’s functionality.
Focusing on the geometric flow of your space reduces the need for complex hardware and ensures a cleaner, more intentional finish that stands the test of time.
Extended Entry Wall
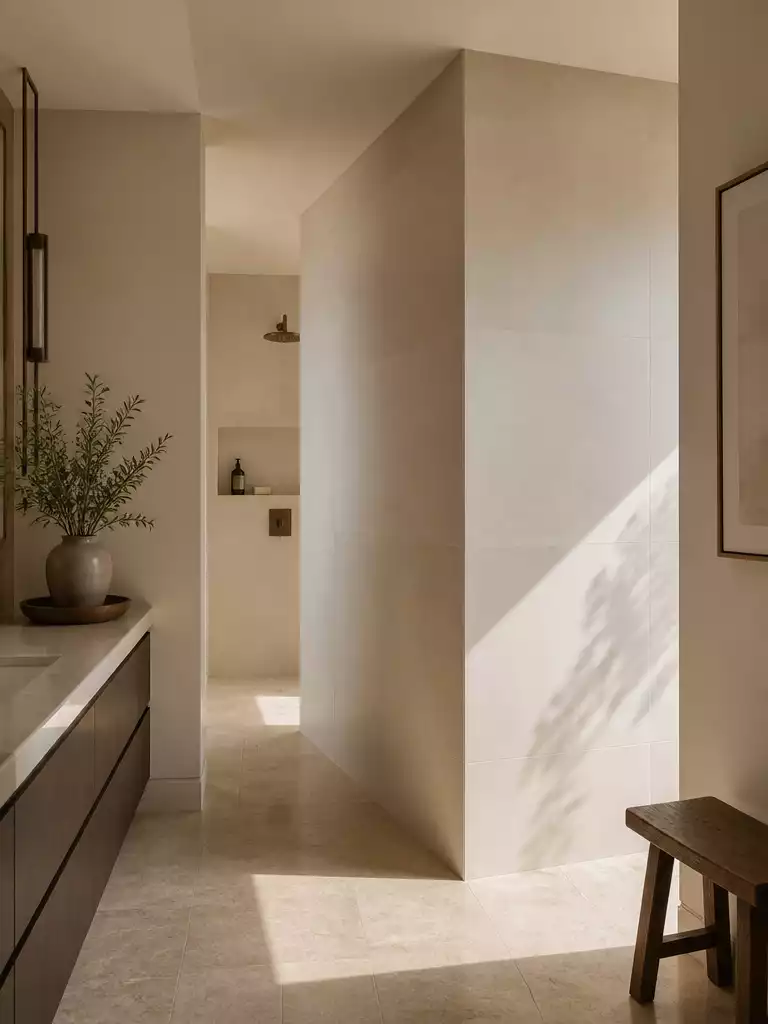
Create a private, spa-like cocoon by extending your shower wall into a concealed corridor.
The extended entry wall, often called a corridor entry, treats your shower like a private path rather than a simple stall. By extending one of the side walls, you create a blind that effectively hides the user from the bathroom doorway.
This layout is the best solution for homeowners who prioritize total seclusion over saving every square inch of floor space. Because you have to walk around a corner to enter, the showerhead remains completely out of sight from the main room.
The Splash-Trap Effect: This design is a masterclass in water containment. Because the water has to travel through a deep, walled corridor to reach the bathroom floor, you effectively eliminate the need for doors or curtains entirely.
Before you commit to this structural choice, keep in mind that it requires a larger footprint than a standard shower. It is a layout choice meant for master baths where you have the flexibility to frame new walls around your wet zone.
Construction requires perfect waterproofing continuity where the wall meets the floor and the adjacent structure. Make sure your contractor ties the wall’s internal membrane directly into the shower’s floor pan to prevent leaks inside the wall assembly.
- ✓ Privacy: Total blockage of sightlines from the vanity and bathroom door.
- ✓ Splash Control: The deep entry acts as a natural barrier that keeps your bathroom floor dry.
- ✓ Aesthetic: Creates a clean, high-end architectural look that avoids hardware clutter.
Heads up: This is a permanent structural change. Skip this if you are working with a tight, pre-existing footprint where closing off the space would make the room feel cramped.
⭐ Extended Entry Walls to Consider
Durable Fiberglass Window Screen Mesh Roll
Magnetic Closure Fiberglass Screen Door Mesh
✨ Editor’s Pick
Fiberglass Screen Mesh Repair Replacement Kit
💰 Where the Budget Goes
- The real range: Expect a total project cost between $5,500 and $15,000, covering demolition, custom waterproofing, and tile work.
- Hidden cost: Budget for additional expenses like subfloor modification or drainage adjustments if you are opting for a curbless design.
- Worth it: Invest heavily in professional-grade membrane installation; skipping this to save cash often leads to high-cost structural water damage.
Angled Wall Layout
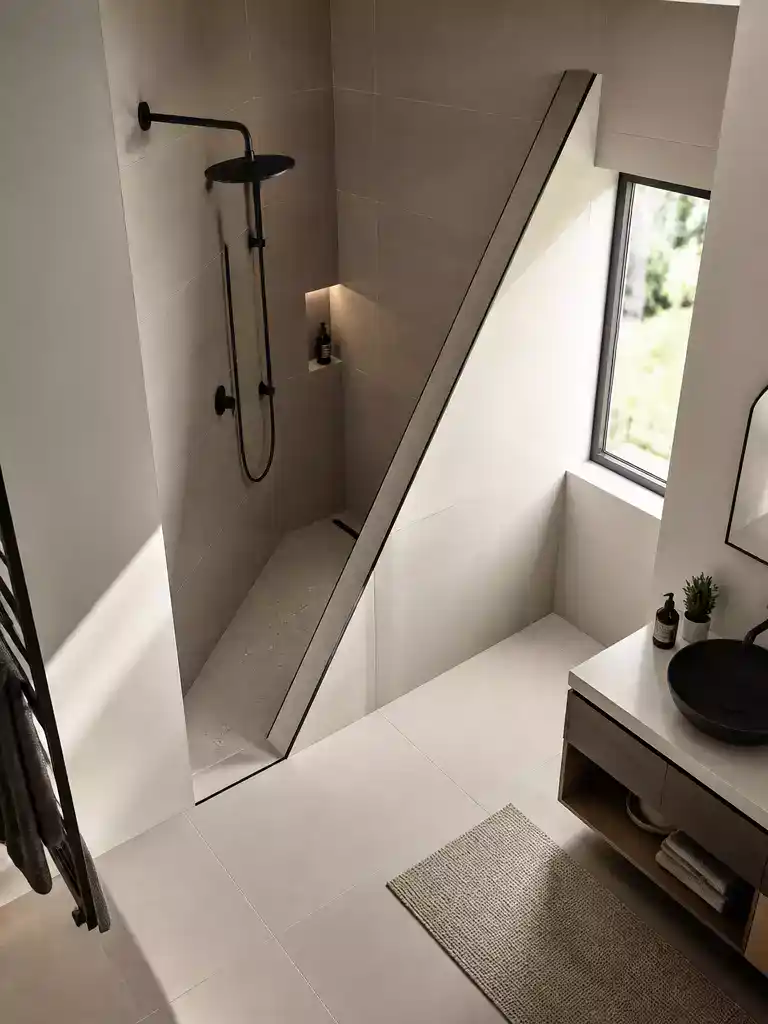
Break up boxy bathroom geometry to redirect sightlines and contain water without a door.
A 45-degree wall changes the entire flow of a bathroom by breaking up the rigid, boxy feel of standard layouts. Instead of a shower entry facing the vanity or toilet, the angled wall shifts the opening toward a corner, effectively hiding the user from view the moment they step into the room.
Beyond privacy, this geometry acts as a natural splash guard. The angle forces the shower’s spray to hit the back or side walls rather than traveling directly toward the room’s open space.
Consider this for: Renovations where you are already opening up the subfloor or reframing walls. Because this requires custom framing, it is best implemented when you have the flexibility to adjust the structure behind the tile.
When planning an angled layout, keep these considerations in mind:
- Framing: This requires non-standard framing that may take more time to construct than a traditional straight wall.
- Sightlines: Test your layout by walking through the bathroom doorway to ensure the angle successfully masks the shower interior from common traffic areas.
- Water Flow: Use the angle to your advantage by positioning your showerhead to spray toward the furthest, most enclosed corner of the stall.
Warning: Avoid this layout if you are working with a very small square footage, as the angular footprint can sometimes create awkward, unusable dead space in the corners of your bathroom.
⭐ Angled Wall Layouts That Work
✨ Editor’s Pick
Stainless Steel Shower Glass Door Squeegee
Clear Multi Purpose Shower Suction Hooks
Watercolor Peel and Stick Accent Wallpaper
🏡 How This Works in a Real Home:
- Daily traffic flow: Ensure the angled entrance doesn’t pinch your path to the vanity or create a tight, awkward “bottleneck” during morning routines.
- Visible sightlines: Place a mirror near the entrance to check if the angle successfully blocks the shower interior from the main bathroom door.
- Natural transitions: Use a continuous floor tile pattern that flows from the bathroom into the angled shower to make the small footprint feel expansive.
Corner Placement
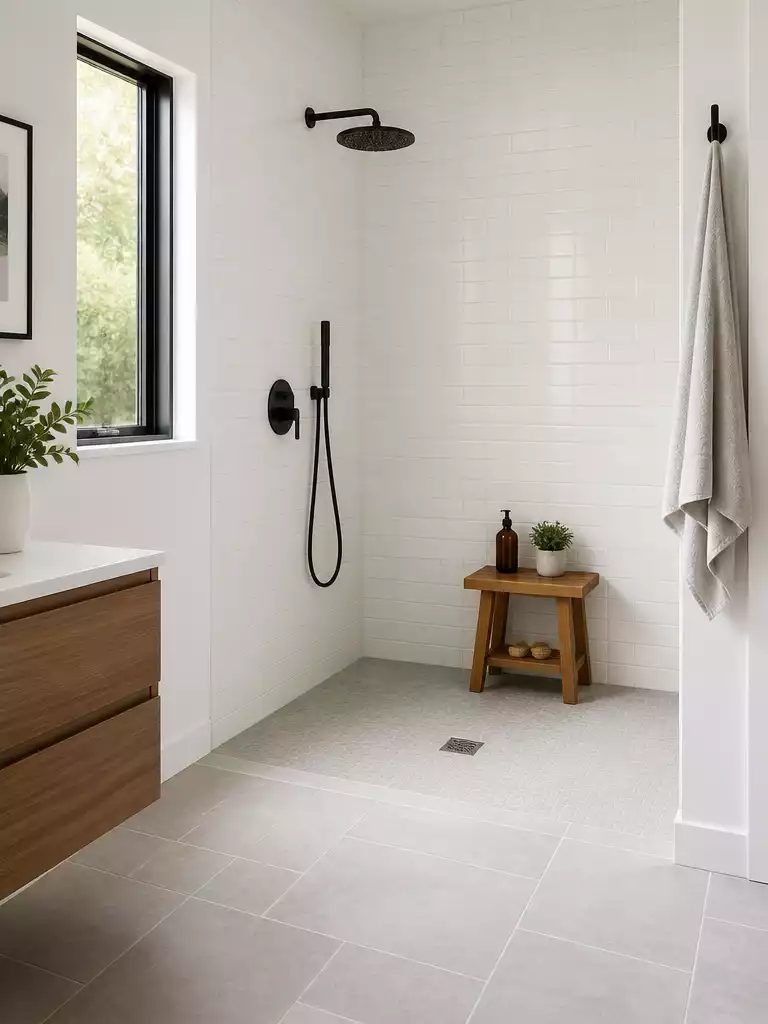
Maximize existing architecture to create a naturally sheltered shower zone without bulky hardware.
Corner placement is the most efficient way to use your bathroom’s existing architecture to create a contained shower. By tucking the wet zone into a corner, you only need to finish one or two sides to complete the enclosure.
This layout is ideal for smaller bathrooms where floor space is at a premium. It naturally reduces the exposed perimeter of your shower, which means there is less area for water to escape compared to a mid-wall or floating layout.
The Golden Rule: Always mount your showerhead on an interior wall that faces away from the main bathroom doorway. This positioning ensures that your spray cone is directed back into the corner, keeping the rest of your bathroom floor bone-dry.
Before you commit to this setup, consider your sightlines carefully. A corner shower is essentially a “two-wall” solution, so the two open sides must be managed to maintain privacy.
Quick Planning Checklist
- Check your local building codes to ensure the shower opening width meets minimum safety requirements.
- Place your showerhead on the wall furthest from the bathroom door to minimize accidental spray.
- Use a 1/4 inch per foot floor slope toward the drain to keep water confined to the corner.
- Test your layout with painter’s tape to ensure the entry doesn’t feel cramped when entering from the side.
If you prefer a completely open feel, this is a great choice because it requires the least amount of structural building. However, skip this if your preferred showerhead position forces you to aim water toward an open walkway.
⭐ Corner Placement Picks for Showers
Paint Edge Trimmer for Corner Walls
✨ Editor’s Pick
Dual Sliding Corner Glass Shower Enclosure
Clear Plastic Wall Corner Protector Guard
🏡 How This Works in a Real Home:
- Transition zones: Use a slightly different floor texture or color at the threshold to visually define the wet zone without needing a physical door frame.
- Daily maintenance: Keep a high-quality rubber squeegee stored discretely inside the corner to prevent water pooling on your main bathroom floor after every shower.
- Softening edges: Add a moisture-resistant plant or a teak bench in the corner to make the transition between the shower and vanity feel intentional and cozy.
Recessed Alcove
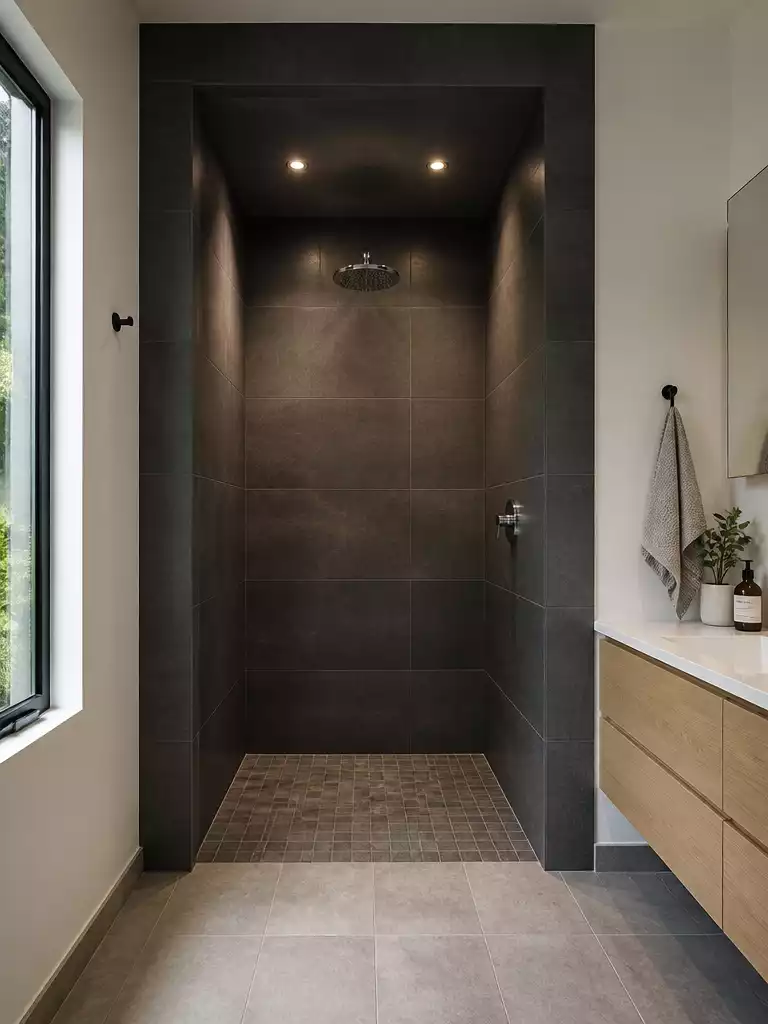
Create a private, spa-inspired sanctuary by tucking your shower into a structural wall niche.
A recessed alcove transforms your shower from a simple corner stall into a private cocoon. By setting the showering zone back from the bathroom’s main floor plan, you gain an inherent layer of seclusion without needing a door or curtain.
The depth advantage here is twofold. First, it physically contains water spray within the cavity, keeping your vanity and toilet area bone-dry. Second, the deep walls naturally shield the user from view, making it the perfect layout for shared master bathrooms.
Planning Tip: Light It Right
Because alcoves are set back into the wall, they can easily become dark shadows within your bathroom. Install dedicated, moisture-rated recessed lighting directly above the showerhead to maintain a bright, airy feeling.
Waterproofing is the most critical technical consideration for an alcove design. Since you are creating multiple interior corners, you must ensure your membrane and sealant are applied perfectly to prevent moisture from wicking into the structural wall framing.
This layout is an excellent choice if you are performing a full-scale renovation where you have the flexibility to adjust framing depth. If you are working with a strict existing footprint, you may find that an alcove requires too much space for a standard wall configuration.
- Maximize Depth: Aim for at least 36 to 48 inches of depth to fully contain water spray.
- Sealant First: Use high-quality, flexible sealant at every floor-to-wall and wall-to-wall junction.
- Drainage: Ensure your floor slope clearly directs water toward the drain within the alcove to prevent standing water in the deeper inner corners.
Warning: Avoid shortcuts on waterproofing. Any compromise in the corner joints of an alcove can lead to hidden rot in your bathroom wall studs over time.
⭐ Recessed Alcove Solutions We Love
Nylon Plastic Shower Door Bottom Guide
Transparent PVC Shower Glass Door Seal
✨ Editor’s Pick
Semi Frameless Double Sliding Shower Door
💰 Surprise Costs to Plan For:
Building an alcove is more than just framing; it involves significant structural integration. Because this layout requires modifying your wall depth, ensure your budget accounts for these hidden requirements.
- Structural Demo: Opening existing walls often reveals unexpected plumbing or electrical lines that require professional rerouting.
- Waterproofing Labor: Perfecting membrane coverage in deep corners is labor-intensive and requires high-quality, professional-grade materials.
- Subfloor Prep: If you are recessing the shower floor, expect $500–$1,500 in additional costs for structural subfloor modifications.
Strategic Showerhead Position
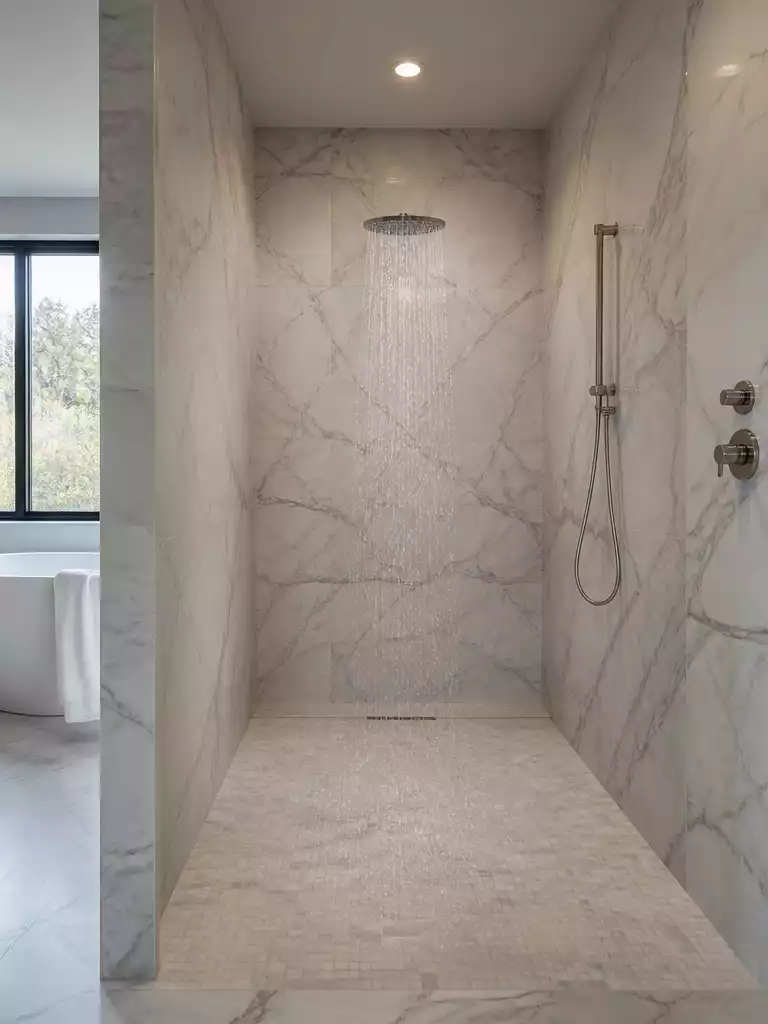
Master the physics of water flow to keep your bathroom floors dry without doors.
The most effective way to eliminate a shower door is to master the physics of the spray. By aiming water away from your entry point, you can create a functional open zone that stays dry during use.
Position your showerhead on the wall furthest from the opening, directing the spray toward the most enclosed corner of the stall. This creates a natural “no-splash” zone that keeps the rest of your bathroom floor safe from stray droplets.
The Spray-Cone Rule
Calculate your showerhead’s reach before installing plumbing. If the cone of water hits the edge of your opening, you need to either shift the head position or add a fixed glass panel to catch the overspray.
If you are planning a dual-head setup, proceed with caution. Multiple heads increase the splash radius, making it significantly harder to contain water without a physical barrier.
Before you tile, run a simple test with a garden hose or your rough-in plumbing to observe the actual water path. This allows you to adjust the angle of the head or the height of the mount to ensure the spray stays exactly where you want it.
⭐ Strategic Showerhead Positions to Try
✨ Editor’s Pick
Frameless Glass Shower Door Sweep Strip
No Drill Suction Cup Wreath Hooks
Water Resistant Adhesive Refill Strips
✨ Small Details That Matter
Beyond the plumbing layout, the final aesthetic and splash containment rely on these subtle finishing touches that bridge the gap between open-concept and functional.
- Threshold slope: Ensure your curb or floor transitions maintain a 1/4 inch per foot slope to guide rogue droplets back into the drain.
- Caulk lines: Use color-matched, mildew-resistant silicone at all wall-to-floor junctions to prevent water from seeping behind your chosen tile finish.
Curved Wall Entry
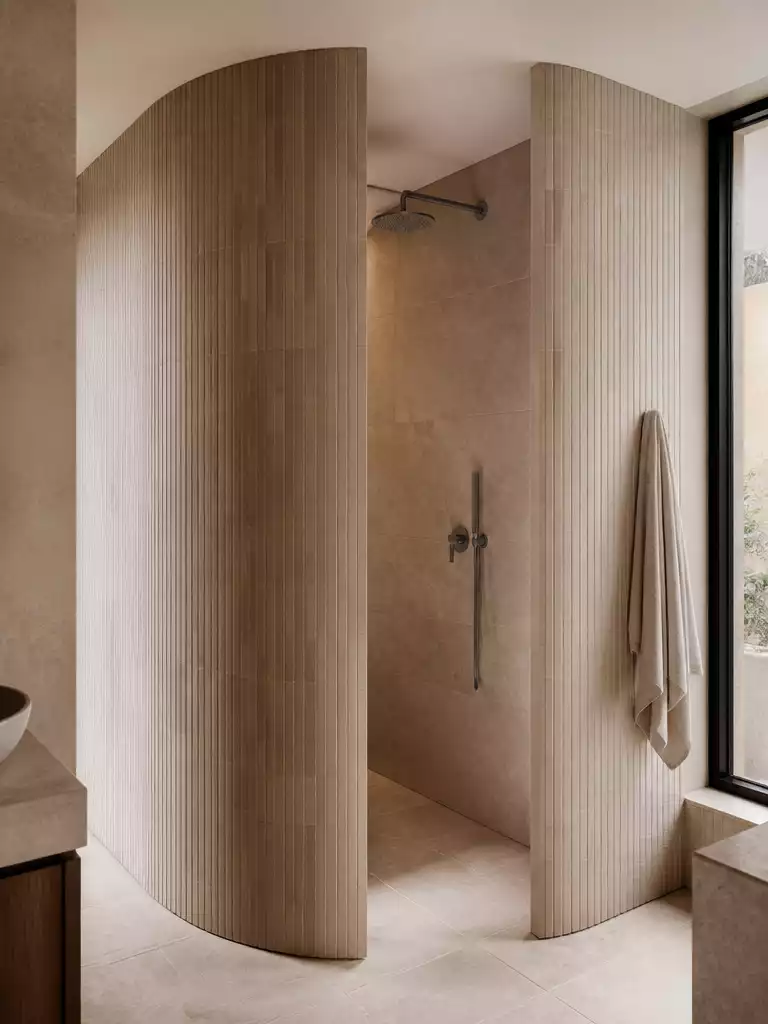
Soften your bathroom’s geometry with a fluid, organic entry that balances privacy and flow.
A curved wall entry breaks the monotony of standard right-angled construction, acting as a graceful guide for both your eye and your path into the shower. By sweeping the wall inward, you create a natural visual shield that obscures the shower interior from the vanity area without needing a heavy door.
This design choice relies on the radius of the curve to manipulate sightlines effectively. A tighter curve provides more enclosure and privacy, while a wider radius keeps the space feeling expansive and inclusive.
Construction Reality Check: Achieving this look requires specialized materials like flexible backer board or custom-formed masonry blocks. You should expect higher labor costs compared to standard straight-walled showers because the tiling process requires precise, small-format tiles or mosaic sheets to follow the radius.
If you are planning a complete renovation, this is an ideal way to add a custom, high-end architectural focal point to your bathroom. It works best in larger master suites where the sweeping footprint of the wall doesn’t crowd your circulation path.
Who should choose this:
- Homeowners prioritizing a high-end, custom aesthetic.
- Those who prefer organic, soft lines over industrial, boxy layouts.
- Bathrooms with enough square footage to accommodate a curved footprint comfortably.
Who should skip this:
- DIY renovators, as the framing for curves requires professional precision.
- Small, space-constrained bathrooms where every inch of floor space is needed for clearance.
- Budgets that cannot accommodate the extra labor and material costs of specialized curved construction.
⭐ Curved Wall Entry Ideas
Wall Jamb Bumper for Shower Doors
✨ Editor’s Pick
Flexible Casing Molding for Curved Walls
Strong Adhesive Wall Hooks for Towels
⚖️ Quick Decision Guide: Curved vs. Straight
- Choose curved if: You want a high-end, organic focal point that softens the rigid lines of a modern bathroom.
- Skip this if: You have a standard-sized room where the sweeping footprint might disrupt your natural walking path or flow.
- Pair it with: Mosaic tile sheets or small-format glass tiles, which are far easier to install smoothly over curved surfaces.
Double Entry Walk Through
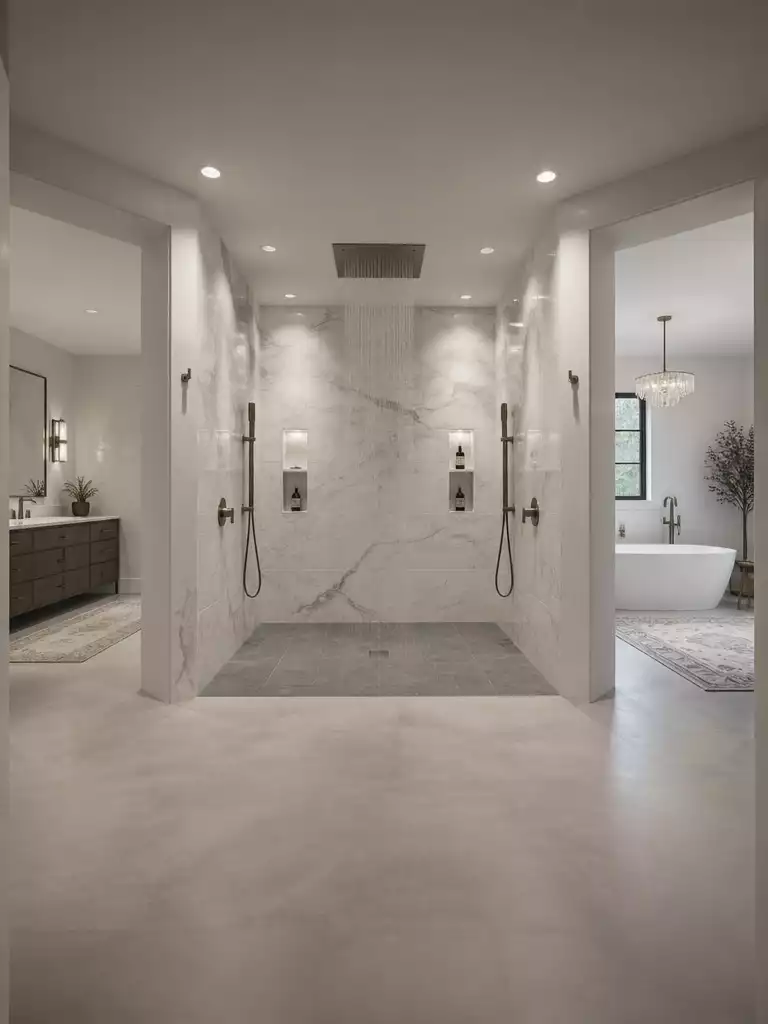
Experience a hotel-inspired flow that balances grand scale with daily functional convenience.
The double entry walk-through removes the physical barrier of a single entrance, turning your shower into a fluid corridor rather than a static box. This layout creates an effortless circulation path, making it the premier choice for large, light-filled master bathrooms.
Because you are entering from two sides, you must treat the entire footprint as a high-traffic zone. You should only attempt this design if you have the square footage to centralize the wet zone well away from your vanity or closet areas.
The Golden Rule of Dual Access: You must place your showerhead and controls in the center or on a dedicated interior wall that keeps the spray arc strictly within the middle of the stall.
If your water source is too close to either opening, you will inevitably end up with wet floors outside the designated zone.
If you are considering this for a project, look at your available floor space through these specific requirements:
- Floor Slope: Ensure your building contractor prioritizes a consistent 1/4 inch per foot slope toward the drain to prevent water from migrating toward both entrances.
- Membrane Coverage: Your waterproofing membrane must extend at least three feet beyond the wettest part of the shower to account for foot traffic carrying moisture out.
- Sightline Awareness: Since you have two openings, you lose two walls for privacy; place this shower away from the main bathroom door to keep the user hidden.
Who Should Skip This?
If your bathroom is under 100 square feet, this design will likely result in a permanent puddle in your main walking path. Stick to a corner placement or a single entry layout to keep your vanity and storage areas dry.
⭐ Double Entry Walk Through Solutions
Solid Pine Wood Dutch Exterior Door
Double Exterior Entry Doors with Frame
✨ Editor’s Pick
Contemporary Fiberglass Exterior Entry Door Slab
🧰 Questions for Your Installer:
- Membrane continuity: How will you ensure the waterproofing membrane remains seamless between the two entries and the shower floor?
- Drainage capacity: Does the current drain size handle the potential water flow from a dual-entry, oversized wet zone layout?
- Structural slope: What is your plan to maintain a perfect 1/4 inch per foot slope toward the center drain?
Offset Doorways
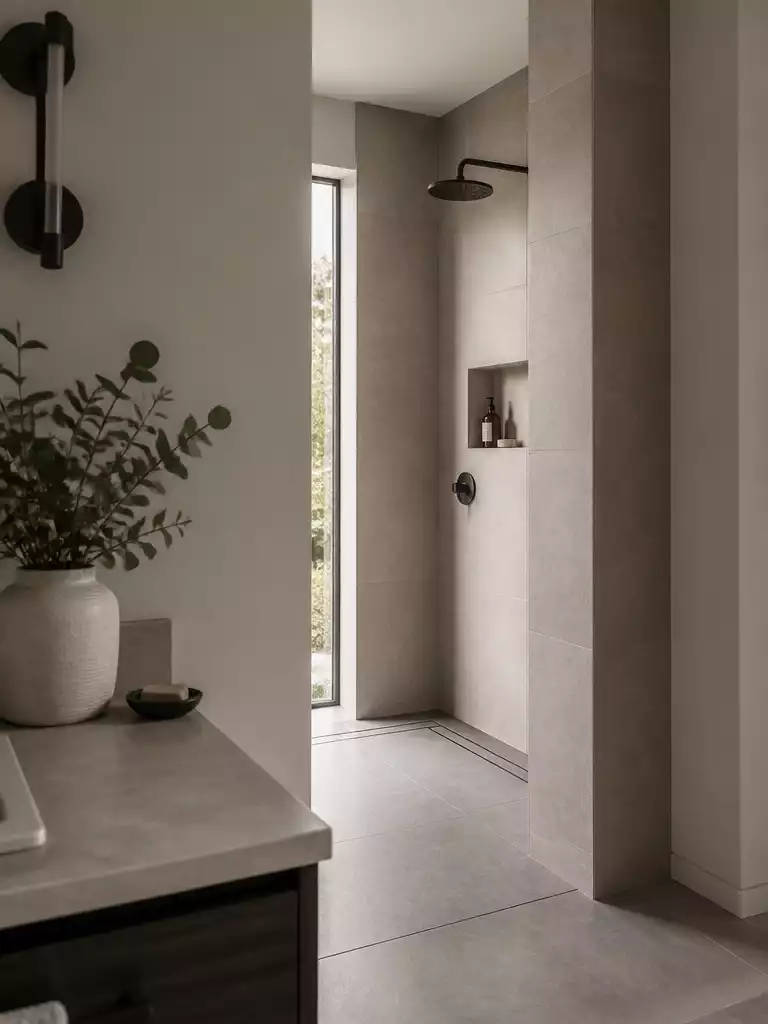
Create a natural sense of seclusion by shifting the entry point out of direct view.
An offset doorway works by breaking the direct line of sight between the bathroom and the shower interior. By placing the opening to the side rather than the front, you create a dedicated buffer zone that keeps the rest of the room feeling private even when the main bathroom door is open.
Best For: This layout is ideal for homeowners who prioritize privacy above all else but still want the airy, doorless aesthetic of a modern wet room.
The structural logic here is simple: you are creating a “turn-to-enter” transition. Because the opening is no longer directly in front of the showerhead, water spray is naturally contained by the depth of the wall partition rather than splashing toward the vanity or toilet area.
Keep in mind that this design requires careful attention to the floor slope beyond the entry. Since the entry area itself is part of the wet zone, ensure the waterproofing membrane extends at least three inches past the threshold to prevent moisture from seeping into the bathroom subfloor.
Avoid this mistake: Do not skimp on the width of your offset corridor, as a space tighter than 30 inches will make entering the shower feel cramped and difficult to navigate. Always test your planned dimensions with painter’s tape on the floor before construction begins.
⭐ Offset Doorway Picks
✨ Editor’s Pick
Semi Frameless Double Sliding Shower Door
Frameless Rotatable Bathtub Shower Door
Bifold Barn Door with Frosted Glass
⚖️ Quick Decision Guide: Offset vs. Open Layouts
- Choose offset if: You want total visual privacy while keeping the shower area feeling spacious and airy.
- Skip offset if: Your bathroom layout is tight; this design requires extra floor space for the entry corridor.
- Pair it with: A frameless glass screen or subtle tiled partition wall to define the “wet zone” boundary cleanly.
You have now navigated ten structural paths to achieving a doorless walk in shower that feels private and intentional. Finding the right balance between openness and splash control does not require incorporating every technique listed here; choosing the one or two layouts that align with your existing floor plan is significantly more effective.
Before committing to major construction, try marking out your preferred shower zone with painter’s tape to visualize the footprint. A design that prioritizes functional sightlines and proper splash containment will naturally provide the clean, spa-like result you are aiming for. When you focus on a single, well-planned entry strategy, the rest of the bathroom design falls into place with ease. For more inspiration on how to refine your bathroom aesthetics, you might explore shower door ideas that can further influence your final layout choices.
Related posts:
 How to Paint Interior Doors Black Without Making the Trim Feel Disconnected
 14 Door Decorations for Summer Ideas That Feel Bright and Breezy
 16 Door Decorations for Home Ideas That Instantly Feel Welcoming
 12 Front Door Ideas That Make Narrow Porches Feel Finished
 14 Latest Door Design for Home Ideas That Feel More Expensive
 Are Exposed Hinges a Thing
 12 Door Handle Upgrades That Make Cabinets Feel Custom
 Why Some Homes Feel Welcoming Before You Reach the Front Door