A Polar Express classroom door turns the walk from the hallway into a night train ride for second graders. These 8 ideas use black paper, gold tickets and simple shapes that a busy teacher can finish in an evening. For more hallway ideas, see our Christmas door ideas.
Some product links below are Amazon affiliate links. As an Amazon Associate we earn from qualifying purchases.

Night Train Scenes
The first four ideas build the scene itself. They start with a black or dark backdrop and add one bold shape at a time.
A second grader should be able to read the door from across the hall, so keep the shapes large and the colors few. The sketch shows where the first five ideas sit on one door.
1. A Paper Steam Train Across the Night Sky
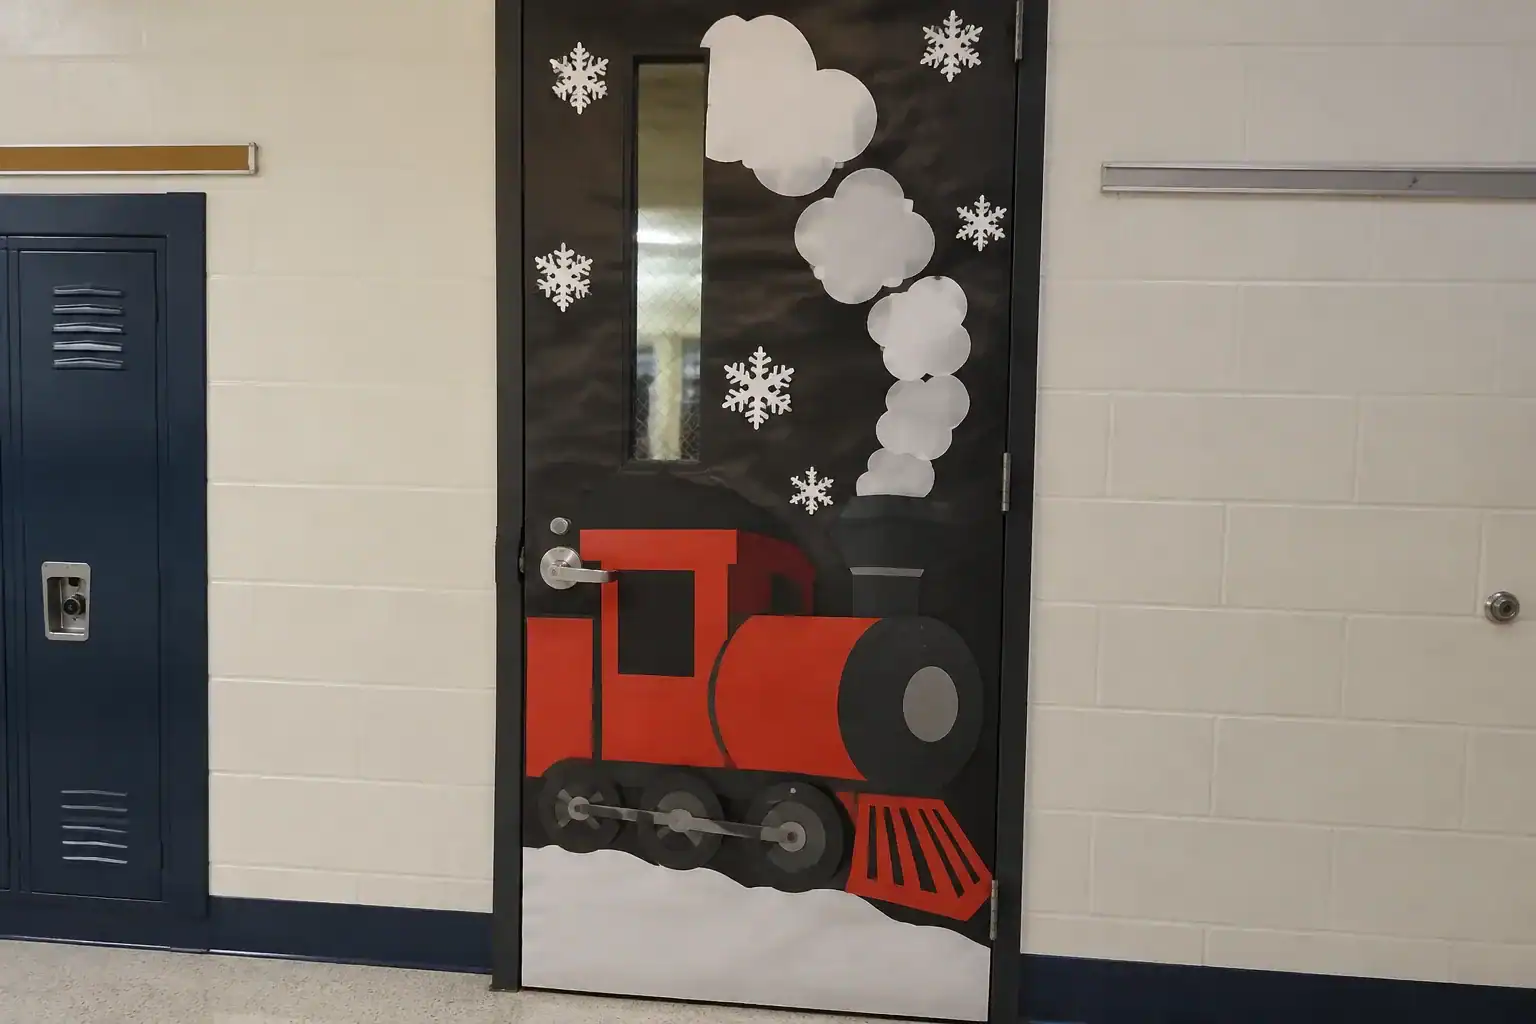
Cover the door in black paper and cut a big steam train from red, black and gray paper. Add white puffs of smoke and a few snowflakes, and the scene is done.
Make the train from large shapes so children can read it from across the hall. Cut the wheels as simple circles and layer the smoke in three or four puffs that grow as they rise.
Put the train at about the height of a child’s shoulder, since that is where students look as they walk in. Leave the handle and its surrounding space free.
Shop this idea
Black paper and a train to start the scene
- BLACK PAPERBlack kraft paper rollShop on Amazon
- TRAIN CUTOUTSTrain bulletin board paper cutoutsShop on Amazon
As an Amazon Associate we earn from qualifying purchases.
The train cutouts are new and have few reviews, so look closely at the product photos before you order.
2. A Snowy Pine Forest Along the Bottom
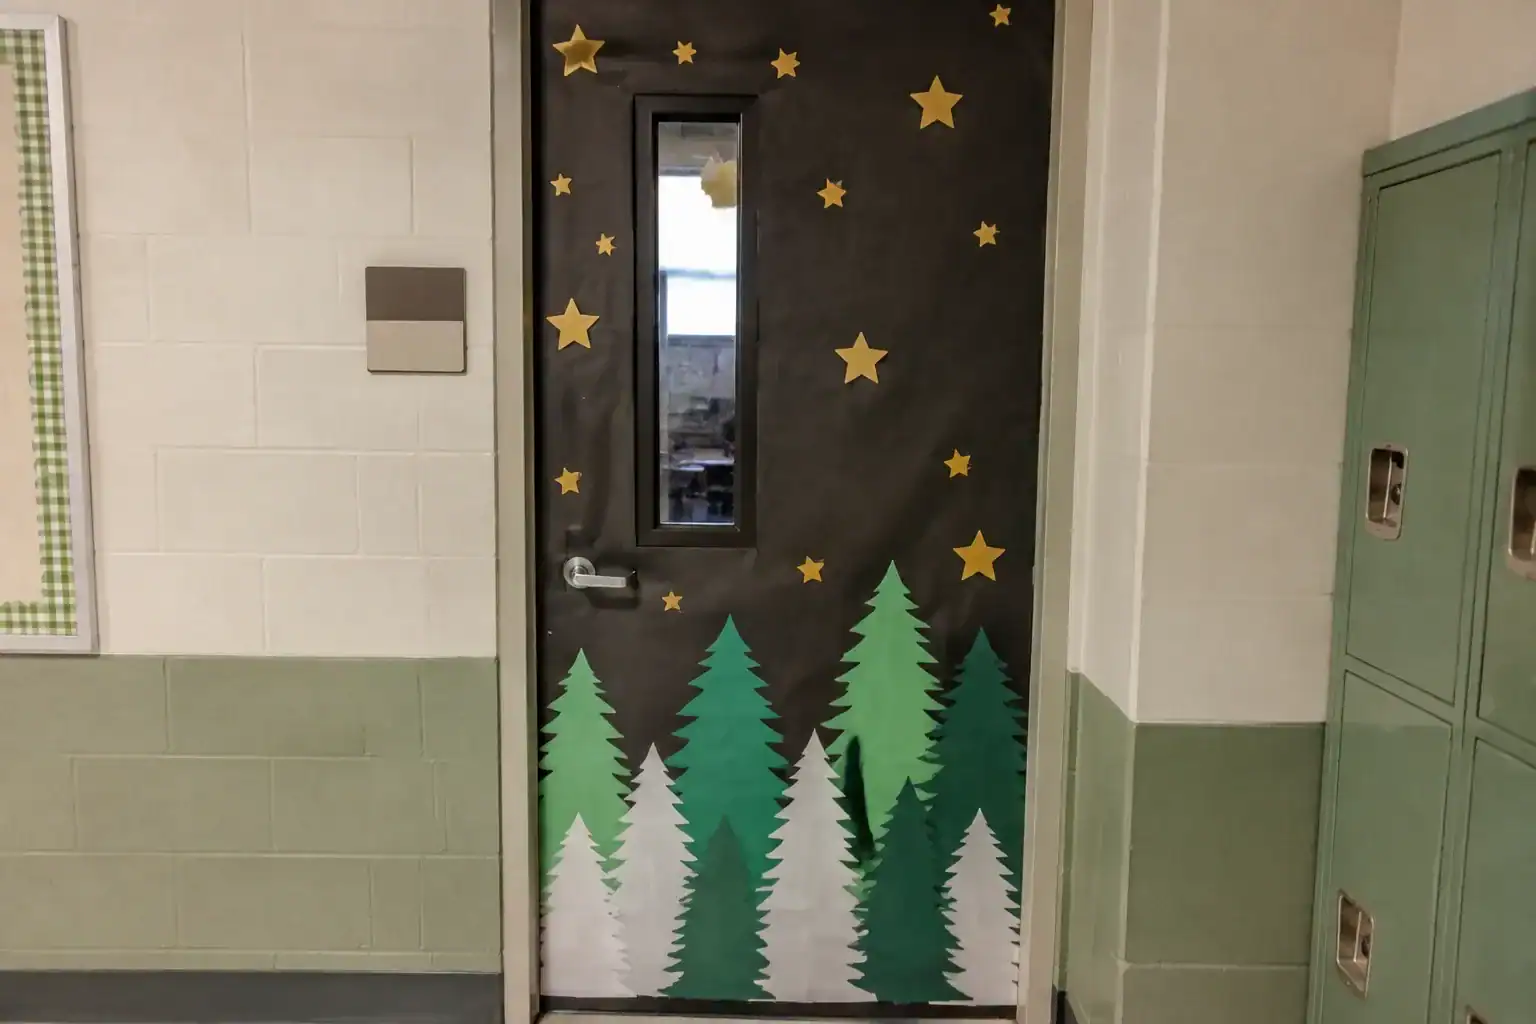
A row of green and white paper pines along the bottom of the door gives the train something to pass. Add small gold stars to the sky above.
Cut the pines in three sizes so the forest looks deep. Put the tallest trees near the edges and the smallest in the middle, then dab white paper snow on the branches.
Stars are the easiest way to fill the sky. A sheet of foil stickers lets students place their own, which keeps them busy while you work on the train.
Shop this idea
Pine cutouts and stars for the sky
- PINE TREE SETJumbo pine tree bulletin board setShop on Amazon
- STAR STICKERSGold foil star stickers, 30 sheetsShop on Amazon
As an Amazon Associate we earn from qualifying purchases.
Stick the stars on last, once the trees are up, so you can see where the sky has gaps.
3. String Lights Around the Frame
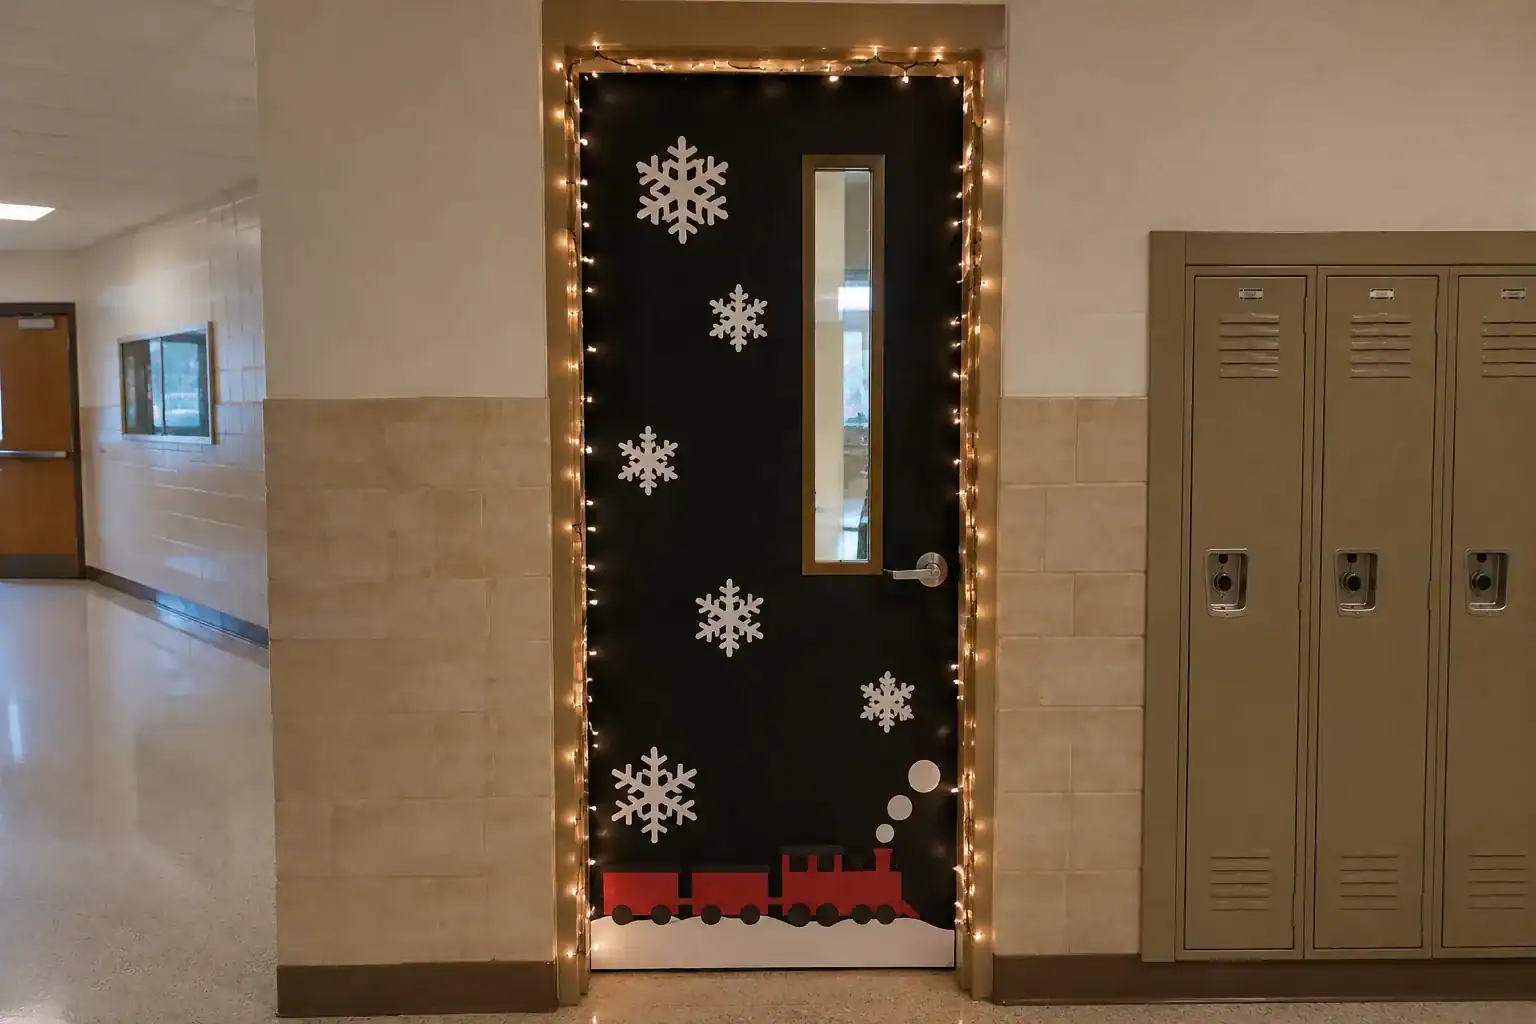
A string of warm white lights around the door turns the display into a glowing window. Add white paper snowflakes to catch the light.
Use battery lights with a timer, and tape the wire flat so nobody trips on it. Run the wire along the frame and not across the opening.
The lights make the train glow in a dim hallway, so they are worth the extra step if your school allows them.
Shop this idea
Battery lights and paper snowflakes
- STRING LIGHTSBattery string lights with timer, warm white, four packShop on Amazon
- SNOWFLAKESWinter snowflake paper cutoutsShop on Amazon
As an Amazon Associate we earn from qualifying purchases.
Lights and paper sit close together on a door, so read the fire guidance below before you plug in or switch on anything.
Check the fire rules before you add paper or lights
Yakima County fire marshal guidance for schools says “combustible artwork and teaching materials are limited on the walls of corridors to not more than 20 percent of the wall area.” Your own district may set a different rule, so ask your building lead first. Never cover an exit sign, a sprinkler or an alarm.
Battery lights keep the display away from a wall outlet, which is one more reason to choose them.
4. A Gold Border and Washi Tape Stripes
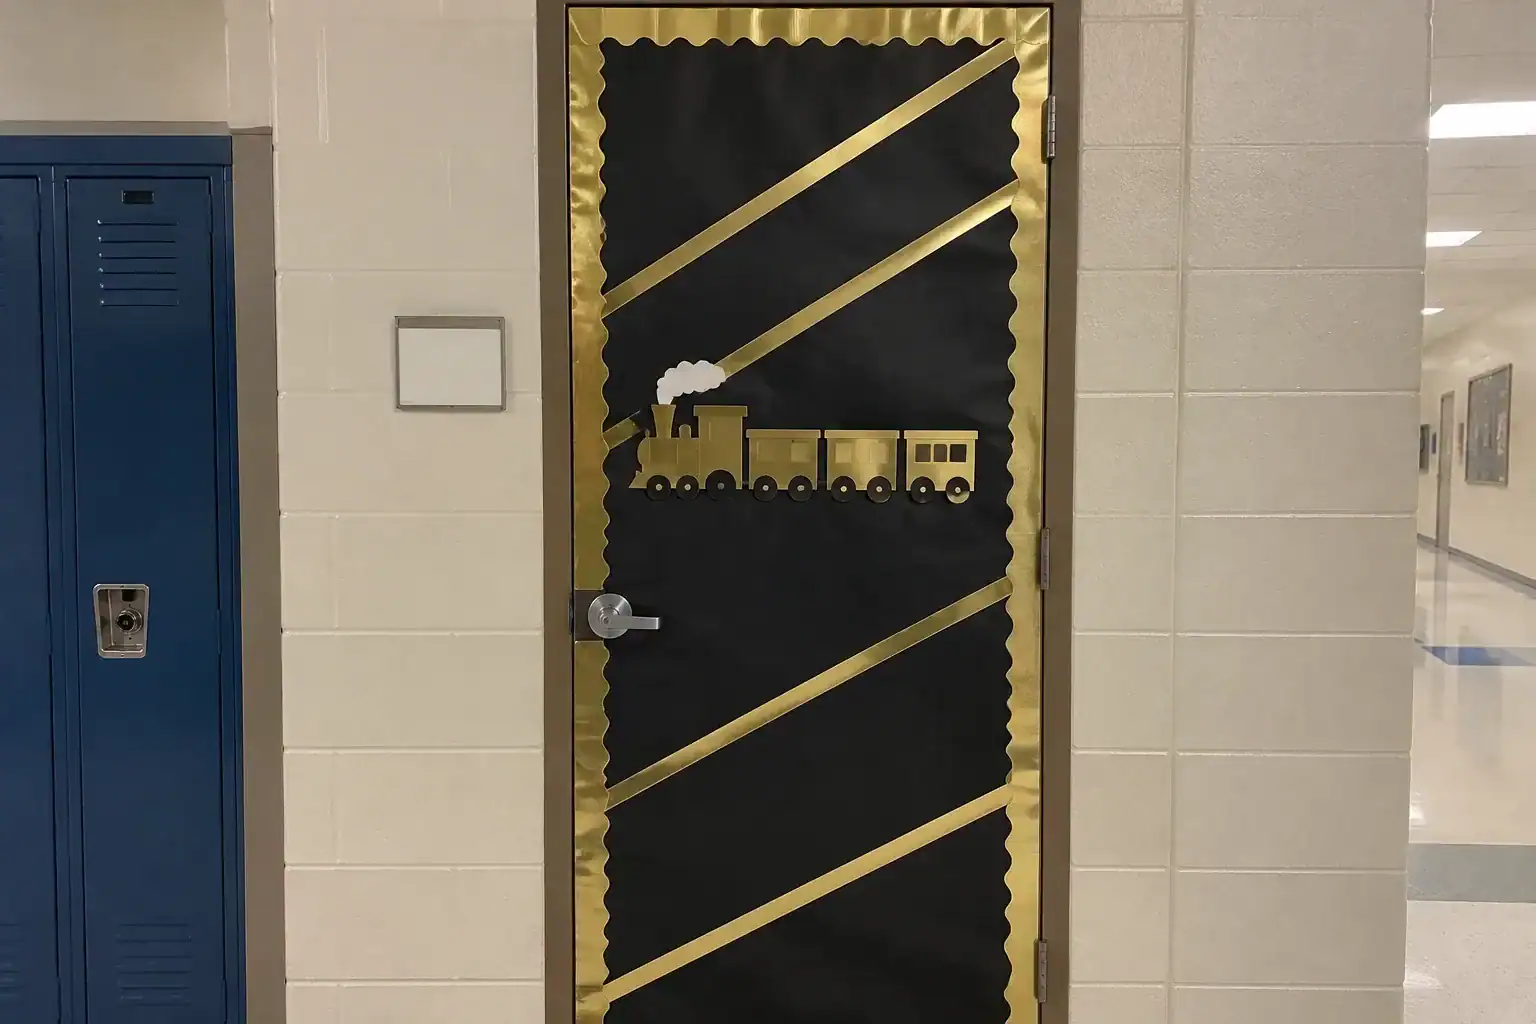
A neat gold border makes a black door look finished. Add a few stripes of gold washi tape to echo the tracks.
Cut the border in long strips so you have few seams to match. Fold the strips at the corners instead of cutting four separate pieces.
Washi tape lifts easily, which makes it safe for painted doors. Press it down firmly with a ruler for straight lines.
Shop this idea
Gold paper and tape for the border
- GOLD PAPERGold matte paper rollShop on Amazon
- GOLD TAPEGold metallic washi tapeShop on Amazon
As an Amazon Associate we earn from qualifying purchases.
Mark the border with a light pencil line first, so the strips run straight.
Student Touches
The last four ideas put the class on the door. They work best when the children cut, write or decorate a piece themselves.
If you want more ways to show student work, see our classroom door ideas.
5. A Golden Ticket for Every Student
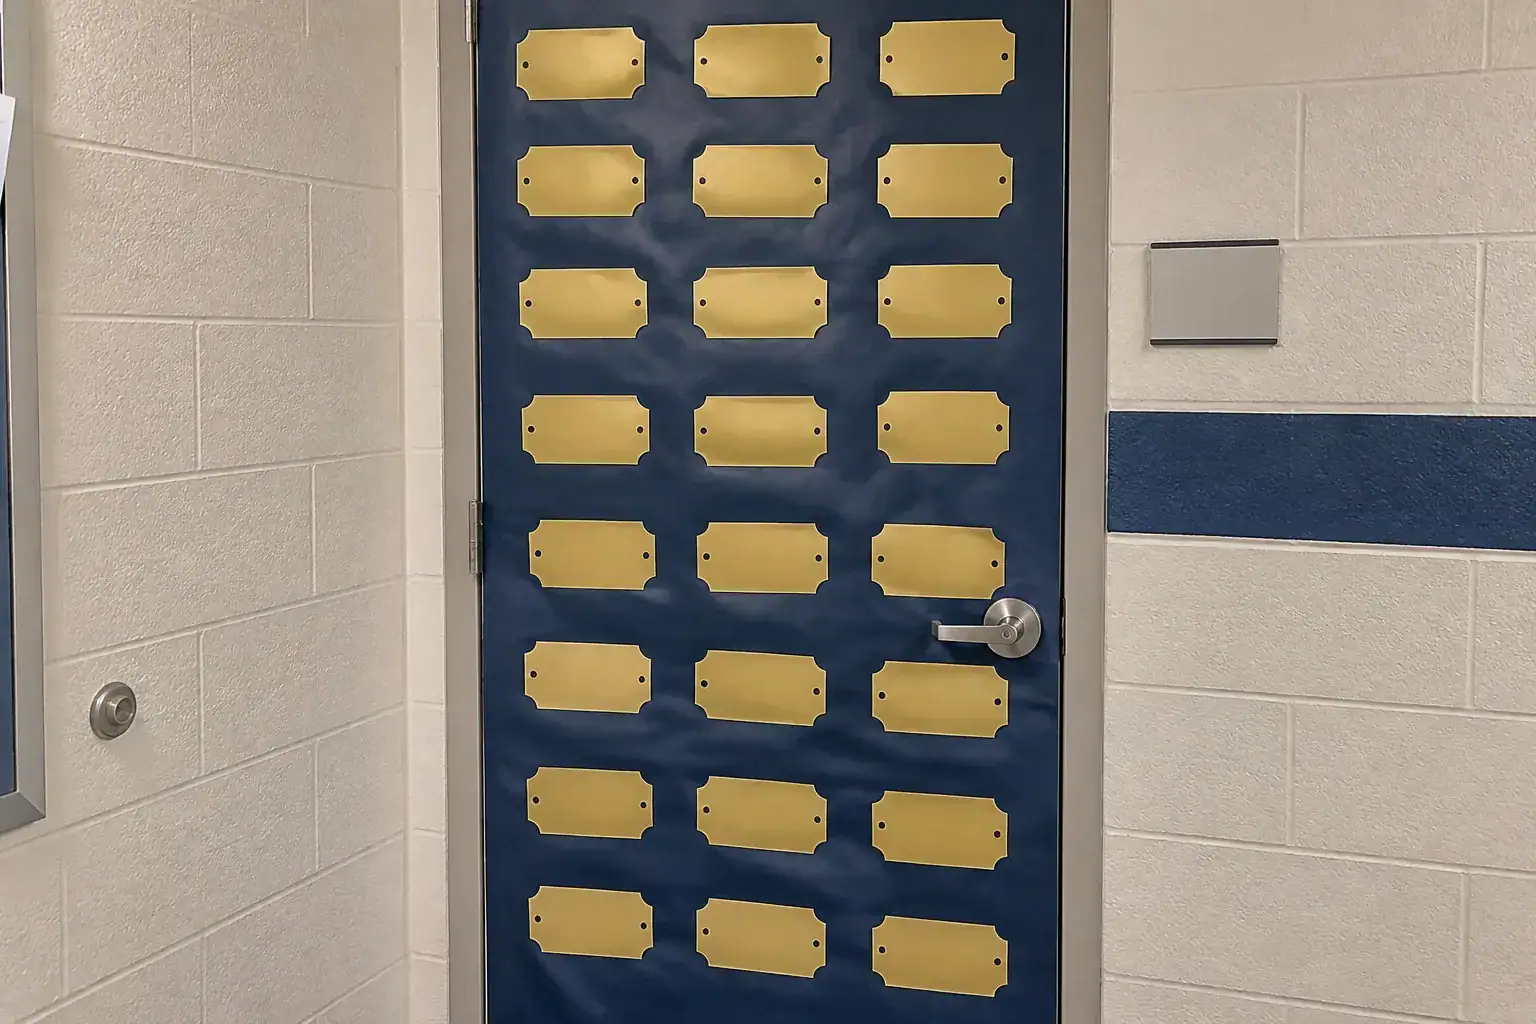
Give each student a gold paper ticket and have them write a name on it. Line the tickets up along the door like passengers boarding.
Punch a small hole in each ticket for a finishing touch. A line of tickets across the top also hides the edge of the black paper.
Make a few spares, since a ticket with a smudged name is easy to replace. The calculator below counts them for you.
Shop this idea
Gold tickets for every student
- GOLD TICKETSGolden foil raffle tickets rollShop on Amazon
As an Amazon Associate we earn from qualifying purchases.
Use a permanent marker so the names do not smudge.
6. A Train With a Car for Each Student
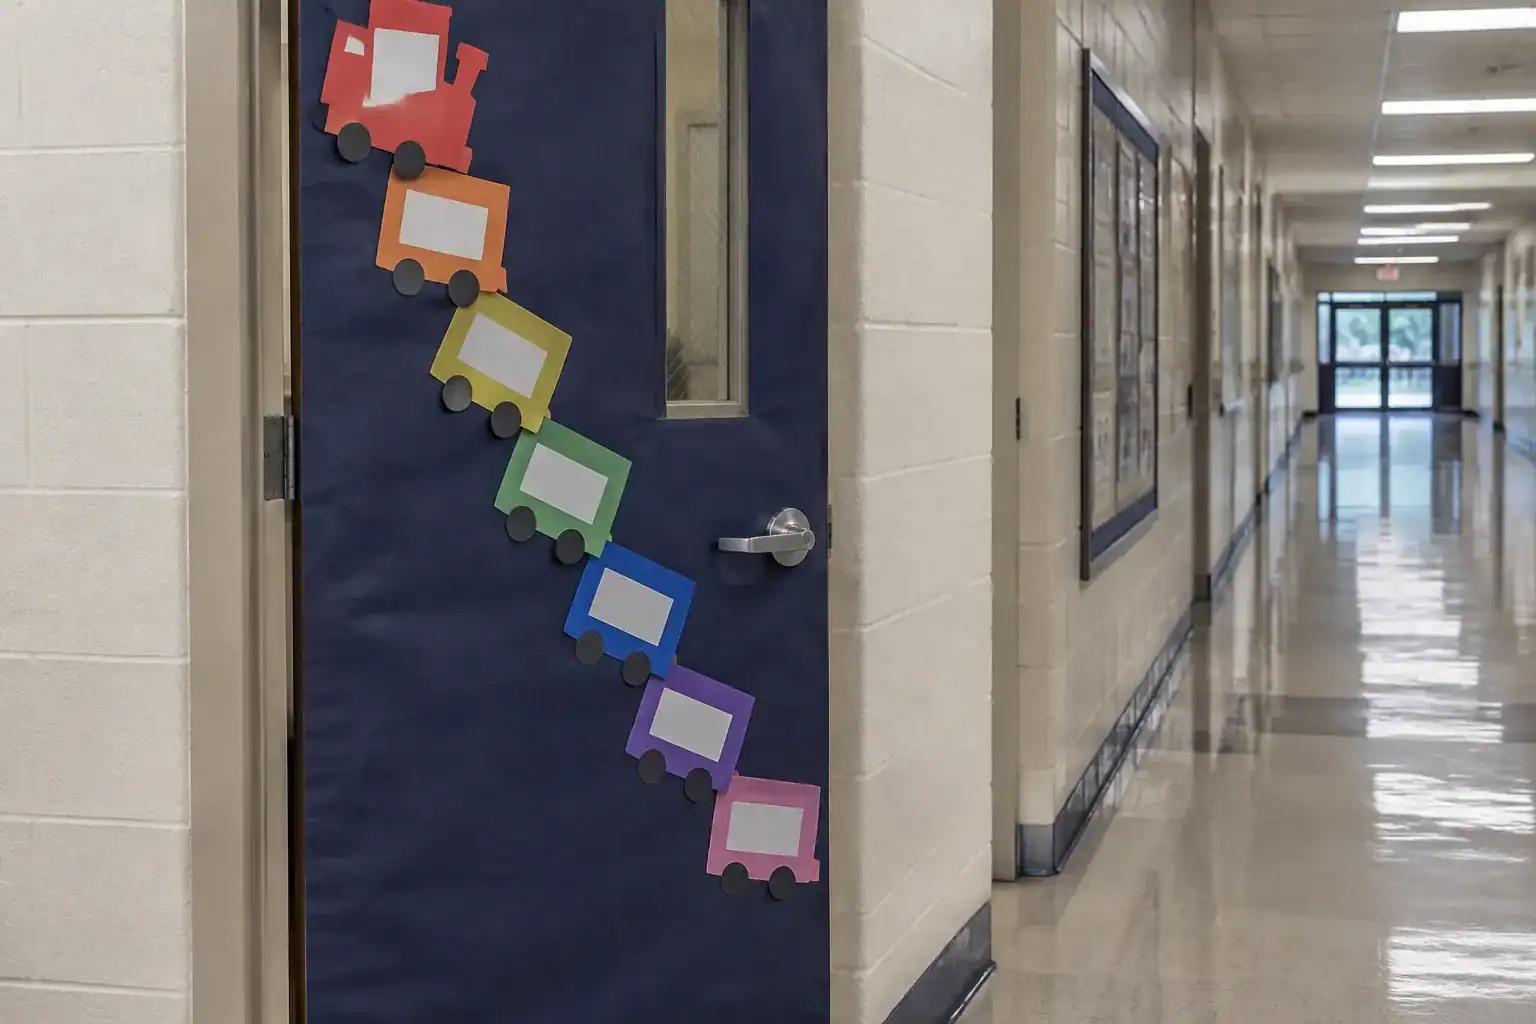
Cut one paper train car per student and let each child draw a picture in the window. Staple the cars into a long line across the door.
A heavy duty stapler makes this quick, especially on a thick display board. If the train gets long, break it into rows so every car stays readable.
The calculator works out how many rows your class needs and how much black paper to cut.
Shop this idea
A stapler for the train cars
- STAPLERHeavy duty metal stapler with staplesShop on Amazon
As an Amazon Associate we earn from qualifying purchases.
Keep the stapler out of reach of children when you are finished.
Measure your own door first, since classroom doors vary. The picture shows the default answer.
7. A Row of Hot Cocoa Mugs

A row of paper mugs topped with cotton ball marshmallows brings a warm touch to a cold hallway. Students can color each mug and write a wish for the season.
Cut the mugs from brown cardstock so they hold their shape. Glue the cotton on in small tufts and add a curl of white paper for steam.
It suits a class that likes cocoa on the last day before break.
Shop this idea
Cardstock and cotton for the mugs
- BROWN CARDSTOCKBrown kraft cardstock, 25 sheetsShop on Amazon
- COTTON BALLSCotton balls, 200 countShop on Amazon
As an Amazon Associate we earn from qualifying purchases.
Let the glue dry flat before you hang the mugs.
8. A Single Silver Bell
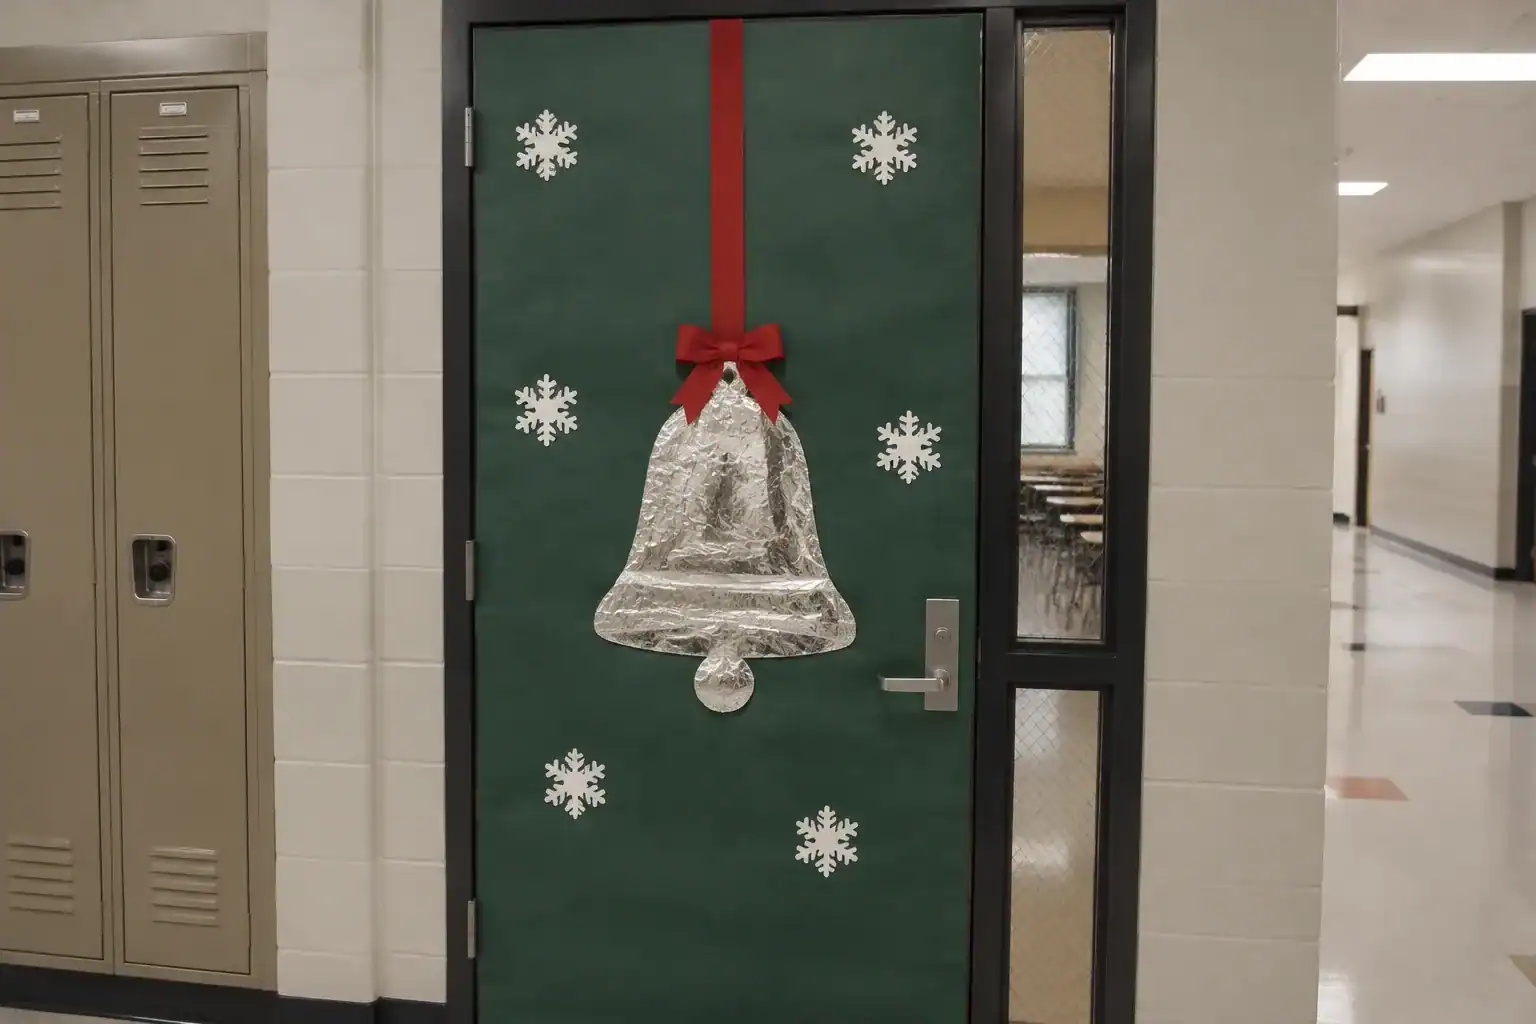
If you have almost no time, hang one large bell on a red ribbon in the middle of a dark green door. Add a few snowflakes and stop.
It reads as a clean, calm display and needs very little work. It also suits a class that wants one clear symbol from the story instead of a whole scene.
The bell in the box is a white honeycomb paper bell with silver tassels, so tie on a silver ribbon if you want the silver look.
Shop this idea
A paper bell and a red ribbon
- PAPER BELLHanging paper honeycomb bells with silver tasselsShop on Amazon
- RED RIBBONTrue red satin ribbon roll, 1 inchShop on Amazon
As an Amazon Associate we earn from qualifying purchases.
Hang the bell at eye level for the students, not the teacher.
Here is how the eight ideas compare, so you can mix a few.
| Idea | Main supplies | Who builds it | Watch for |
|---|---|---|---|
| Paper train | Black, red and gray paper | Teacher | Large shapes only |
| Pine forest | Green and white paper | Students and teacher | Tree sizes |
| String lights | Battery lights | Teacher | School fire rules |
| Gold border | Gold paper and washi tape | Teacher | Straight lines |
| Golden tickets | Gold foil tickets | Students | Smudged names |
| Train cars | Cardstock and a stapler | Students | Door width |
| Cocoa mugs | Brown cardstock and cotton | Students | Wet glue |
| Silver bell | Paper bell and ribbon | Teacher | Hanging height |
Three or four ideas on one door is plenty. Pick the train for the middle and add the forest, the border and one student piece.
Here is the order of work.
- Measure the door and cut the black paper to length
- Tape the paper to the back edge of the door and fold it over
- Hang the train and the forest with reusable putty
- Add the student pieces last, so each child puts theirs on
- Check the handle and hinges, then step back to the middle of the hall
Reusable putty holds light paper without marking the paint.
Shop this step
Putty and tape for hanging the paper
- REUSABLE PUTTYReusable adhesive poster putty, 120 piecesShop on Amazon
- PAINTER’S TAPEDelicate surface painters tape, 1.88 inchShop on Amazon
As an Amazon Associate we earn from qualifying purchases.
Before you start, run through this list.
- Measure the door and plan the layout on the floor
- Check school rules on paper and lights
- Keep paper clear of the handle and hinges
- Use battery lights only
- Let students add the final details
These checks take a few minutes and save a lot of re-hanging.
Our take · George Anderson
For most classes I would choose the train with a car for each student. Every child sees their own work on the door, and the whole scene comes together in one afternoon.
Start with the backdrop, then add the train and let the class finish the rest.
Quick Answers on Polar Express Classroom Doors
How do I hang paper on a painted door without damage?
Use reusable putty or painter’s tape, and test a hidden spot first. Staple only into a display board made for it.
What if my class has more students than cars fit across the door?
Add rows. The calculator shows how many rows your class needs, and you can also run a second column down the wall beside the door.
Can second graders help build the door?
Yes. Children can cut snowflakes, decorate tickets and draw in train car windows, which gives them ownership of the display.
Related posts
 The Mystery of Second-Floor Barn Doors: History, Purpose, and Evolution
 How to Build a Door Jamb for French Doors
 How to Build Steps Outside French Doors
 17 Christmas Door Ideas for Classroom That Turn the Door Into the Display
 12 Christmas Classroom Door Ideas
 12 Patio French Door Upgrades to Boost Curb Appeal Fast
 Flat Door Makeovers That Look Custom-Built Not Builder-Grade
 14 Classroom Door Decorations for Back to School Week