Adjusting self-closing hinges is essential for ensuring smooth operation. We all understand the frustration of a door that slams shut or doesn't latch properly. Neglecting this simple task can lead to further trouble down the line.
In this discussion, we will explore how to adjust self-closing hinges to prolong their lifespan and maintain their effectiveness.
Key Takeaways
In the world of door functionality, making adjustments to self-closing hinges is like fine-tuning the gears of a well-functioning machine. By taking the time to modify the tension and make necessary tweaks, we can prevent doors from slamming shut and ensure a smooth and reliable closure.
Just like a skilled mechanic achieves the perfect balance of components, adjusting self-closing hinges guarantees the longevity and effectiveness of these essential door mechanisms.
So grab your wrench and embrace the art of creating a harmonious door experience!
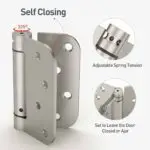
Remove the Locking Pin
To remove the locking pin, you'll need a hex wrench. Carefully release tension by turning the wrench in either direction to loosen the pin.
Once the tension is released, use pliers to extract the pin from the socket at the top of the self-closing hinge. Be cautious when handling the pliers to avoid damaging the hinge.
Removing the locking pin is an important step in adjusting self-closing hinges without causing any harm.
After successfully removing the pin, you can make adjustments to the spring hinge to ensure that the door functions properly.
Adjusting Tension With a Hex Wrench
After successfully removing the locking pin, we can now proceed to adjust the tension on the self-closing hinge using a hex wrench.
To access the tension adjustment mechanism, insert the hex wrench into the socket at the top of the spring hinge.
With the hex wrench in place, turn it in either direction to increase or decrease the tension on the hinge.
It's important to make small, gradual adjustments and test the door's close rate after each turn of the wrench. This will allow you to fine-tune the tension to ensure that the door closes at the desired rate.
Additionally, it's crucial to ensure that the tension is balanced across all hinges by adjusting each one to the same level of tension.
Once the desired tension is achieved, remember to reinstall any locking pins or screws securely to prevent any mishaps or damage.
Repositioning the Tension Pins

Let's explore the techniques for adjusting the tension pins on self-closing hinges. This adjustment is important for fine-tuning the hinge tension and ensuring proper door closure.
To reposition the pins, locate the adjustment holes and use a nail or metal tension rod. You can easily remove and insert the pins into the desired holes to increase or reduce tension.
Remember to promptly reposition the pin after removal to maintain the desired tension setting.
Pin Repositioning Techniques
Repositioning the tension pins in self-closing hinges can be achieved by locating the adjustment holes on the side of the hinge near the top and using a nail or metal tension rod to remove the tension pin with the assistance of needlenose pliers. Once the tension pin is removed, there are a few techniques you can use to adjust the tension and ensure the door closes properly:
- Insert the pin in the next hole to the right to increase tension or in the hole to the left to reduce tension.
- Unscrew the locking screw from the top of the hinge or insert a hex wrench into the hole on top of the hinge, then rotate the screw counterclockwise or clockwise to adjust the tension.
Test the door for proper closure by opening it and checking if it closes completely without slamming.
Remember to be cautious while adjusting the tension to avoid damaging the hinges. If needed, consult a professional handyman or door installer for assistance.
Adjusting Hinge Tension
To adjust the tension of the hinge, you can reposition the tension pins. Look for the adjustment holes on the hinge near the top and gently insert a nail or metal rod to remove the pin. Once the pin is out, you can move it to the next hole on the right to increase tension or to the left to decrease tension. Make sure to repeat this process for all hinges and check that the door closes properly without slamming.
To release tension, use a hex wrench to loosen the tension pin. Conversely, to tighten the tension, use the hex wrench to tighten the tension pin. Pay close attention to the door's closing speed after each adjustment to ensure it functions correctly.
Here is a summary of the steps for adjusting hinge tension:
Step Action
1 Locate adjustment holes on hinge near the top
2 Insert nail or metal rod to remove pin
3 Reposition pin to the right to increase tension or to the left to decrease tension
4 Repeat process for all hinges
5 Verify door closes properly without slamming
6 Use hex wrench to loosen tension pin to release tension
7 Use hex wrench to tighten tension pin to increase tension
8 Test door's closing speed after each adjustment
Unscrew the Screws From the Hinge
Now that we've discussed adjusting the tension pins, let's move on to the next step: removing the screws from the hinge.
To begin, we'll need a suitable tool such as a screwdriver or a hex wrench. Take care to remove the screws cautiously to avoid any damage to the door or frame.
It's also important to ensure that the door is securely in place before unscrewing the hinge to prevent accidents or the door from falling.
Screw Removal Process
Have you identified and located the screws on the hinge that need to be unscrewed for adjustment? Once you've determined which screws require removal, it's time to proceed with the process of removing the screws.
Here's a step-by-step guide to ensure a smooth and successful adjustment:
- Use the appropriate screwdriver or tool, such as a hex wrench, to loosen and remove the screws from the hinge. Make sure to apply steady pressure and avoid stripping the screws.
- Keep track of the screws and store them safely during the adjustment process. Losing or misplacing any screws can cause unnecessary delays and frustration.
- Ensure the removal of the screws is done carefully and gently to avoid any damage to the hinge or the surrounding area. Take your time and be mindful of the pressure applied.
Adjusting Hinge Tension
We can adjust the tension of the hinge by unscrewing the screws using a hex wrench.
Start by turning the hex wrench counterclockwise to remove the locking pin.
Once the pin is out, you can adjust the tension by turning the wrench in either direction.
Turning it clockwise will increase the tension, while turning it counterclockwise will release the tension.
It's important to make small adjustments and test the door's closing speed after each adjustment to ensure accuracy.
Once you achieve the desired tension, insert the pin into the new hole to secure the adjusted tension.
Finally, reinstall the locking screws on top of the hinges to complete the process.
Please note that these instructions are provided under the Creative Commons license and require express written consent.
Rotate the Wrench Clockwise or Counterclockwise

To adjust the tension of self-closing hinges, simply rotate the wrench in the appropriate direction to achieve the desired door closing speed. Here are the steps to follow:
- Locate the tension rod using a hex wrench. The tension rod is typically found at the top of the hinge.
- Insert the hex wrench into the tension pin and turn it in the clockwise direction to increase tension for a slower door closure.
- If you prefer a quicker door closure, turn the hex wrench counterclockwise to decrease tension.
- Make sure to adjust the tension in small increments to fine-tune the door's closing speed.
- After each adjustment, test the door to ensure it closes smoothly.
- It's important to maintain the same tension on both hinges for balanced and consistent closure.
Insert the Small Tension Pin
Now that we've successfully adjusted the tension of the self-closing spring hinge, it's important to insert the small tension pin to secure the new position.
Using needlenose pliers, carefully remove the metal tension pin and insert it into the appropriate hole on the right or left side, depending on whether you need to increase or reduce tension.
This step ensures that the hinge adjustment remains secure, allowing the door to close properly without slamming.
Proper Pin Insertion
Proper Pin Insertion
To begin the proper pin insertion process for adjusting self closing hinges, carefully locate the small tension pin hole near the top of the hinge. This step is crucial for ensuring correct adjustment.
Here are some important points to consider:
- Insert the small tension pin into the hole using a hex wrench. This pin secures the adjusted tension in place.
- Make sure the pin is securely inserted to prevent any slipping during door operation. A loose pin can cause the door to malfunction and compromise safety.
- Use caution to avoid damaging the pin or the hinge during insertion. Mishandling can result in costly repairs or replacements.
Proper pin insertion is essential for the smooth functioning of self closing hinges. For a visual demonstration, check out the video tutorial on adjusting self closing hinges. By following these steps, you can ensure that the tension is properly set and the door latches securely.
Ensuring Secure Hinge Adjustment
After inserting the small tension pin into the adjustment hole near the top of the hinge, the next step is to ensure a secure hinge adjustment.
To do this, you'll need a hex wrench or Allen wrench. Use the wrench to turn the tension pin clockwise to increase tension or counterclockwise to reduce tension.
It's important to test the door after each adjustment to ensure it closes smoothly without slamming. If the door doesn't latch properly or still slams shut, you may need to make further adjustments.
Refer to the images provided by the copyright holder or consult a Home Improvement expert for guidance.
With careful adjustments, your Spring Hinges will work flawlessly.
Adjust Other Hinges to the Same Tension

To achieve a balanced closure, it's important to adjust the tension of the remaining hinges to match the tension of the first hinge. This ensures that the door closes smoothly and latches securely.
Here are some steps to help you adjust the other hinges to the same tension:
- Find out the hex wrench size needed for your hinges.
- Locate the tension adjustment screw on each hinge and insert the hex wrench.
- Turn the wrench clockwise to increase tension or counterclockwise to decrease tension.
- Test the door's closing and latching functionality after adjusting the tension of each hinge.
- Make small adjustments to the tension of the other hinges until the door closes and latches smoothly.
- Remember to ensure that all hinges have the same tension for a balanced closure.
Test the Door's Closing Action
Now that we've adjusted the self-closing hinges, it's important to test the door's closing action to ensure it operates smoothly.
We'll perform a door alignment check and make further adjustments to the tension screws if necessary.
Door Alignment Check
To properly evaluate the alignment of a door and its closing action, it's important to open and close the door while observing if it closes completely without slamming and if there's any resistance or misalignment in the closing process. This door alignment check is crucial to ensure the proper functioning of self-closing hinges.
Here are some key points to consider during the door alignment check:
- Check for any resistance or misalignment in the closing process, as this can indicate issues with the hinge tension or alignment.
- Use a hex wrench to adjust the tension of the hinges. By rotating the hex wrench, you can increase or decrease the tension to achieve the desired closing action.
- Pay close attention to the latch mechanism. It should secure properly when the door is closed, without any gaps or looseness.
Adjusting Tension Screws
We recommend testing the door's closing action after each adjustment of the tension screws to ensure the desired speed and latch are achieved.
Make small, incremental adjustments to the tension screws, testing the door's closing action after each change.
If the door still slams shut or doesn't close properly, readjust the tension screws and retest the door.
It's important to ensure that both hinges have the same tension for balanced closure.
Once adjustments are made, reinstall the locking screws on top of the hinges to secure the tension.
When handling the tension screws, be cautious to avoid excessive adjustments that may damage the hinges.
Install the Locking Screws

With the door securely closed and locked, insert and tighten the locking screws on top of the hinge to ensure proper tension. This step is important for adjusting self-closing hinges for optimal functionality.
Here's how to install the locking screws:
- Stand in front of the closed door and locate the hole on top of the hinge.
- Align one of the locking screws with the hole on top of the hinge.
- Insert the screw and use a screwdriver to turn it clockwise, securing the tension in the hinge.
- Repeat the process with the remaining locking screws, ensuring they're tightened securely.
Test the door by opening and closing it to verify that the locking screws hold the tension in place. Regularly check and maintain the locking screws to ensure the self-closing hinge operates effectively.
How Many Spring Hinges Per Door?
For optimal functionality and security, it's recommended to install a specific number of self-closing spring hinges per door, depending on the type and size of the door.
Residential doors typically require two self-closing hinges to ensure proper closure and latch. This ensures that the door closes smoothly without slamming and remains secure.
However, for taller commercial doors, it may be necessary to install up to four commercial spring hinges to achieve the same level of functionality and security.
Adjusting the self-closing hinges is crucial for ensuring that the door closes properly and latches securely. Neglecting to adjust the hinges can result in damage to the door or frame over time. Regular adjustment is essential for the longevity and effectiveness of the hinges.
Additionally, properly adjusted hinges contribute to home safety, convenience, and may even be required by law in certain states.
How to Adjust Soft Close Hinges

To adjust soft close hinges effectively, follow these simple steps:
- Locate the hex wrench hole on the hinge and insert the wrench. Turn it counterclockwise to release the tension on the pin.
- Once the tension is released, test the closing rate of the door. If it closes too slowly, turn the hex wrench clockwise to increase the tension. If it closes too quickly, turn the hex wrench counterclockwise to decrease the tension.
- Make small adjustments and test the door after each adjustment until you achieve the desired closing rate.
Examining the Door for Issues
When inspecting the door for issues, it is important to thoroughly assess its condition, alignment, and functionality. This step is crucial before adjusting self-closing hinges to ensure that any underlying problems are addressed. Here is a table summarizing the key aspects to consider when examining the door:
| Aspects to Consider |
|---|
| Visible damage or wear |
| Proper alignment within the frame |
| Presence of obstructions |
| Condition of hinges |
| Alignment of latch and strike plate |
First, visually inspect the door for any cracks, warping, or signs of wear. Next, check if the door is properly aligned within the frame, making sure it is not sagging or misaligned. Look for any obstructions that may hinder the smooth operation of the door. Additionally, inspect the hinges for damage, rust, or excessive wear that may affect their functionality. Lastly, ensure that the latch and strike plate are properly aligned and engage smoothly when the door is closed. By thoroughly examining these aspects, any existing issues can be identified and addressed before adjusting the self-closing hinges.
Modifying the Hinge for Better Performance

After thoroughly inspecting the door for any existing problems, the next step in improving the performance of self-closing hinges involves adjusting the hinge itself. Here are some important steps to consider:
- Use a hex wrench to release the tension on the pin and carefully remove it to allow for adjustments to the self-closing spring hinge.
- Gradually tighten or loosen the spring hinge with the wrench and test the door's closing speed after each adjustment to ensure it doesn't slam shut.
- Locate the adjustment holes on the side of the hinge near the top, use a tension rod to adjust the tension, and make sure the door closes properly without slamming.
Expert Q&A on Self-Closing Hinge Adjustment
We spoke with an expert who provided valuable insights and advice on adjusting self-closing hinges.
To adjust these hinges, start by removing the locking pin. Use a hex wrench to release tension by turning it counterclockwise or increase tension by turning it clockwise.
Make small adjustments and test the door's close rate after each one to find the optimal tension for smooth closure and latching.
If you're unsure about the process, watching a video tutorial on replacing an interior door can provide visual guidance.
Regularly adjusting your self-closing hinges is important for proper door functionality and prevents issues like slamming.
Tips for Adjusting Self-Closing Hinges

To ensure proper adjustment of self-closing hinges, follow these tips for optimal functionality and smooth door closure:
- Use a hex wrench to release tension on the locking pin and carefully remove it to allow adjustments to the self-closing hinge. This will allow you to fine-tune the tension to suit your needs.
- Rotate the wrench to position the tension pin into the desired hole, testing the door's close rate after each adjustment until it closes and latches smoothly. This step ensures that the hinge is adjusted to the right tension for a secure and efficient closure.
- Watch a video tutorial for visual guidance on adjusting self-closing hinges. This can be a helpful resource for those attempting the task themselves as it provides contextually relevant tips and tricks, making the adjustment process easier to understand and execute.
Frequently Asked Questions
Can Self Closing Hinges Be Adjusted?
Self-closing hinges can indeed be adjusted. To make the necessary adjustments, simply use a hex wrench to release tension on the locking pin. By making small tweaks, you can ensure that the hinges function properly and avoid any potential damage to the door or frame.
Is There a Way to Adjust Soft Close Hinges?
Yes, you can adjust soft close hinges by following proper maintenance procedures. If you encounter any issues, you can troubleshoot them and make DIY adjustments such as lubricating the hinges and adjusting the tension. These steps will ensure that your doors close smoothly and with control.
Why Is My Soft Close Hinge Not Closing Fully?
Our soft close hinge may not fully close due to obstructions or incorrect tension adjustment. To troubleshoot common problems, such as debris and improper installation, you can try regular maintenance and cleaning. Another solution is to upgrade to the appropriate self-closing hinges.
How Do You Adjust Spring Loaded Door Hinges?
To adjust spring-loaded door hinges, start by removing the locking pin using a hex wrench. Then, make small adjustments to tighten or loosen the hinge, testing the door's closing speed after each change. Finally, fine-tune both hinges to ensure the door closes evenly.
Can the Same Techniques for Adjusting Soft Close Cabinet Hinges be Used for Self Closing Hinges?
Yes, the same techniques for adjusting soft close cabinet hinges can generally be used for self-closing hinges as well. Both types of hinges work on a similar principle and can usually be adjusted using the same methods. It’s important to follow the manufacturer’s instructions for best results.
Are the Steps to Adjust Blum Soft Close Hinges Similar to Adjusting Self Closing Hinges?
Yes, the steps for adjusting Blum soft close hinges are similar to adjusting self closing hinges. Whether you are adjusting Blum hinges or self closing hinges, the process involves making small tweaks to the screws and hinges until the door closes properly and fits snugly.
Conclusion
In the realm of door functionality, making adjustments to self-closing hinges is akin to fine-tuning the gears of a well-functioning machine. By taking the time to modify the tension and make necessary tweaks, we can prevent doors from slamming shut and ensure a smooth and reliable closure.
Just like a skilled mechanic achieves the perfect balance of components, adjusting self-closing hinges guarantees the longevity and effectiveness of these essential door mechanisms.
So grab your wrench and embrace the art of creating a harmonious door experience!
Related posts:
 Adjusting Soft Close Cabinet Hinges
 HOSOM Self Closing Door Hinges Review
 Comparing 3 Automatic Self-Closing Door Hinges
 Haidms Self Closing Door Hinges Review
 SOESFOUFU Invisible Closing Hinge Review
 SORGMACH Door Hinges Satin Nickel 3.5 Inch Interior Hinges Review
 Homoyoyo Spring Hinges Door Hinges Review
 6 Pack Non-Mortise Door Hinges Review