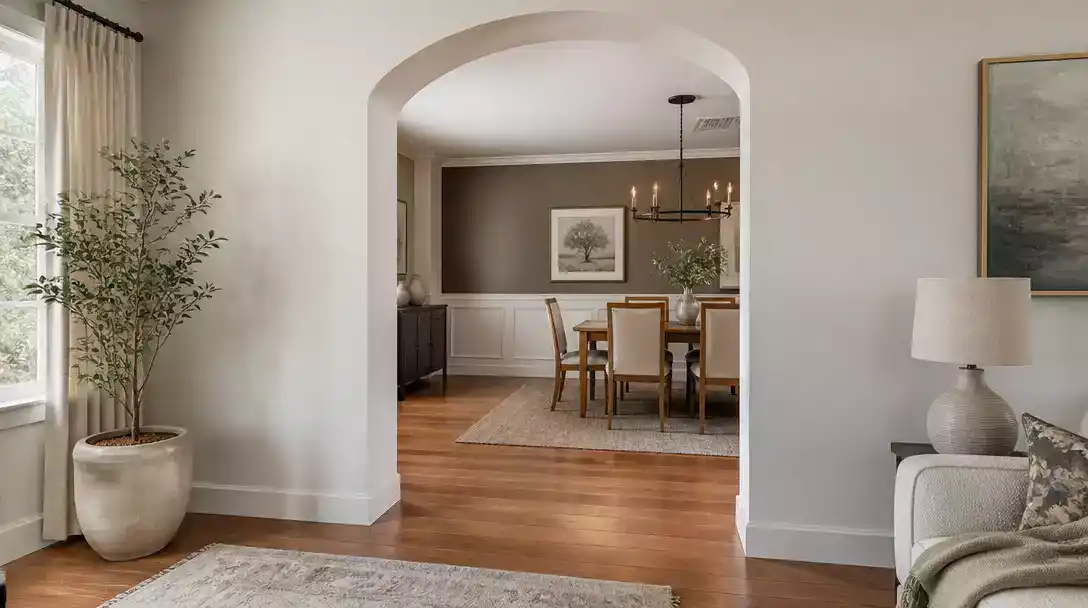
Standard floor plans often feel boxy, but arched interior doorway passages offer a practical way to break the monotony and improve how light flows between rooms. This guide covers 12 ideas worth saving to help you identify the right architectural shape for your home. Let’s start with the foundational approach.
Simple Plaster Arch
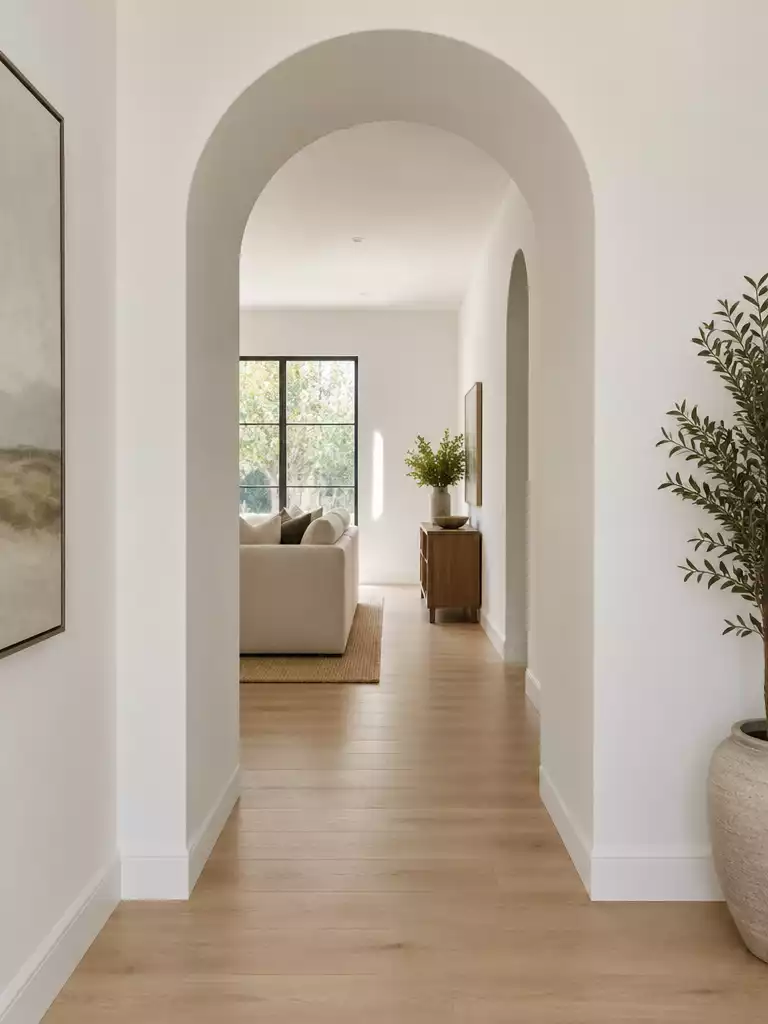
Achieve a clean, gallery-inspired transition that lets your home’s architectural lines command all the attention.
As an Amazon Associate I earn from qualifying purchases. Affiliate links may earn me a commission at no extra cost to you.
The simple plaster arch is the ultimate choice for a modern, gallery-style home where the wall plane itself serves as the design feature. By omitting traditional casing, you create a seamless transition that makes the opening feel like a natural extension of the wall.
Construction relies on dimensional lumber framing and plywood curves, which are then finished with metal corner beads and high-grade plaster. This method creates a rigid, durable edge that holds up to daily movement between rooms.
Critical Finish Warning
Because there is no trim to conceal gaps or uneven edges, this style demands a high level of finish work. Avoid telegraphing joints or “waviness” by ensuring the drywall mudding and sanding are perfectly smooth before applying your final coat of paint.
I recommend this style if you are comfortable with professional-grade drywall finishing or have a skilled contractor. If your project involves a DIY approach in a high-traffic area, you may find the lack of protective casing leads to dings and scuffs that are notoriously difficult to patch on a curved radius.
⭐ Simple Plaster Arch Solutions
✨ Editor’s Pick
Paintable Rounded Door Arch Trim Kit
DIY Paintable Foam Door Arch Kit
Customizable Aluminum Door Casing Trim
⚠️ Where This Can Go Wrong:
- Ignoring wall thickness: Failing to account for the depth of the opening often leaves raw, unfinished edges that ruin the seamless look.
- Overlooking structural headers: Cutting through load-bearing framing without proper support can lead to sagging, cracking, or severe structural failure over time.
- Rushing the mudding phase: Inadequate sanding on the curve will cast shadows under interior lighting, making any imperfections or ripples painfully obvious.
Soft Elliptical Arch
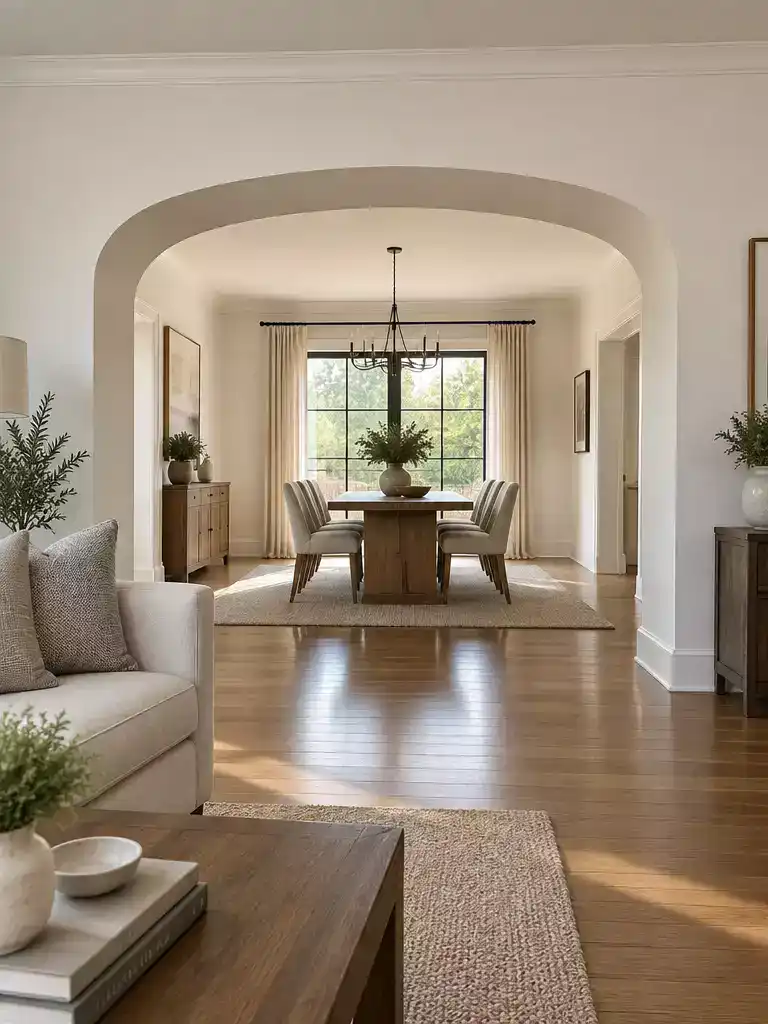
Create a sense of height and openness in rooms with standard ceiling heights.
The soft elliptical arch uses an elongated, flatter curve that feels significantly more expansive than a traditional, high-rising semicircle. It is the ideal choice for wider spans where a tighter, more vertical arch would feel cramped or visually compressed.
Pro-Tip: Because even slight asymmetry is highly visible in an ellipse, a full-scale paper template is mandatory before cutting your plywood substrate. Creating this template ensures your curve remains mathematically consistent across the entire span.
If you have standard 8-foot ceilings, this profile provides the illusion of extra verticality without the aggressive, tunnel-like effect of a Roman arch. It works best in transitional spaces where you want to signal a change in function without creating a visual barrier.
Skip this option if you prefer a strictly historical or Mediterranean aesthetic, where the taller, perfect semicircle is often required. You should also avoid this if you are uncomfortable with the precision sanding required to make the flatter apex of the curve look perfectly smooth.
⭐ Soft Elliptical Arch Ideas
High Density Foam Archway Decor Kit
✨ Editor’s Pick
Curved Interior Door Trim Molding Kit
Paintable Foam Arch Insert For Doorways
📋 Quick Reality Check: Before You Commit to an Ellipse
- Check wall framing: Ensure there are no electrical runs or HVAC ducts hiding in the header, as these require rerouting before framing the curve.
- Align spring lines: Verify that the point where your curve begins matches the height of existing door headers in the home for a cohesive flow.
- Assess load-bearing status: Confirm if the wall is structural; if so, work with a professional to install a proper header beam before shaping the arch.
Tall Roman arch
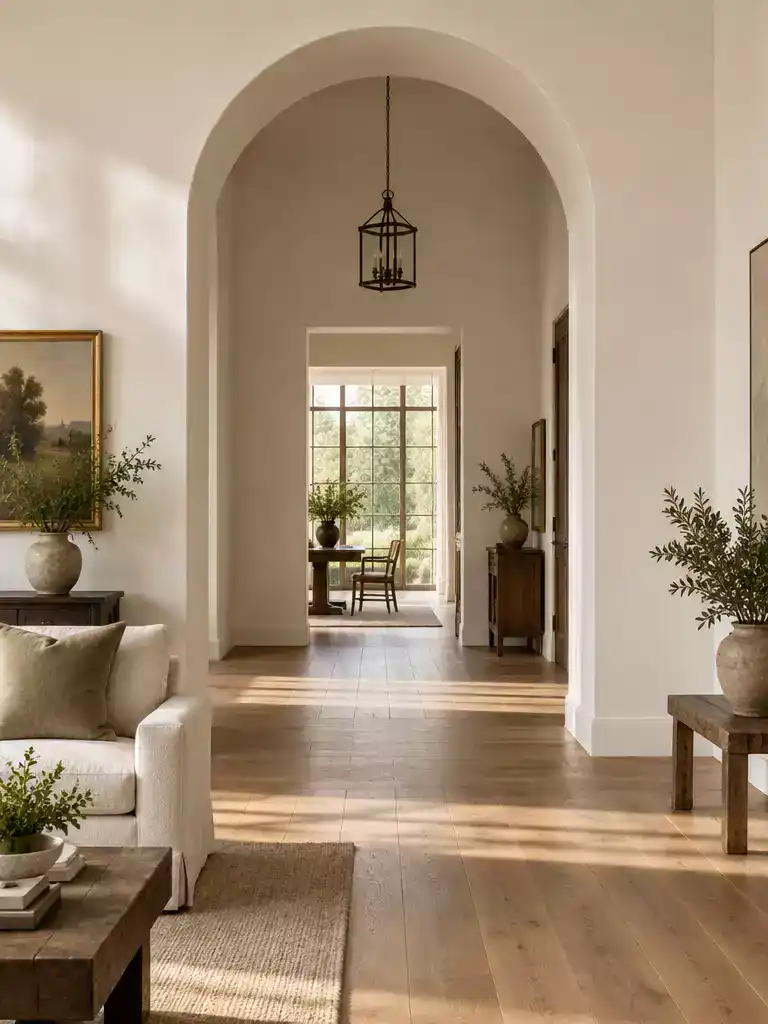
Create a dramatic, vertical focal point that draws the eye upward in high-ceiling spaces.
The Tall Roman arch is defined by its perfect semicircle profile, where the radius of the curve is exactly half the width of the opening. Because this shape is inherently vertical, it requires significant ceiling height to look proportional rather than cramped.
Avoid the Tunnel Effect
Do not use this profile in narrow hallways or low-ceiling basements. The aggressive verticality can make tight, confined spaces feel like an elongated tunnel.
To succeed with this design, ensure the spring line – the point where the vertical wall transitions into the curve – aligns with the header height of any adjacent standard doors. This creates a visual rhythm across your floor plan, preventing the arch from feeling like it was placed at an arbitrary height.
This style is the gold standard for Mediterranean, Spanish Revival, or historic-inspired interiors. If you have the overhead clearance, it provides a sense of grandeur that shallower, modern arches simply cannot replicate.
⭐ Tall Roman Arch Accents
✨ Editor’s Pick
Fluted Pilaster Door Trim Pair
Bendable Decorative Arch Trim Molding
💡 Why This Works:
The Roman arch functions as a visual “anchor” that pulls the eye upward, effectively utilizing vertical space to make rooms feel more expansive and grand. By mirroring classic proportions, you create an intentional architectural feature that transforms a simple passageway into a deliberate, sophisticated transition point between living areas.
Visual payoff: It creates a sense of height and structural elegance that standard square doorways cannot achieve.
Navigating the shift toward architectural arches often feels like a commitment to a permanent legacy, but the longevity of your home’s character relies on structural intent rather than following every passing design trend. Focusing on how these openings improve your interior room-to-room flow is a far more reliable strategy than chasing fleeting aesthetics that may date quickly.
The most enduring architectural impact emerges from selecting proportions that respect your ceiling height, ensuring the transition feels like a deliberate design choice rather than an afterthought.
Shallow Segmental Arch
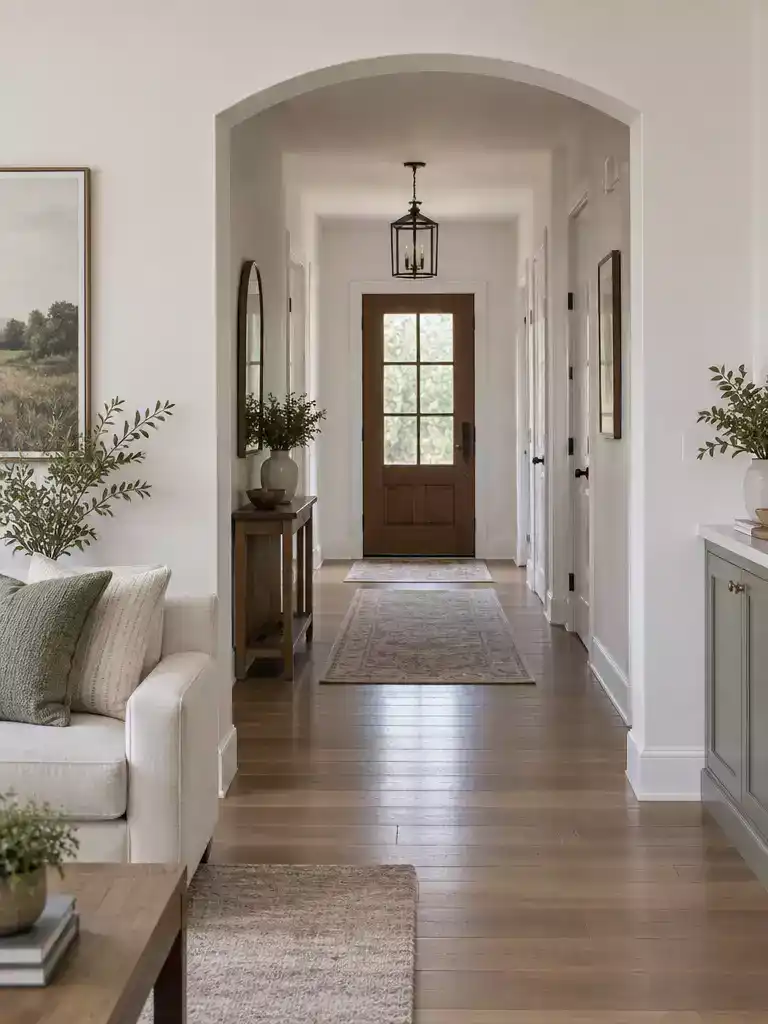
Preserve your ceiling height while adding a sophisticated architectural curve to standard doorways.
The shallow segmental arch is defined by a modest, controlled curve that represents only a portion of a larger circle. This profile is the ideal solution for homeowners who want to soften the edges of standard rectangular rooms without sacrificing functional headroom.
Warning: The Flat Spot Trap
If the curve is too shallow or inconsistent, the passage will look like a bent lintel rather than a purposeful arch. Ensure the radius is mathematically consistent to avoid a sagging appearance at the crown.
This style is best suited for 8-foot ceilings where a full Roman arch would feel too compressed or aggressive. Because the rise is minimal, it maintains the airy, open feel of a modern floor plan while providing a distinct visual shift between spaces.
Skip this style if you are looking for a dramatic, high-vertical focal point, as its primary strength is understated transition. It works perfectly in homes where you want a nod to traditional architecture without the overwhelming height of a classic semicircle.
⭐ Shallow Segmental Arch Styles
✨ Editor’s Pick
Universal Indoor Archway Corner Decor
Black Metal Outdoor Archway Stand
Black Metal Garden Arch Trellis
Wide Cased Arch
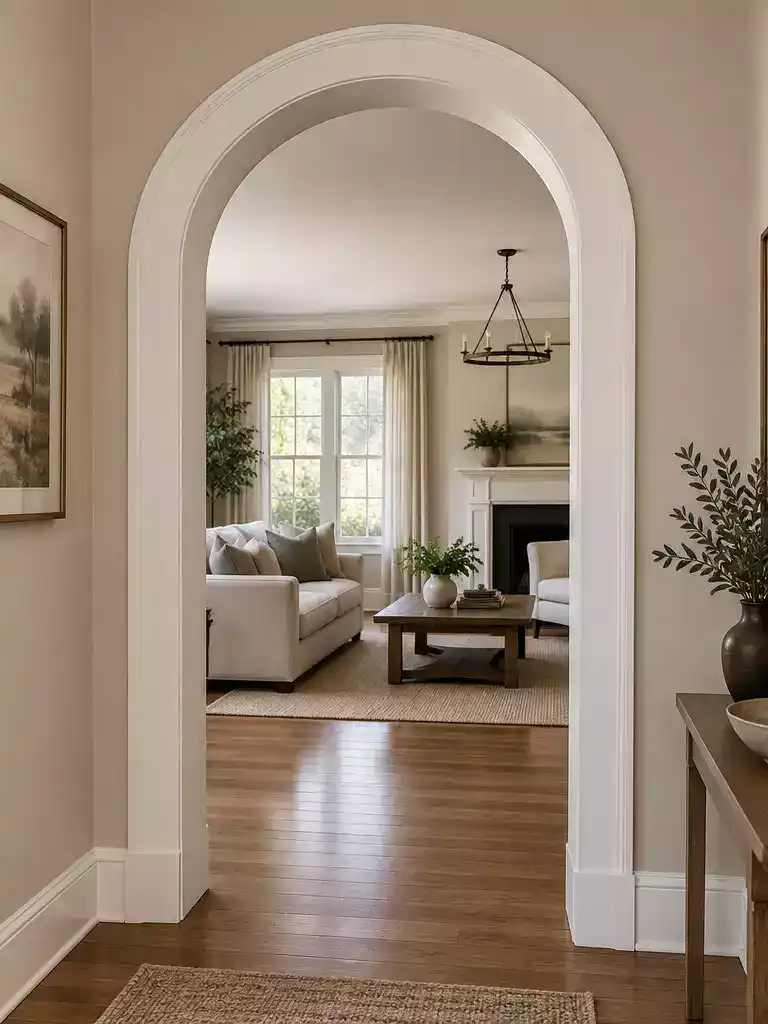
Add architectural weight to your passages with durable, high-impact wood or MDF trim profiles.
The wide cased arch uses wood or MDF casing to define the doorway, acting as a sturdy frame for high-traffic areas. This approach shields your drywall corners from the inevitable bumps of daily life, making it a functional choice for homes with kids or pets.
Pro-Tip: Keep the thickness of your arch casing proportional to your existing baseboards. If the casing is significantly wider or narrower than the baseboards, the transition will feel disjointed and visually cluttered.
Be aware that adding substantial casing will inevitably shrink the physical size of your opening. If you are working with a narrow passage, wide casings can make the space feel cramped and compressed rather than open.
This style is the right choice for homeowners who want to emphasize a transition between rooms without needing complex plaster work. If you prefer a minimalist, disappearing look, you should skip the casing entirely and stick with a simple plaster finish.
⭐ Wide Cased Arch Treatments
✨ Editor’s Pick
Paintable Curved Drywall Arch Inserts
Sturdy Metal Garden Arch Trellis
🏡 How This Works in a Real Home:
- Strategic Clearance: Measure your opening width carefully, as thick casing can eat up valuable inches for moving furniture.
- Entryway Utility: In high-traffic mudrooms or halls, choose dense MDF or solid wood to withstand vacuum and bag scuffs.
- Visual Seamlessness: Paint your casing the same color as the surrounding trim to make the arch feel integrated, not bolted on.
Deep Reveal Arch
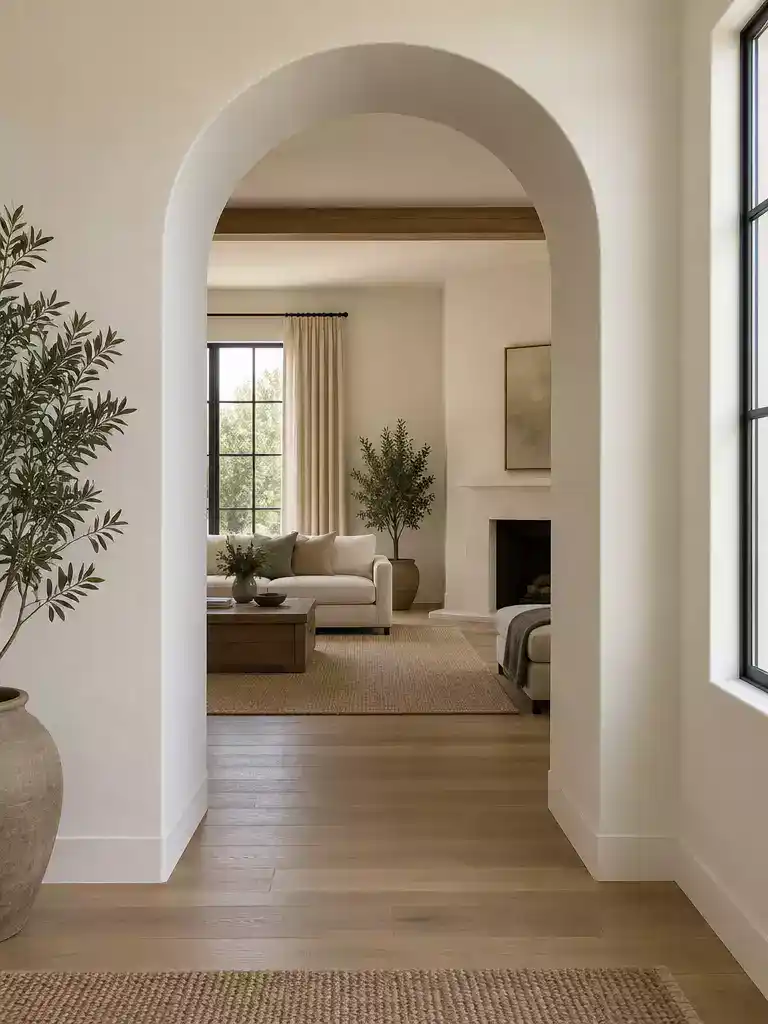
Create architectural drama by emphasizing the depth of your walls with a clean, shadow-casting reveal.
A deep reveal arch relies on the actual thickness of your wall to create a sharp, intentional shadow line. By framing the opening with a recessed edge, you add a sense of architectural gravitas that standard flat-cased openings lack.
Construction requires double-framing the opening to create a bridge between the wall surfaces. This extra step is the best way to make thin interior walls feel substantial and custom-built.
Warning: Precision is non-negotiable. Because this design relies on clean geometry, side lighting will immediately expose any waviness in the drywall mudding.
This style is ideal for modern homes that prioritize clean lines but want more character than a simple, trimless drywall edge. If you are working with older, uneven framing, you should probably skip this unless you have a skilled plasterer on hand to ensure the reveal remains perfectly uniform.
When planning your build, keep these technical requirements in mind:
- Double-Framing: You will need to frame the rough opening and then add a secondary layer to create the recessed depth.
- Corner Beads: Use high-quality metal corner beads to ensure the sharp corner of the reveal stays crisp over time.
- Lighting: Place your recessed can lights or wall sconces carefully; cross-lighting will highlight even the smallest imperfection in your finish.
⭐ Deep Reveal Arch Designs
Tall Inflatable Frankenstein Archway Decoration
Cute Inflatable Pumpkin Archway Decor
✨ Editor’s Pick
Unfinished Decorative Wood Arch Trim
⚠️ Where This Can Go Wrong:
- Shadow distortion: Recessed edges create extreme contrast; any slight bump in the wall surface will cast a distracting, jagged shadow.
- Framing misalignment: If the secondary framing isn’t perfectly plumb, the deep reveal will look crooked or “pinched” from different viewing angles.
- Lighting conflicts: Placing wall sconces too close to the reveal can wash out the shadow detail, effectively erasing your architectural effort.
Wood-Trimmed Arch
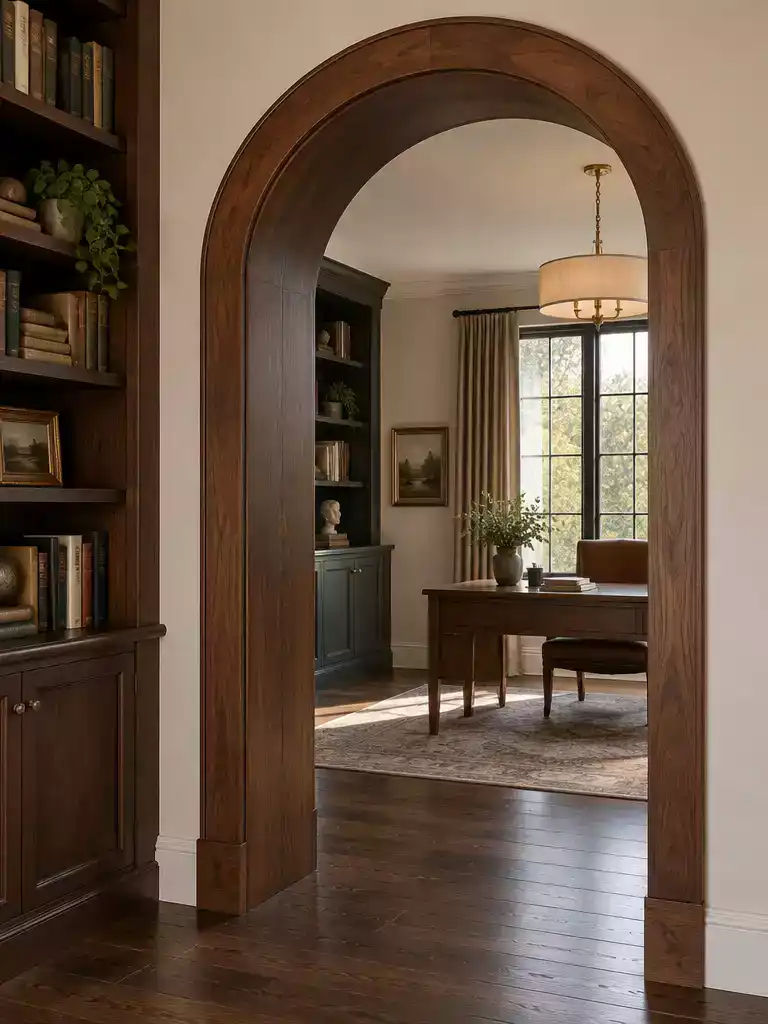
Bring warmth and architectural definition to your space with precision-crafted wood millwork.
A wood-trimmed arch transforms a basic drywall opening into a formal, furniture-grade transition. This style relies on solid wood or high-quality veneer to wrap the curve, grounding the passage with a heavy, finished look.
Because wood does not naturally bend into a perfect semicircle, achieving this look is a technical challenge. Professionals typically use flexible molding or specialized kerf-cut wood – where thin, parallel grooves are cut into the back of the board – to allow the material to follow the arch’s radius without snapping.
Best for: Libraries, formal dining rooms, or home offices where wood millwork or cabinetry is already a primary design feature.
Skip if: You are aiming for a minimalist, modern aesthetic, as the wood detailing inevitably adds visual weight and traditional character to the room.
The success of this archway depends entirely on the quality of the miters. Even a slight gap in the joints where the straight legs meet the curved top will become a focal point that signals a poor installation.
Watch out for: Improperly cured wood or cheap veneers that can warp over time, causing the trim to pull away from the drywall. Always ensure the substrate is perfectly smooth before applying heavier wood profiles.
⭐ Wood-Trimmed Archway Ideas
✨ Editor’s Pick
Artificial Eucalyptus Vine Arch Garland
Faux Silver Dollar Eucalyptus Garland
🧰 Questions for Your Installer:
- Compatibility check: Ask if they will use flexible MDF or solid wood to ensure the trim contours perfectly without stubborn tension.
- Joint treatment: Confirm how they plan to hide miter gaps at the spring line to ensure a seamless, furniture-grade transition.
- Finish consistency: Inquire if the wood grain will be pre-stained or matched on-site to blend seamlessly with existing library or dining room millwork.
Fluted Archway
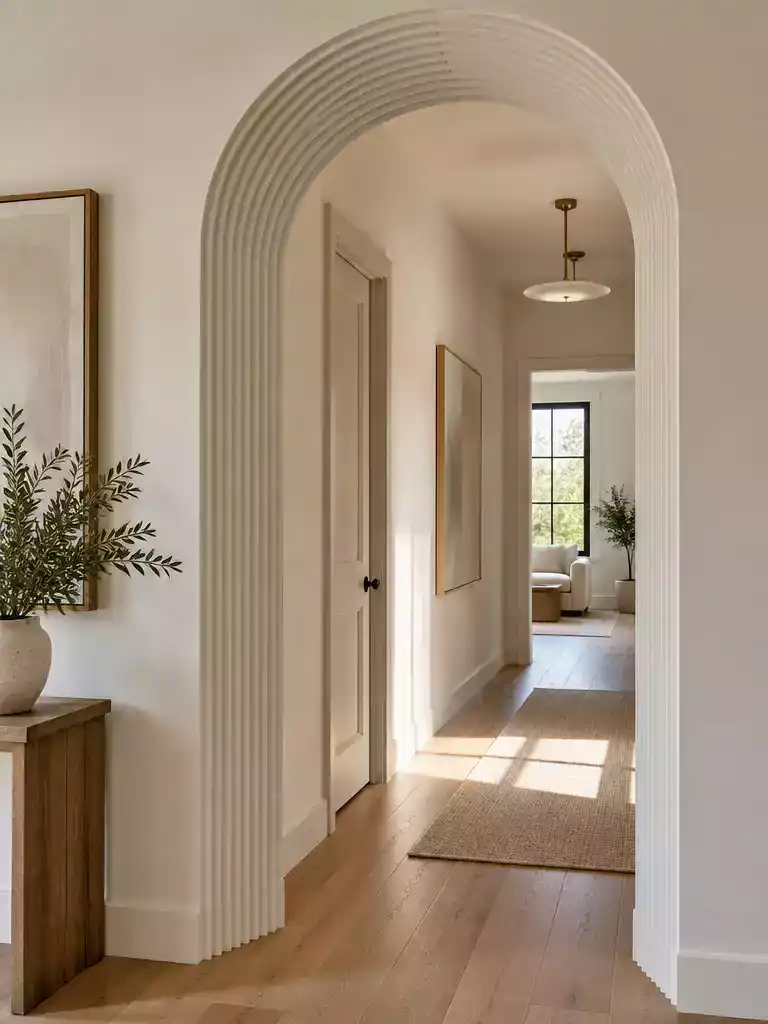
Add tactile depth and rhythmic visual texture to your home’s most frequent transitions.
A fluted archway uses vertical ribbing or recessed grooves carved into the inner reveal to transform a standard passage into a high-texture architectural feature. This design choice creates a repeating pattern that catches light, adding a sense of movement and rhythm as you walk between rooms.
Warning: Precision is non-negotiable. Because the fluting follows a curved path, every single groove must remain perfectly parallel to its neighbor throughout the entire arc. Any slight variance in depth or spacing will be immediately noticeable and impossible to hide with paint.
This style works best for homeowners who want to introduce a sophisticated, furniture-grade element into a plain hallway or open-floor transition. It is particularly effective in spaces where you want to highlight the architecture without adding heavy, traditional casing.
If you are planning a fluted arch, keep these requirements in mind to ensure a clean result:
- Material choice: Use high-density MDF or specialized flexible composite boards that can be CNC-machined for consistent groove depth.
- Finish strategy: Opt for a satin or eggshell paint finish to accentuate the shadows within the flutes without creating distracting glare.
- Installation: Ensure your framing is perfectly plumb before installing the fluted reveal, as the grooves will telegraph even minor structural inconsistencies.
Skip this option if your hallway is high-traffic and prone to bumps, as the delicate edges of the fluting can be difficult to touch up if damaged. It is also not recommended for DIYers who lack access to precision woodworking tools or high-quality pre-milled fluted casing.
⭐ Fluted Archway Details
✨ Editor’s Pick
Heavy Duty Balloon Arch Clips
✨ Finishing Touches: Elevating the Fluted Look
Since fluting relies heavily on shadow to create its signature look, the final finishing steps are just as critical as the structural installation itself.
- Paint Sheen Selection: Choose a satin or eggshell finish; high-gloss paint will create distracting reflections that obscure the delicate, rhythmic depth of the grooves.
- Lighting Placement: Install recessed or wall-mounted accent lighting nearby to cast light across the arch, which dramatically enhances the visual texture of the fluting.
Paneled Archway
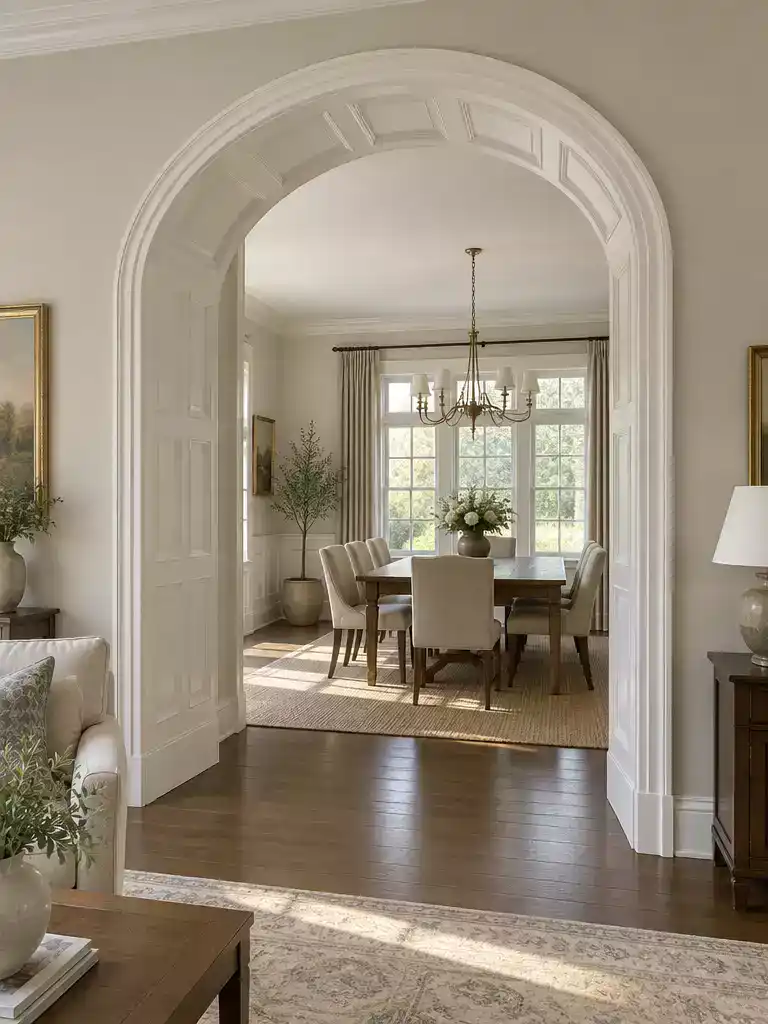
Bring architectural depth to your home by extending existing wall paneling into the archway transition.
A paneled archway incorporates millwork – such as raised or recessed panels – directly into the inner reveal of the architectural opening. This design choice effectively treats the arch as an extension of your room’s existing wainscoting or wall paneling, creating a cohesive, custom-built feel.
This style is best suited for homes that already feature formal millwork in adjacent spaces, such as studies or dining rooms. If your home leans toward a modern, minimalist aesthetic, you may want to skip this option as the added texture can easily overwhelm a simple, flat-walled interior.
Design Tip: Keep it Simple
Avoid complex panel divisions that fight with the curve of the arch. Stick to a simple, uniform pattern that visually anchors the transition without looking cluttered.
When planning a paneled archway, consider the following layout factors to ensure a professional finish:
- Alignment: Ensure the panel heights match your baseboards or chair rail to maintain a consistent horizontal line throughout the room.
- Reveal Depth: Deep reveals provide more shadow, which makes the panels appear more substantial and intentional.
- Scale: Use narrower panels for tighter curves to ensure the millwork follows the radius smoothly without requiring unnatural gaps.
Common Mistake to Avoid
Over-complicating the panel geometry is the fastest way to make a space feel busy. If the panel divisions don’t align with the arch’s arc, the entire assembly will feel distorted rather than custom.
⭐ Paneled Archway Treatments
✨ Editor’s Pick
Sturdy Metal Garden Arch Trellis
Giant Inflatable Clown Archway Decoration
💡 Why This Works
Paneled reveals transform a transition from a simple hole in the wall into a deliberate architectural feature. By echoing the geometry of your existing wainscoting, you create a sense of continuity that makes disparate rooms feel like a unified, custom-designed suite rather than a collection of separate, boxy spaces.
Design Takeaway: Mirroring the rail height of adjacent wall panels ensures the transition feels intentional rather than forced.
Wallpapered Reveal
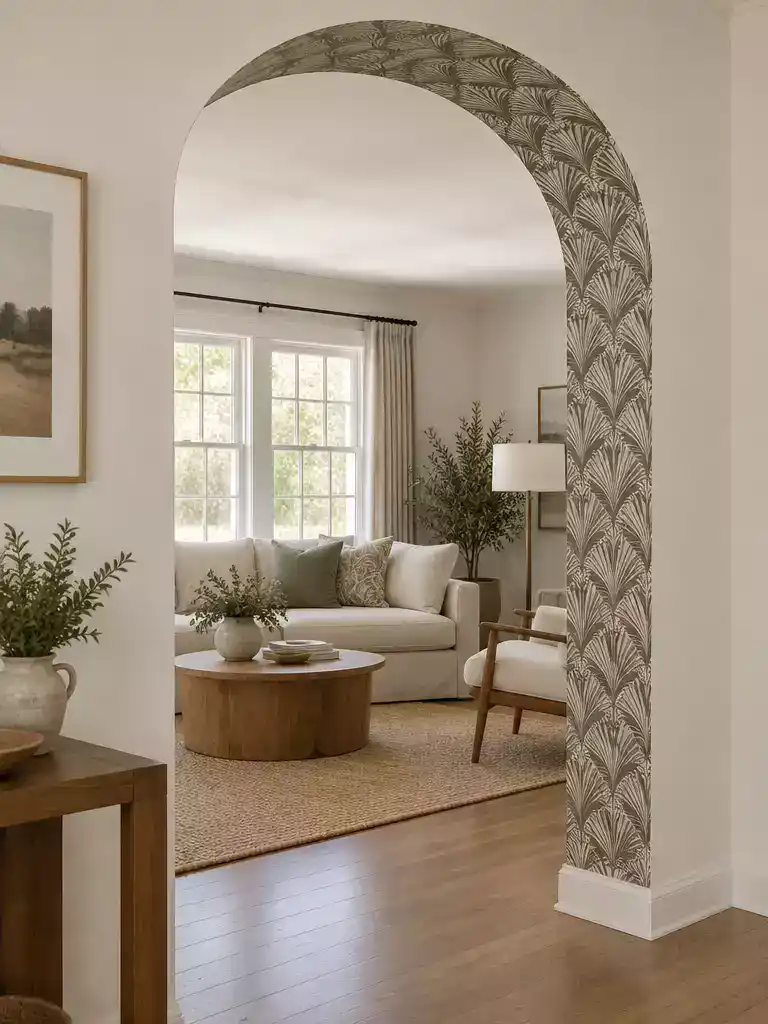
Add hidden depth to your home by layering pattern inside your archway’s curve.
Applying wallpaper to the inner reveal of an archway creates a hidden design moment that only reveals itself as you transition between rooms. This approach works best in neutral homes where you want to introduce pattern without overwhelming the entire space.
Avoid Common Installation Pitfalls
Wallpaper is unforgiving on curved surfaces and will telegraph every imperfection in your drywall mudding. Ensure your substrate is perfectly smooth, sanded, and primed before you begin to prevent bumps or edge peeling.
Because the reveal is a high-traffic transition point, choose a durable, washable wallpaper or a heavy-duty vinyl-coated paper. These materials hold up better against the occasional brush of a shoulder or bag passing through the arch.
If you are DIYing this project, consider these steps to ensure a professional finish:
- Template the curve: Use a flexible piece of cardboard to create a template of the arch’s radius before cutting your paper.
- Overlap at the seams: Since you are working on a curve, small fractional overlaps are often necessary to keep the pattern aligned.
- Use high-tack adhesive: The constant tension of the curved surface requires a stronger adhesive than standard wall paste.
This style is perfect for small, unexpected areas like a hallway entrance or a primary bedroom doorway. Skip this treatment if your arch has a shallow depth, as there won’t be enough surface area to showcase the pattern effectively.
🏡 How This Works in a Real Home:
- Strategic placement: Use this in transition zones like breakfast nooks or mudrooms to define the space without adding heavy architectural bulk.
- Daily wear: Choose a pattern that repeats frequently so that minor misalignments at the curve are masked by the design’s natural rhythm.
- Natural finish: Skip high-gloss wallpapers; a matte or textured vinyl finish looks more organic and hides light reflections that reveal imperfections.
Painted Contrast Arch
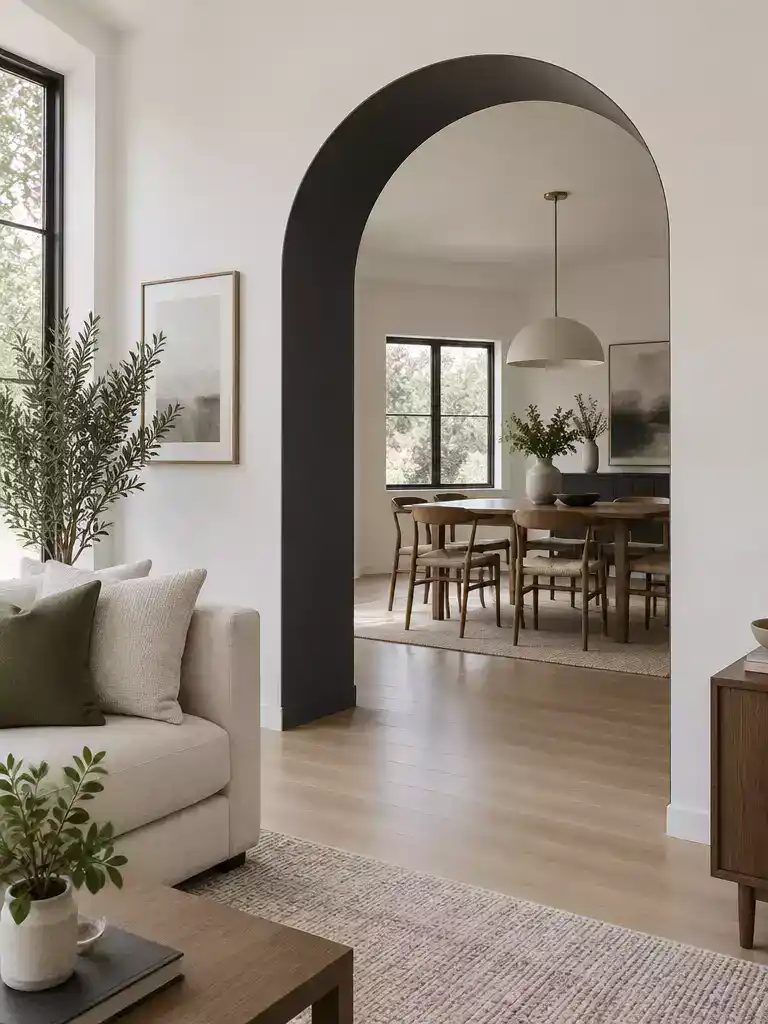
Transform a standard doorway into a high-impact architectural feature using bold color and precision.
This approach relies on color rather than millwork to define a space, making it the most budget-friendly way to turn a basic passage into a focal point. By painting only the inner reveal of the arch a darker or bolder color, you create a visual frame that draws the eye through the opening.
Pro Tip: The Paint Line is Everything
Because this style relies on the contrast between your wall color and the arch’s reveal, any bleed-through or uneven lines will stand out immediately. Use high-quality painter’s tape and apply a thin layer of the wall color over the tape edge first to seal it, ensuring a crisp, professional finish.
This style is best suited for modern homes that lack architectural detail and need a low-cost, high-impact update. It works exceptionally well in hallways where you have multiple doorways, as you can paint the reveals in varying shades to create a rhythmic, gallery-like experience.
Before you commit, check the condition of your drywall corner beads. Because paint highlights every texture, any existing bumps or ripples in the mudding will be magnified by a high-contrast color choice.
⭐ Painted Contrast Arch Styles
✨ Editor’s Pick
High Density Foam Archway Decor Kit
💡 Why This Works
Painting the reveal creates a “forced perspective” effect that draws the eye through the opening, making the transition feel intentional rather than just a gap in the wall. By treating the inner depth as a canvas, you add a layer of architectural depth that makes even a simple, narrow hallway feel like a curated gallery passage.
Design Takeaway: Use a darker shade in the reveal to ground the doorway and create a sophisticated, high-contrast anchor.
Double-Width Arch
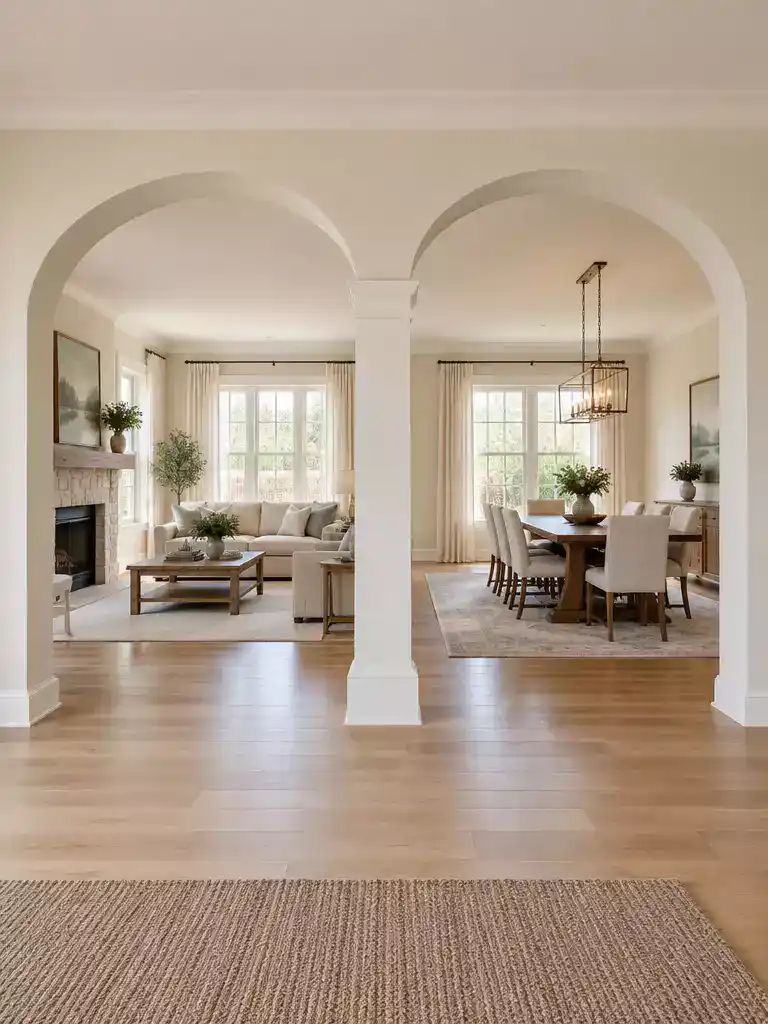
Create a grand, airy transition in open-concept floor plans while maintaining distinct room separation.
When you are dealing with a span wider than six feet, a single, massive arch often struggles to maintain a sense of scale. If the curve is too shallow, the opening can look like a dropped lintel or an awkward porthole rather than a deliberate architectural feature.
Avoid the “Porthole” Effect: If you force a standard semicircle onto a very wide span, the arch will climb too high into your ceiling space. Use a central column or a layered, double-arch design to break up the width and keep the curve proportional to your room’s height.
This style is best for open-concept homes where you want to signal a change in function – like moving from a kitchen into a dining room – without installing heavy doors. It provides the visual division of a wall while keeping the sightlines and light flow completely open.
Because these openings are often load-bearing, you will likely need a structural engineer to size a header beam before you begin framing. Plan for a professional installation to ensure the long, wide curves of the header remain perfectly level and consistent across the entire span.
⭐ Double-Width Archway Designs
✨ Editor’s Pick
Two Pack Premade Doorway Arch Kit
💡 Why This Works:
By introducing a central column or a layered arch design, you effectively break down the vastness of an oversized opening. This strategy creates a sense of rhythm and intentionality, preventing the span from feeling like a hollow tunnel while successfully distinguishing between two connected living zones.
Architectural rhythm: Using structural layering allows you to maintain open sightlines without sacrificing the cozy, defined atmosphere of individual rooms.
You have now navigated twelve distinct ways to break up the boxiness of a standard floor plan with arched architectural passages. With these profiles in mind, you can stop weighing every single option and simply select the one or two shapes that actually complement your home’s specific ceiling height and architectural scale.
The most effective entry transitions come from a few deliberate design decisions rather than attempting to incorporate every trend. Start by measuring your current spans and identifying which of these interior door styles best aligns with your existing millwork. Once you settle on the profile that fits, the rest of your room-to-room transition will naturally fall into place with a cohesive, lasting look.
Related posts
 17 Interior French Door Ideas That Instantly Open Up Small Rooms
 10 Interior Door Colors for Rooms With Dark Furniture
 15 Glass Framed Door Ideas That Pull Light Into Dark Rooms
 16 Glass Door Designs For Bright Interior Rooms
 10 Arched Front Double Door Ideas
 10 Arched Exterior French Door Ideas
 15 Bathroom French Doors That Give Powder Rooms Personality
 17 Sliding Door Living Rooms That Flow Right Into the Garden